

Colorlight 미디어 플레이어 빠른 가이드
A100, A200, A35 등의 Colorlight 미디어 플레이어 사용법에 대한 빠른 가이드 및 LED 화면 미디어 플레이어 고속 작업 매뉴얼

디지털 사이니지 수요를 충족하기 위한 Colorlight 미디어 플레이어의 효율적인 설정 및 관리 방법을 찾고 계신가요?
Colorlight 미디어 플레이어는 콘텐츠 전달을 강화하는 강력한 기능을 제공하여 디스플레이가 매력적이고 효과적이도록 보장합니다.
이 빠른 시작 가이드에서 Colorlight 미디어 플레이어를 신속하게 구성하고 최적화하는 방법을 확인하실 수 있습니다. 무엇보다도 이 과정은 간단하며 광범위한 전문 지식이 필요하지 않습니다.
본 글의 내용
- Colorlight 미디어 플레이어란?
- 하드웨어 연결 및 인터페이스
- WIFI 및 안테나 설정
- IP 주소 확인
- 소프트웨어 다운로드
- PlayerMaster로 관리하기
- 일정 프로그램 작성 및 게시
- 프로그램 생성
- 프로그램 수정
- 표시 효과 미리보기 및 프로그램 게시.
- 프로그램 파일 관리
- 결론
Colorlight 미디어 플레이어란?
Colorlight의 대부분의 미디어 플레이어는 고효율 콘텐츠 전송을 위해 설계된 클라우드 네트워킹 장치입니다. 이 플레이어들은 하드웨어 디코딩과 고화질 출력을 지원하여 원활한 미디어 전송을 촉진합니다. Colorlight의 강력한 클라우드 서비스 플랫폼을 기반으로 하며, 효율적인 장치 모니터링, 프로그램 생성, 스케줄링, 통합 게시, 다단계 관리를 가능하게 합니다.
LED 디스플레이 기술의 선두 공급업체로서 Colorlight는 다양한 요구 사항을 충족하기 위해 다양한 미디어 플레이어 모델을 제공합니다. 다음은 일반적인 옵션에 대한 간단한 개요입니다:
- A100
- A200
- A35
- A2K
- A4K
- C3Pro
- and lots more
하드웨어 연결 및 인터페이스
Taking the Colorlight A200 LED media player as a model, here’s an insight into its interface and a basic hardware connection with LED screen:
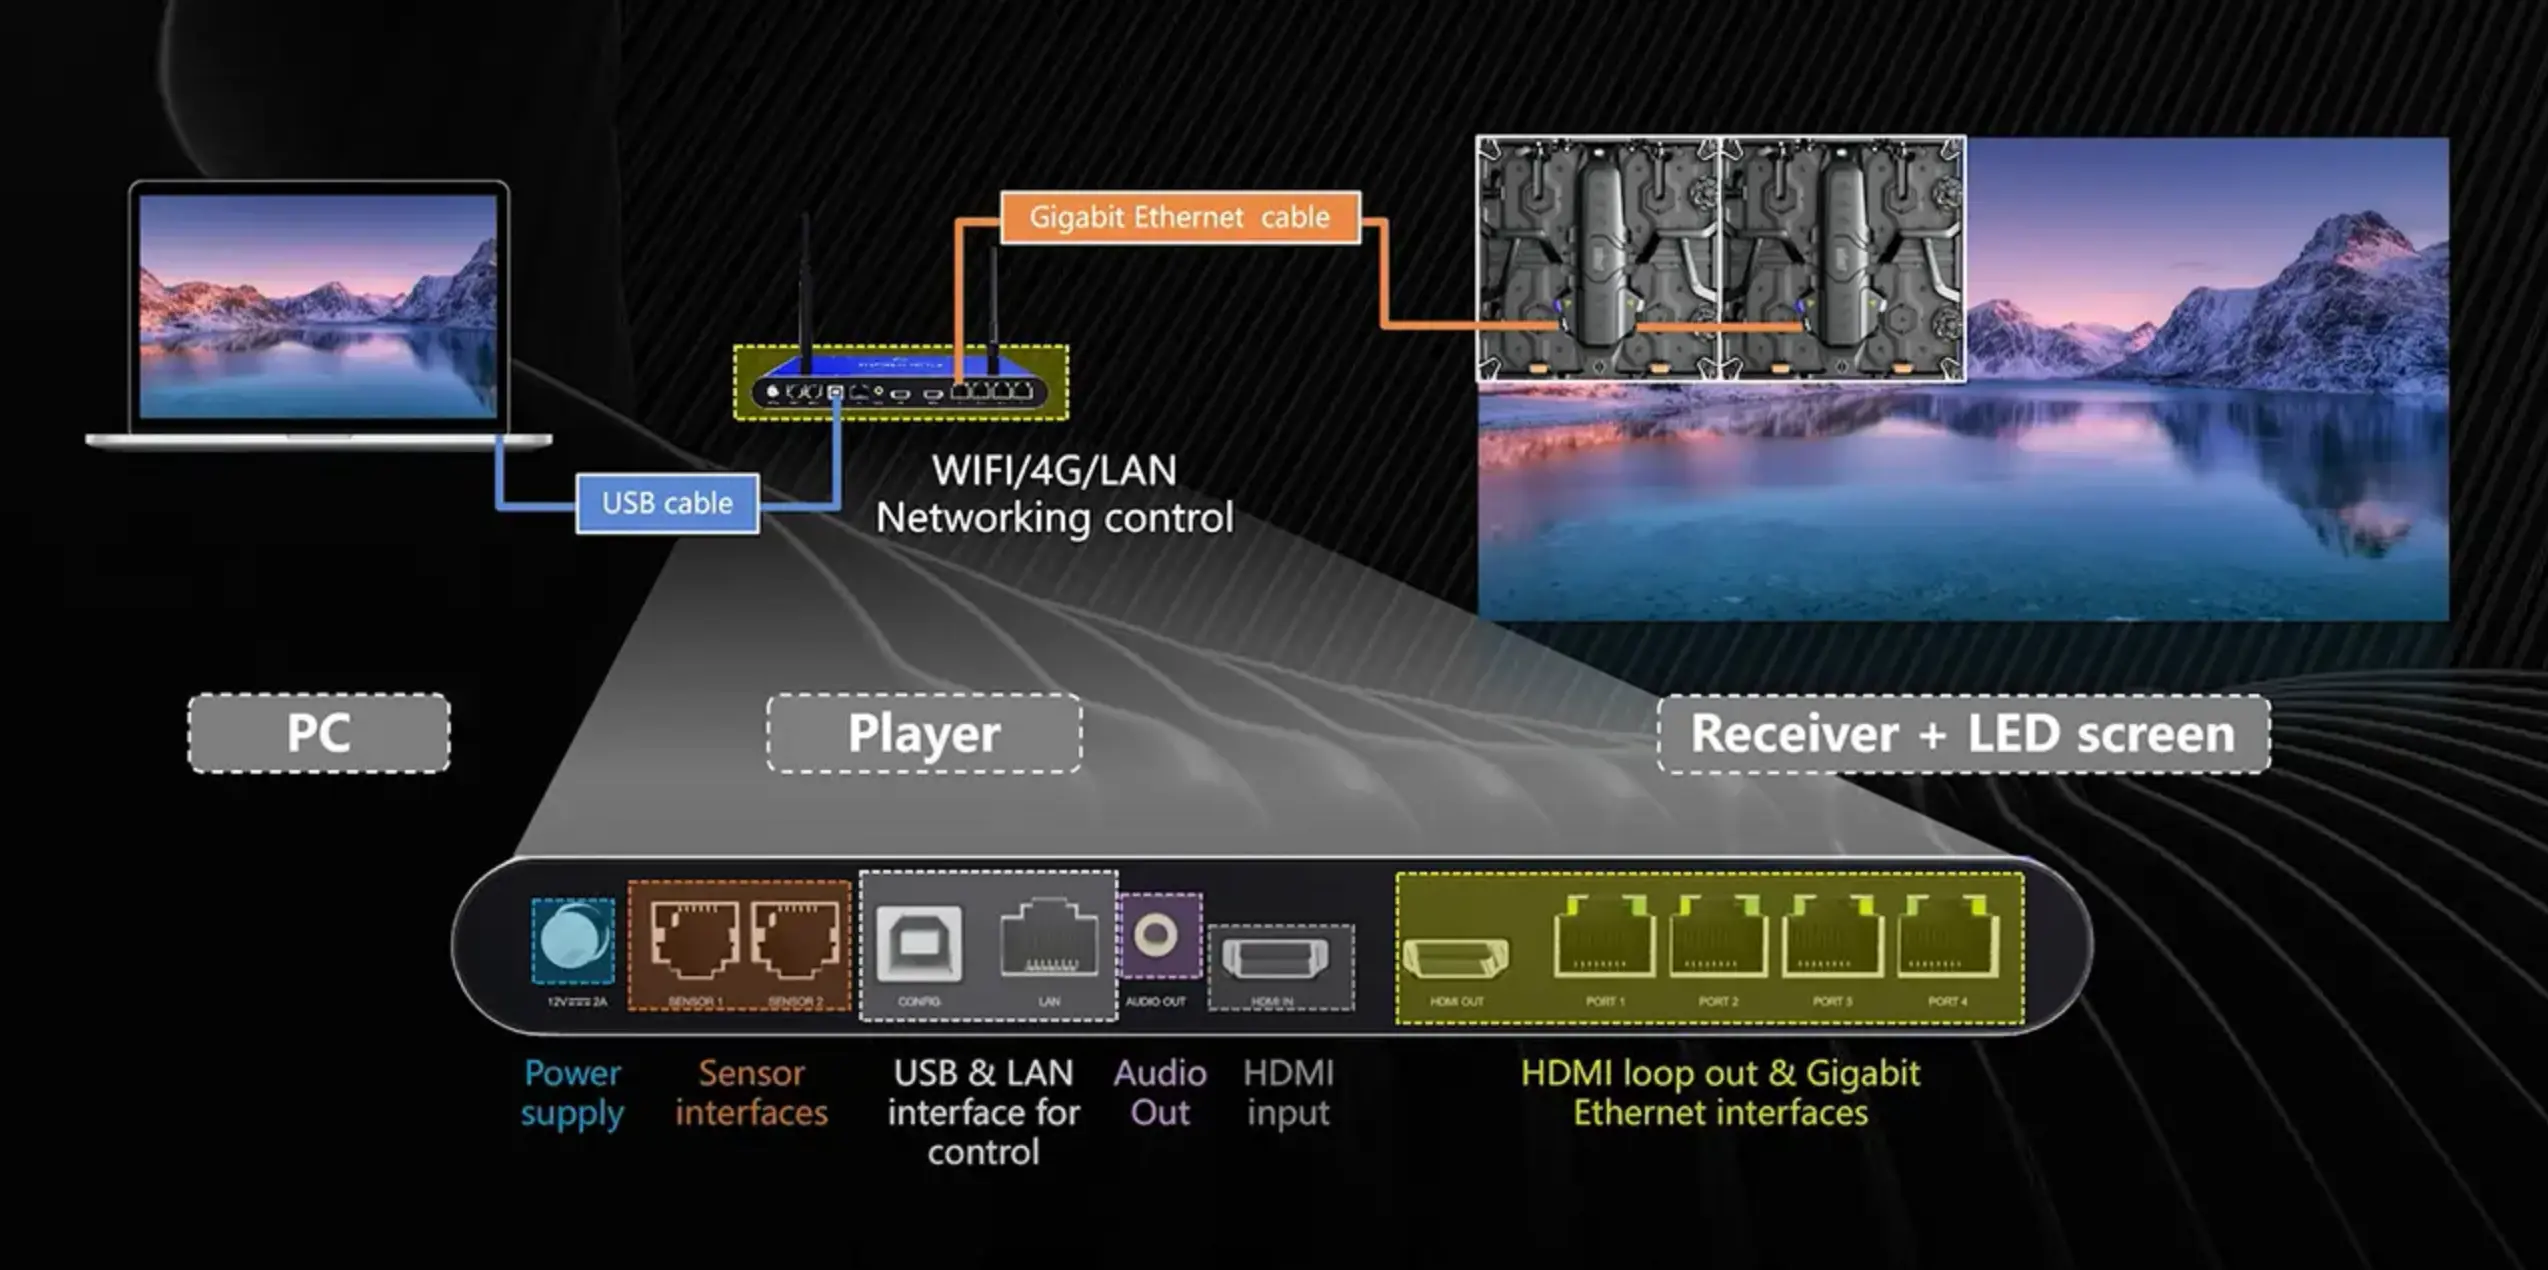
As shown as the image, the media players supports USB to be controlled by a control PC, or supports WIFI/4F/LAN networking control. The main ports includes:
- Power Connector: The player operates at 12V DC with a spiral locking design for enhanced stability.
- Sensor Interfaces: Two RJ11 ports for sensor connections that monitor screen environmental conditions.
- USB Port: For direct connectivity to computers via USB cable, facilitating control.
- Ethernet Port: A 100Mbps port enables control over a Local Area Network and access to cloud services.
- Audio Outputs: A 3.5mm audio output for stereo sound.
- HDMI Input: HDMI video input port which is used to input the video signal source when the player is in sync working mode
- HDMI loop port and Ethernet port: which is used to output the HDMI signal and Ethernet signal, according to the number of pixels on your screen, there are different numbers of Ethernet port media player for your choice. .
Please note that other models may have different interface ports depending on the functions they can offer.
WIFI 및 안테나 설정
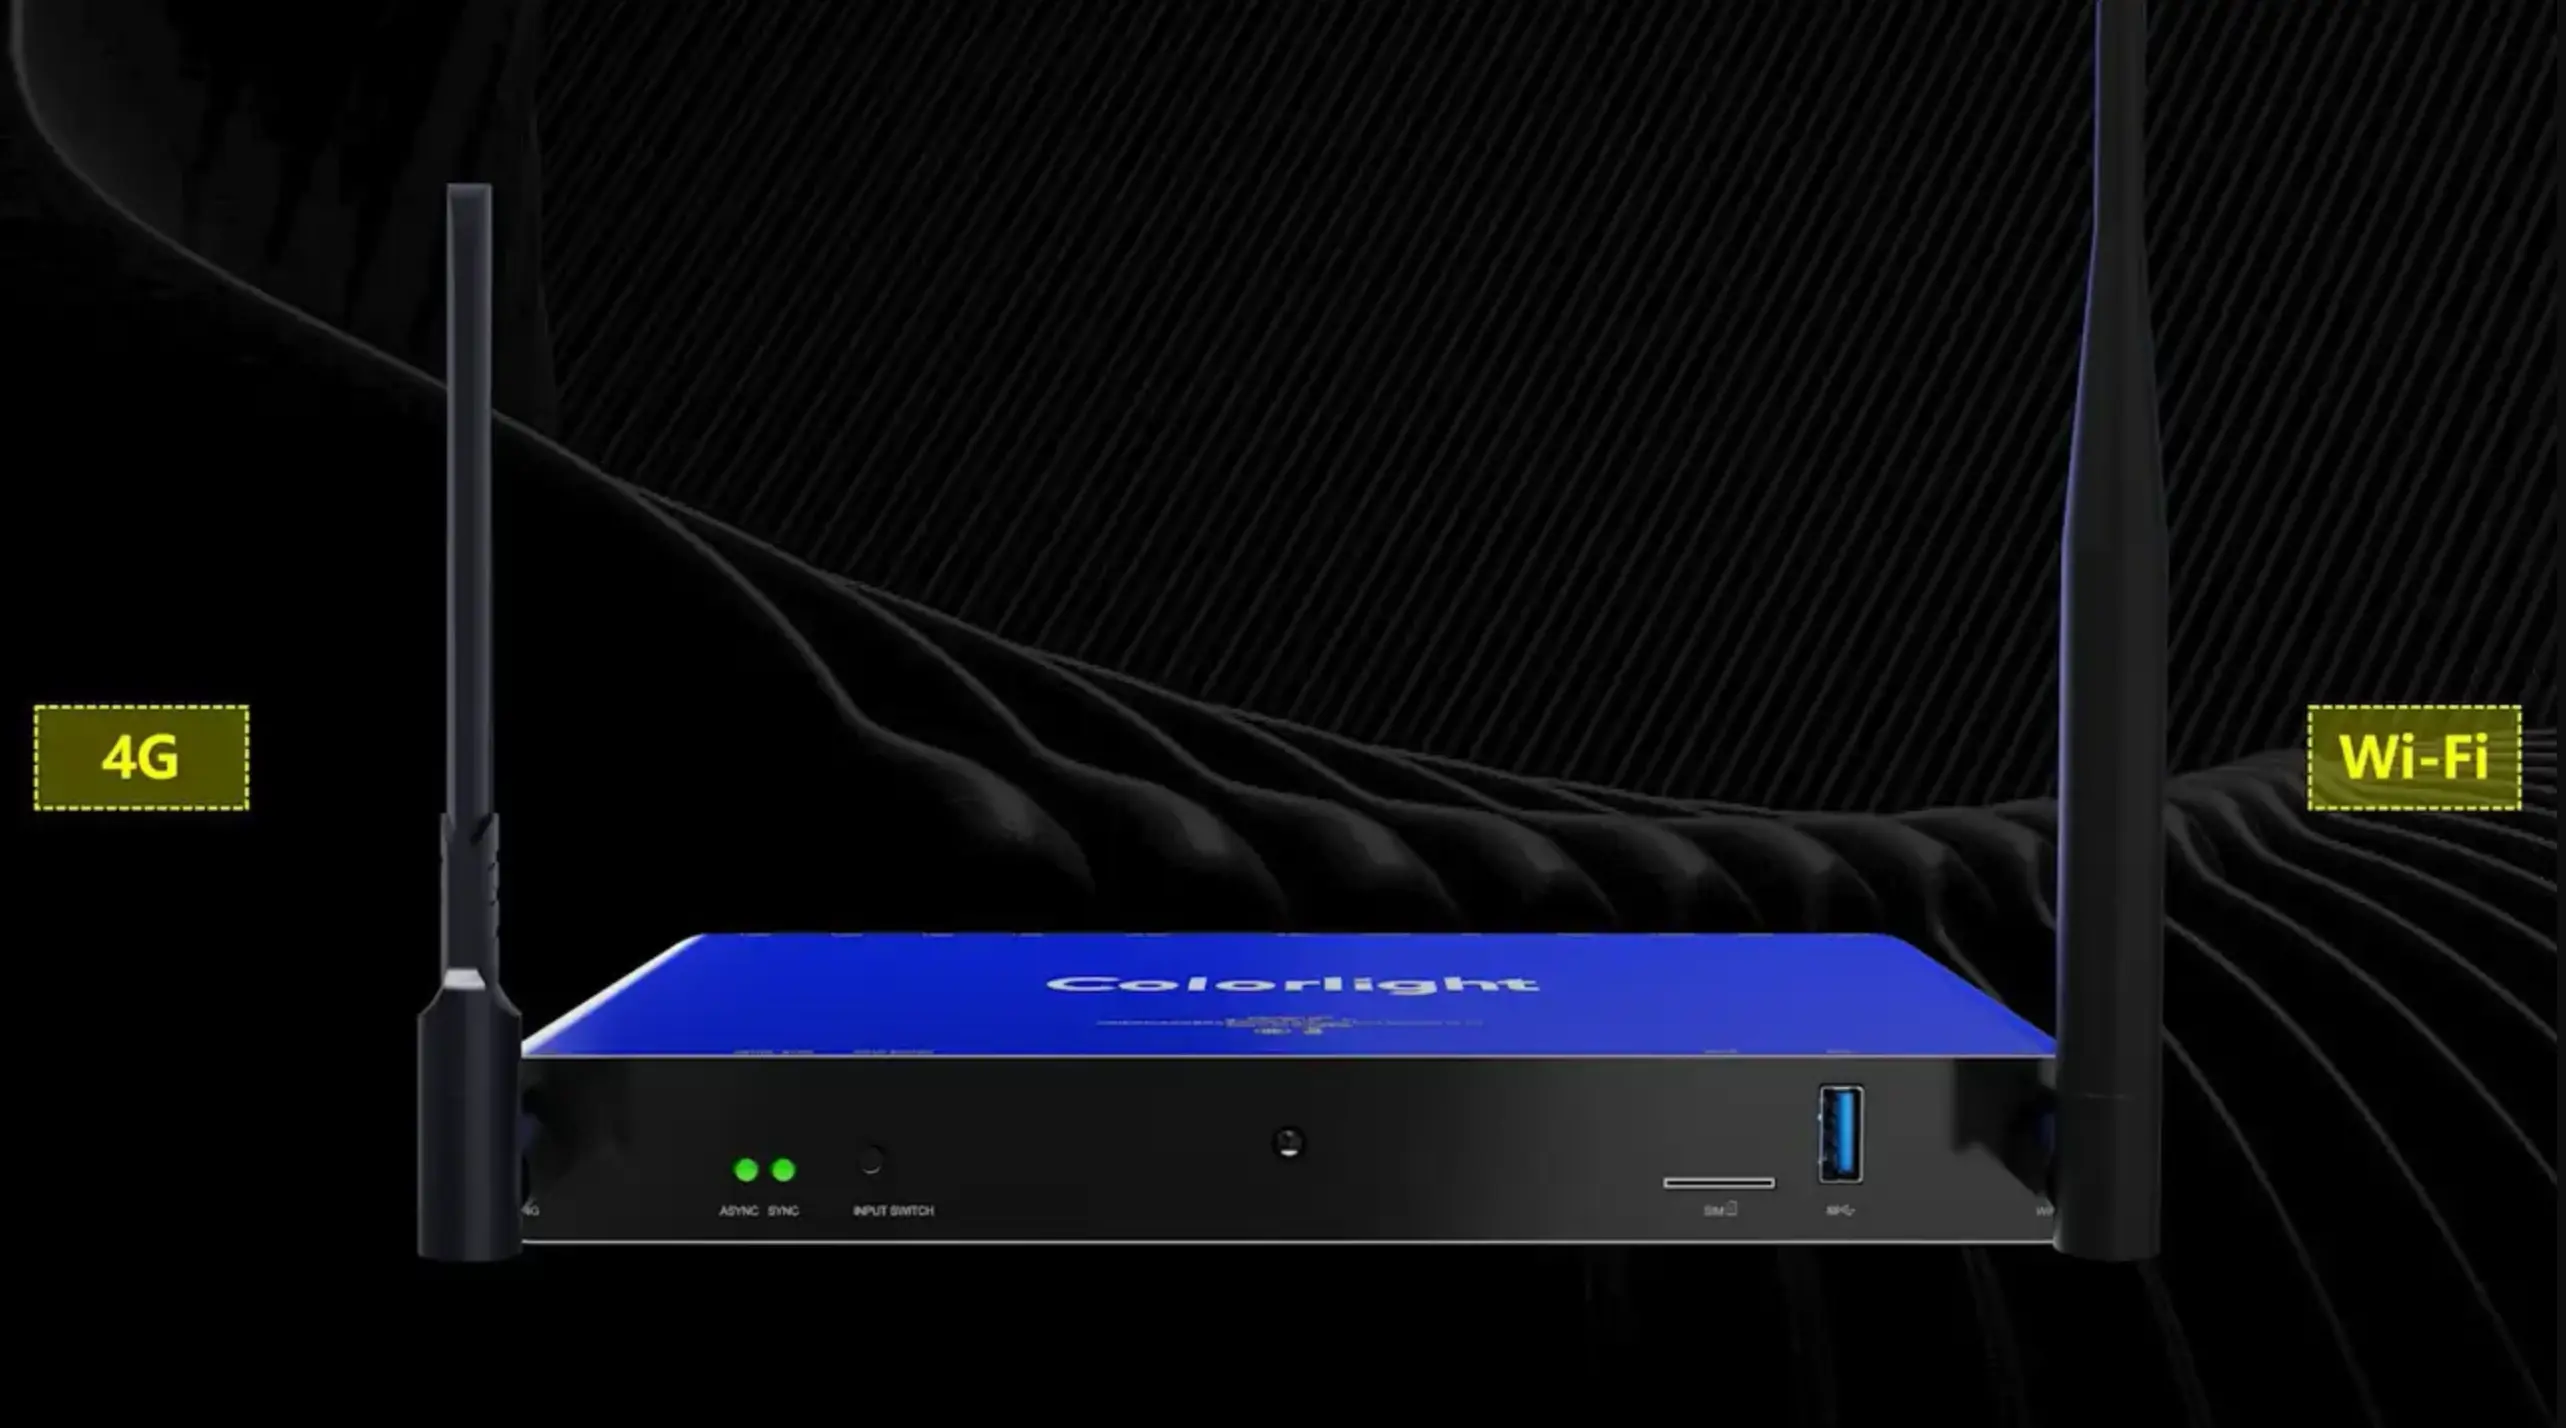
As mentioned above, the Colorlight media player supports wifi and a 4G connection. The WiFi antenna and 4G antenna are located at the two ends of the player. Note that the WiFi antenna is cylindrical, and the 4G antenna is flat, so they should not be mixed up.
IP 주소 확인
After you have set up the hardware connection for the media player, next we need to assign a IP to it.
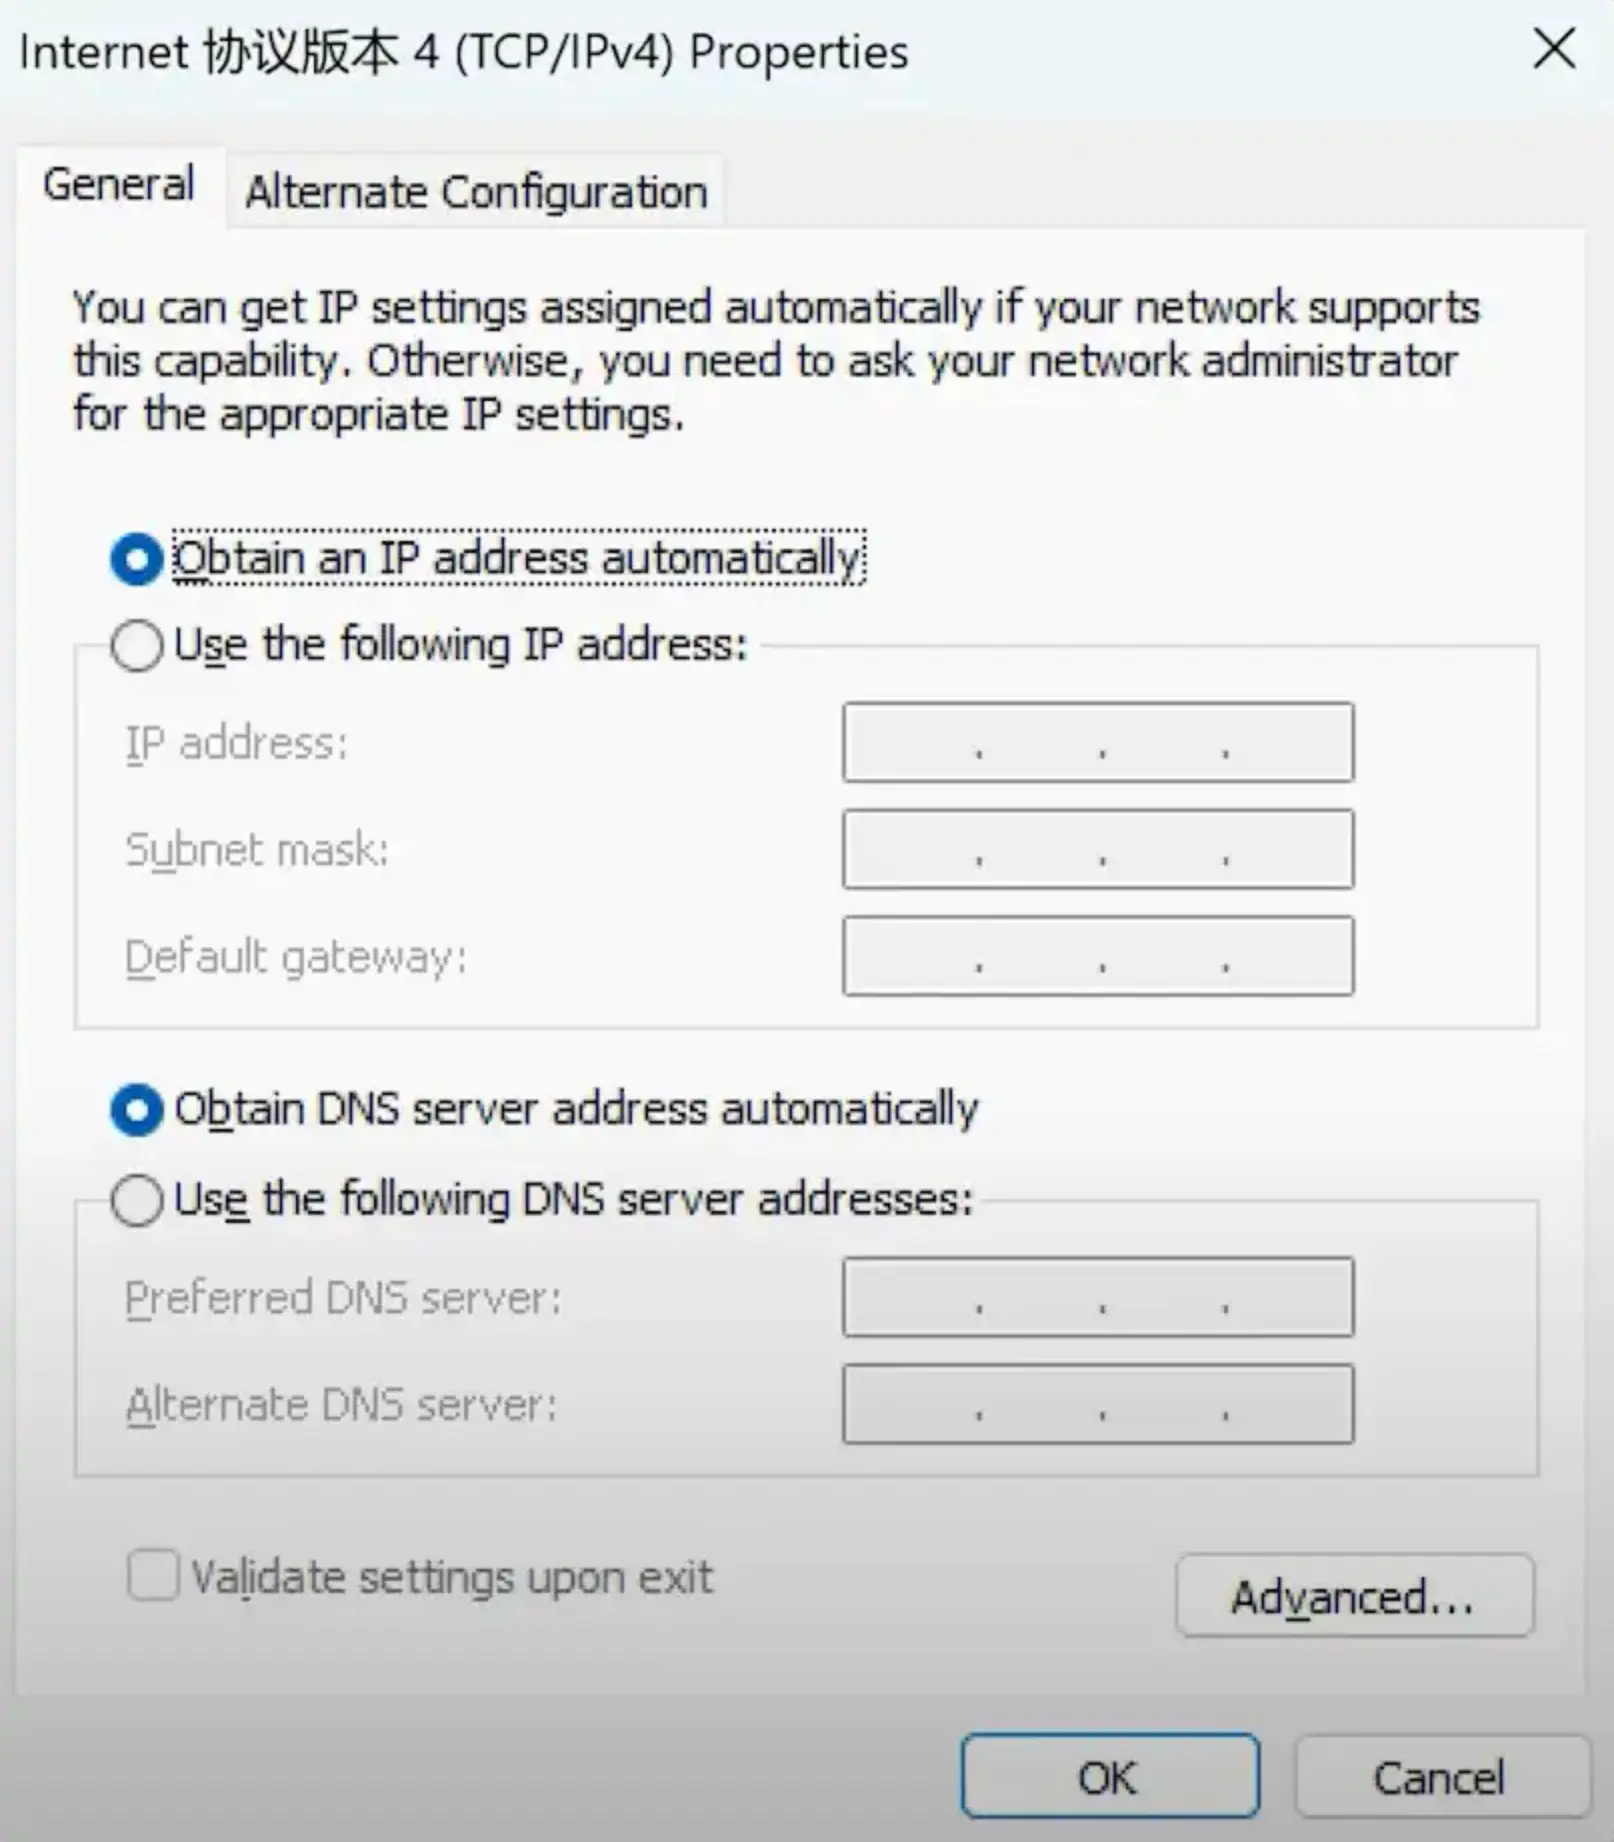
Upon receiving a new media player, use the USB or LAN ports for the initial computer connection. It should be noted that if the Ethernet cable is connected to directly the player, the computer’s IP should be set to obtained automatically mode.
소프트웨어 다운로드
Once the media player obtains an IP address, we need to prepare the LED control software. For Colorlight media players, the software is available as a PC client, Playermaster, and as a mobile application, LEDAssistant, which can be downloaded from the Colorlight website.
PlayerMaster로 관리하기
Here we use PlayerMaster as a test.
To use Playermaster, connect the media player to a computer through a USB or LAN port. Then, open the Playermaster software. Here is the main interface for your reivew.
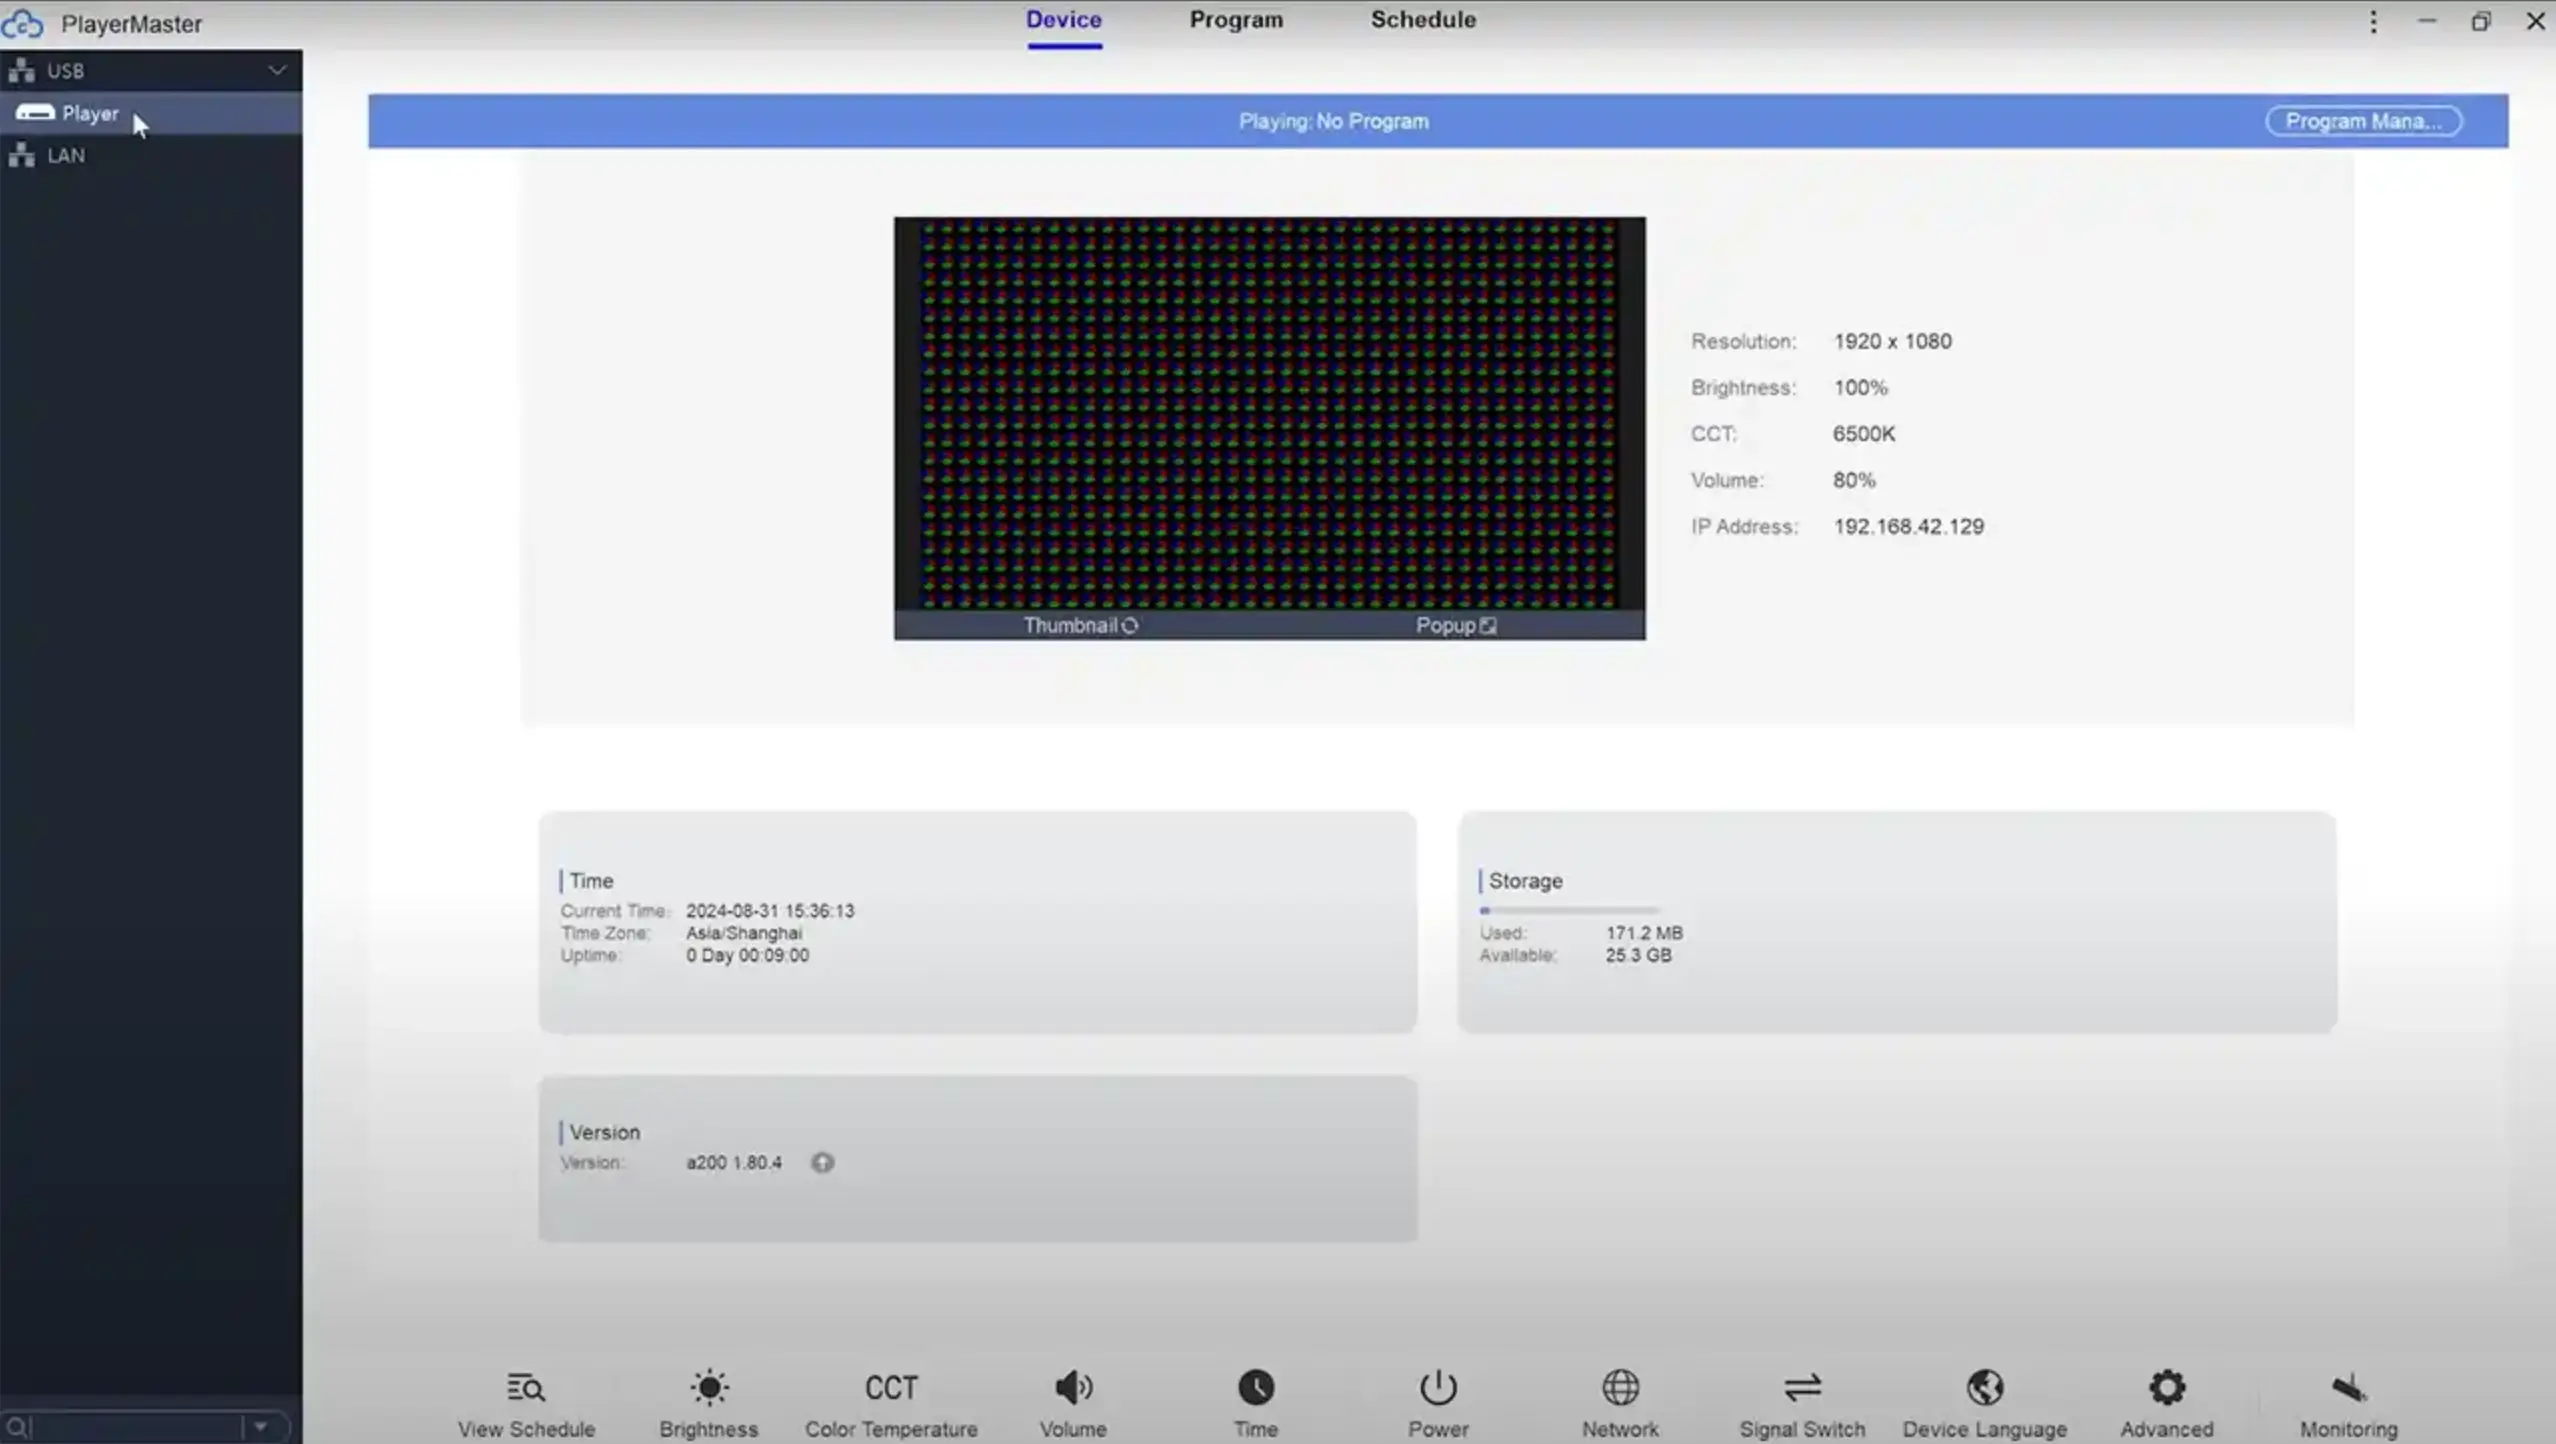
As shown in the image, there are 3 tab interfaces with “Device”, “Program”, and “Schedule”.
- Device: used for viewing terminal information as well as manage and control terminals
- Program: used for managing programs, such as adding, editing, publishing, exporting, and deleting programs.
- Schedule: used for managing schedules, such as adding, editing, publishing, exporting, and deleting schedules.
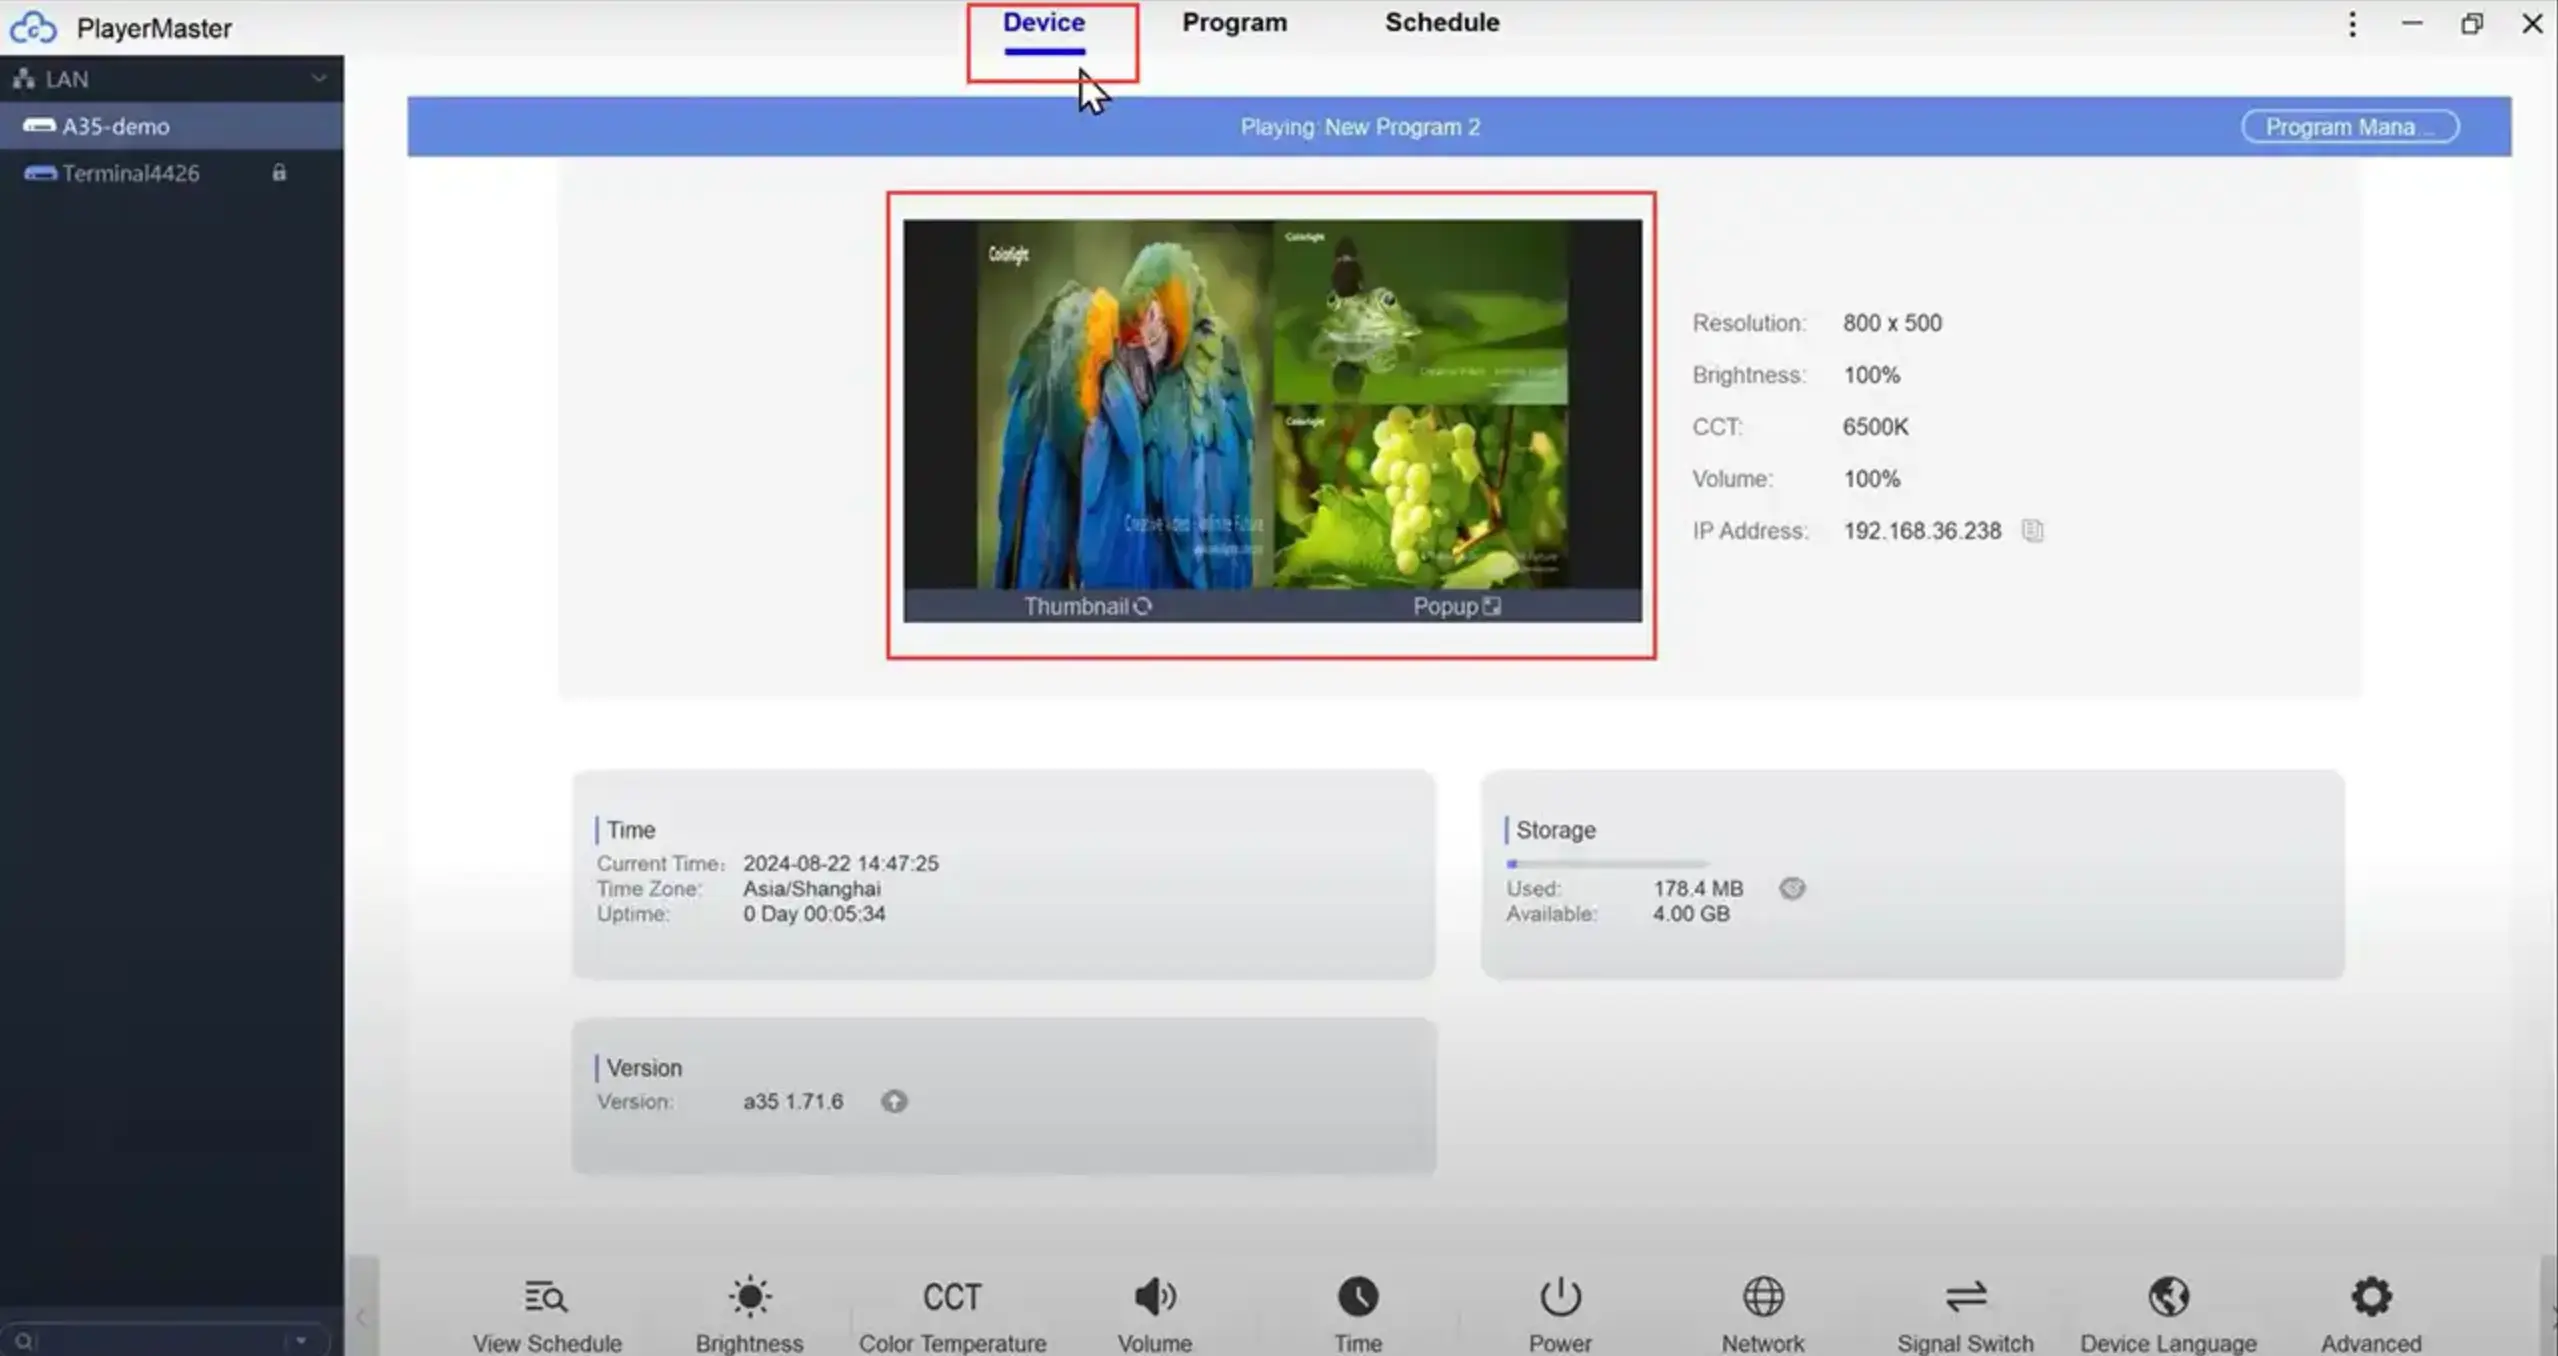
In the interface of “Device”, you can see that there is various information display such as screen resolution, brightness, CCT, column, IP address, system current time/Time zone/Uptime, system storage status used and available, and version information.
On the left side, there is a terminal tree, you can see the media player in the same local area network as your computer in the terminal tree. Right-click the media player then it will display a list of operation menus: “Publish Program”, “Publish Program Schedule”, “Publish Command Schedule”, “Delete Program Schedule”, “Delete Command Schedule”, “Publish Detail”, and “Rename”. You can click the corresponding menu to progress the associated task.
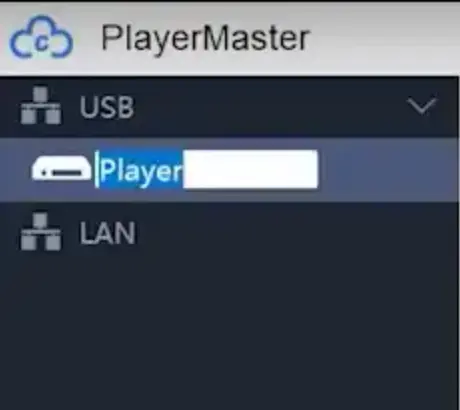
Rename media player
Right-click media player, click the “Rename” operation menu, then set a new name.
View Schedules
Access the bottom menu to click “View Schedule”.
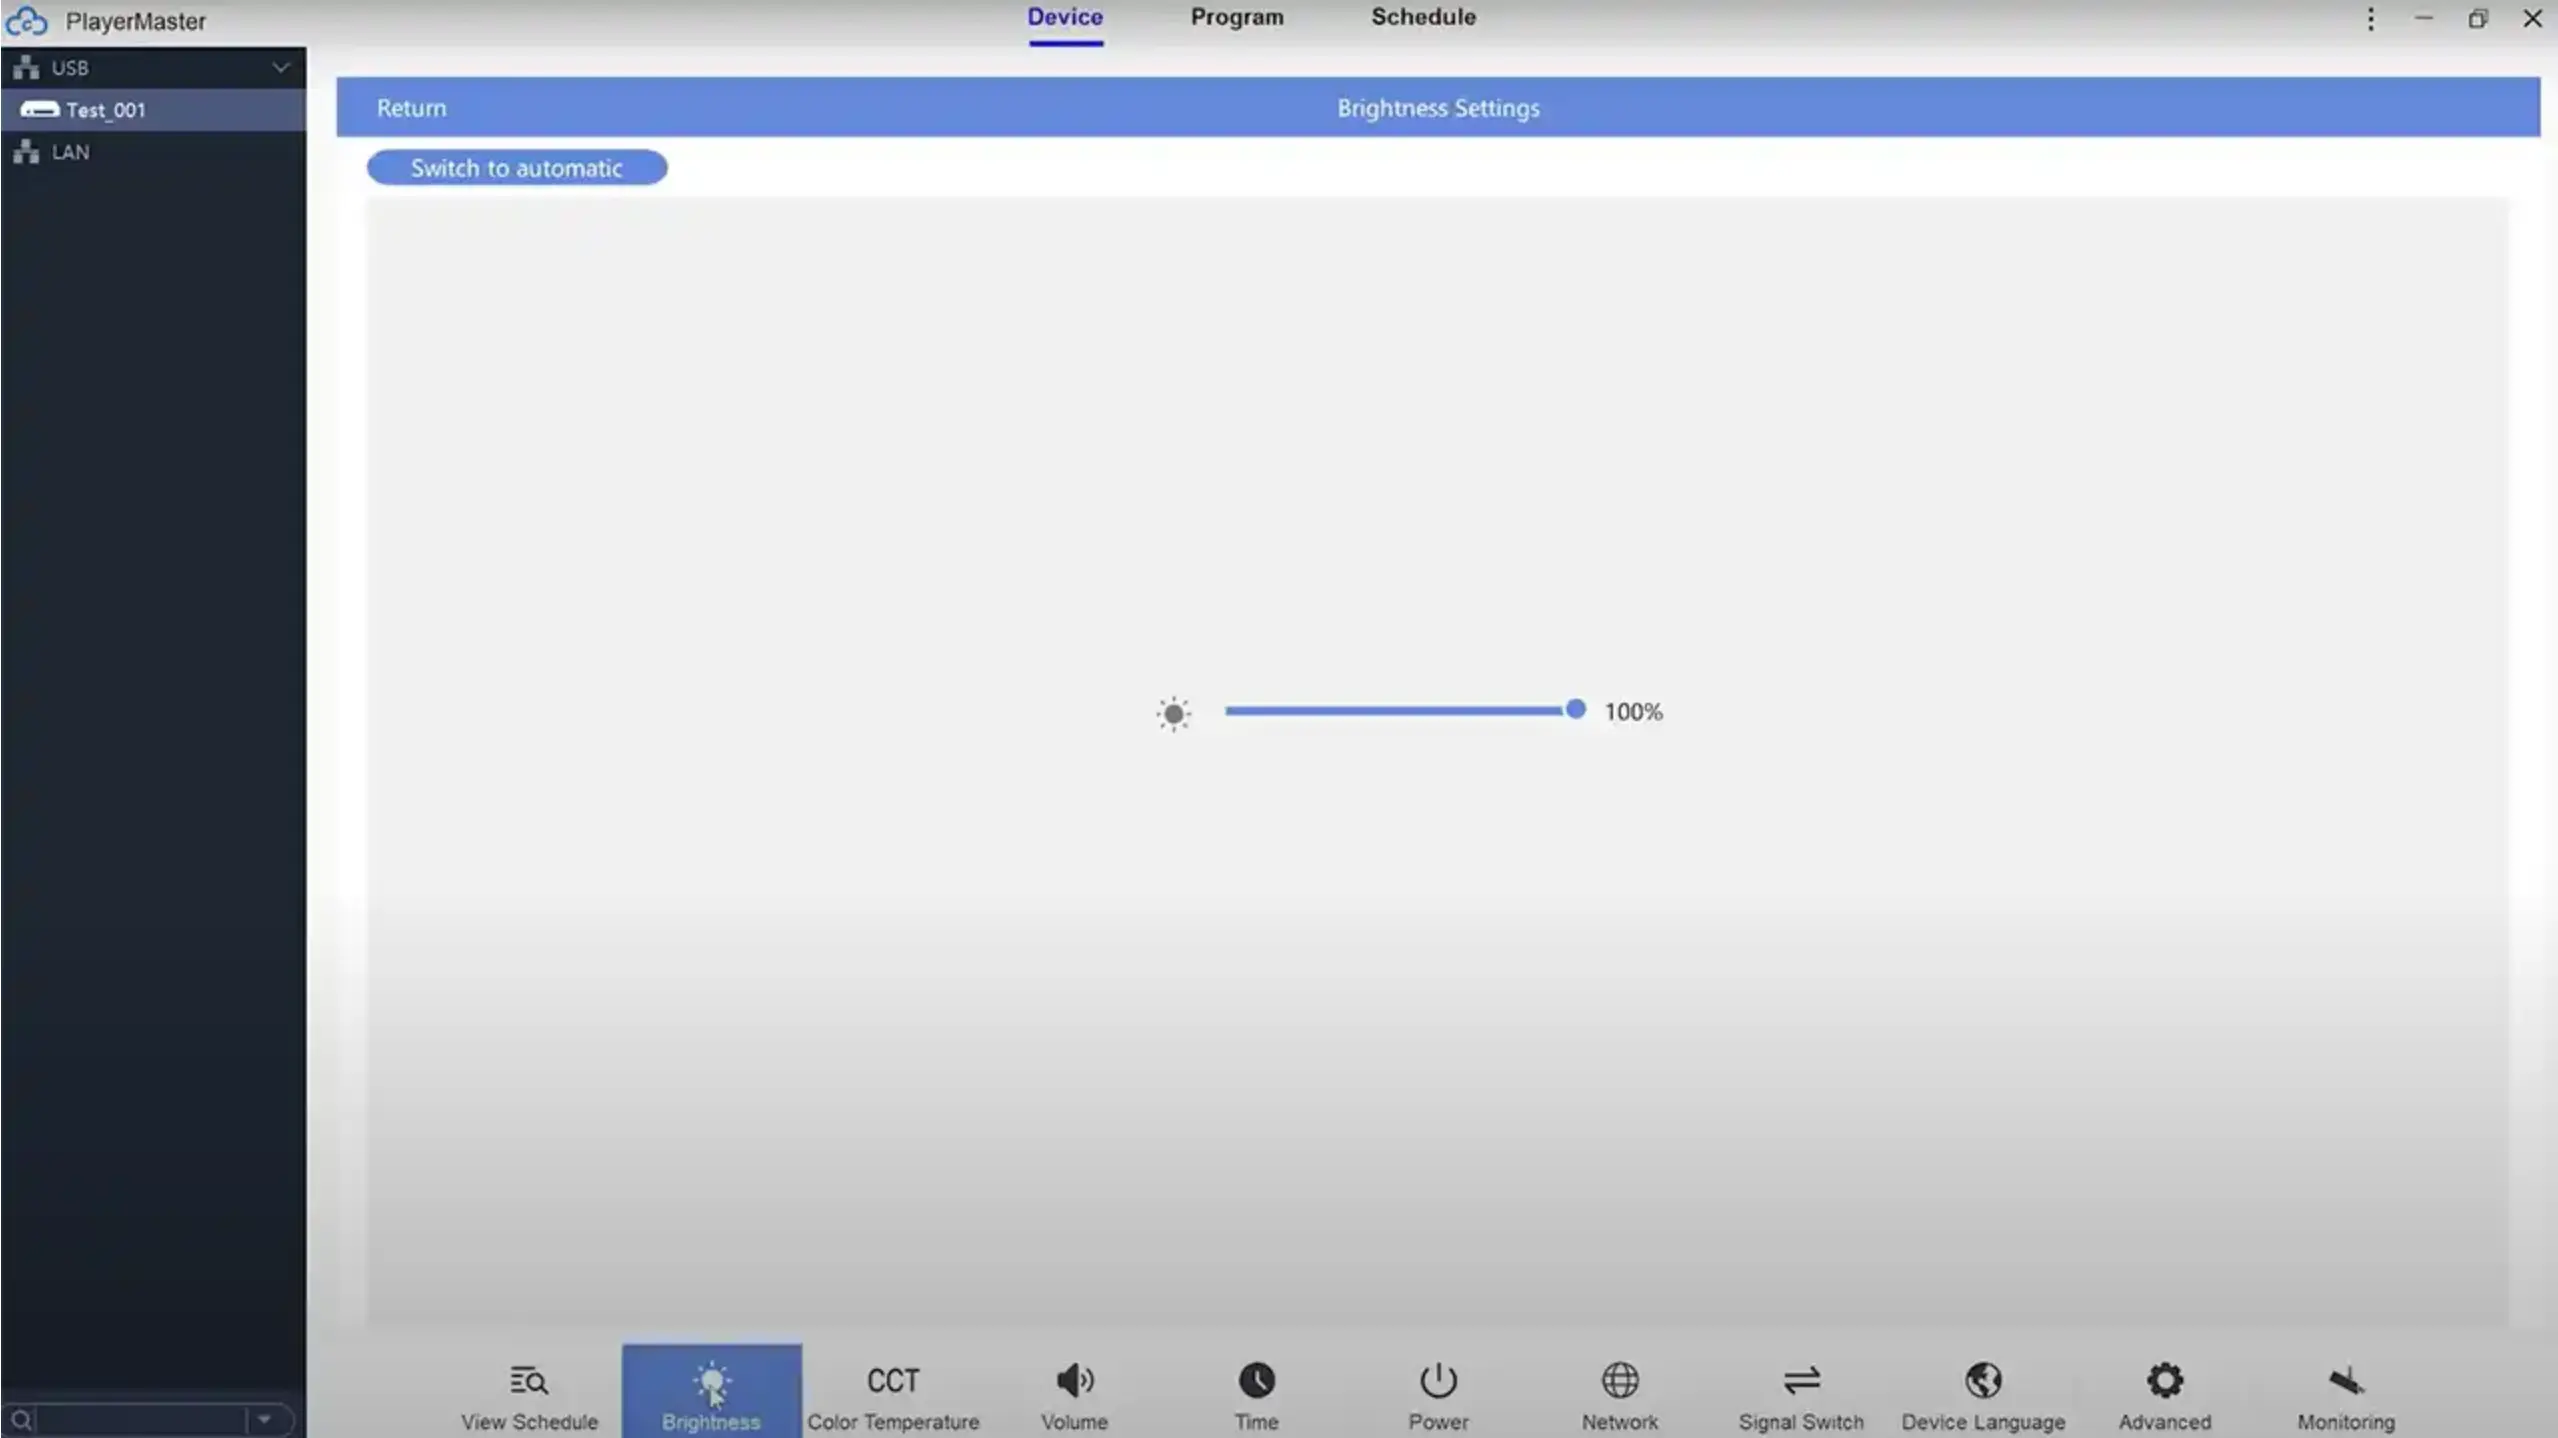
Adjust Brightness
Access the bottom menu to click “Brightness”.
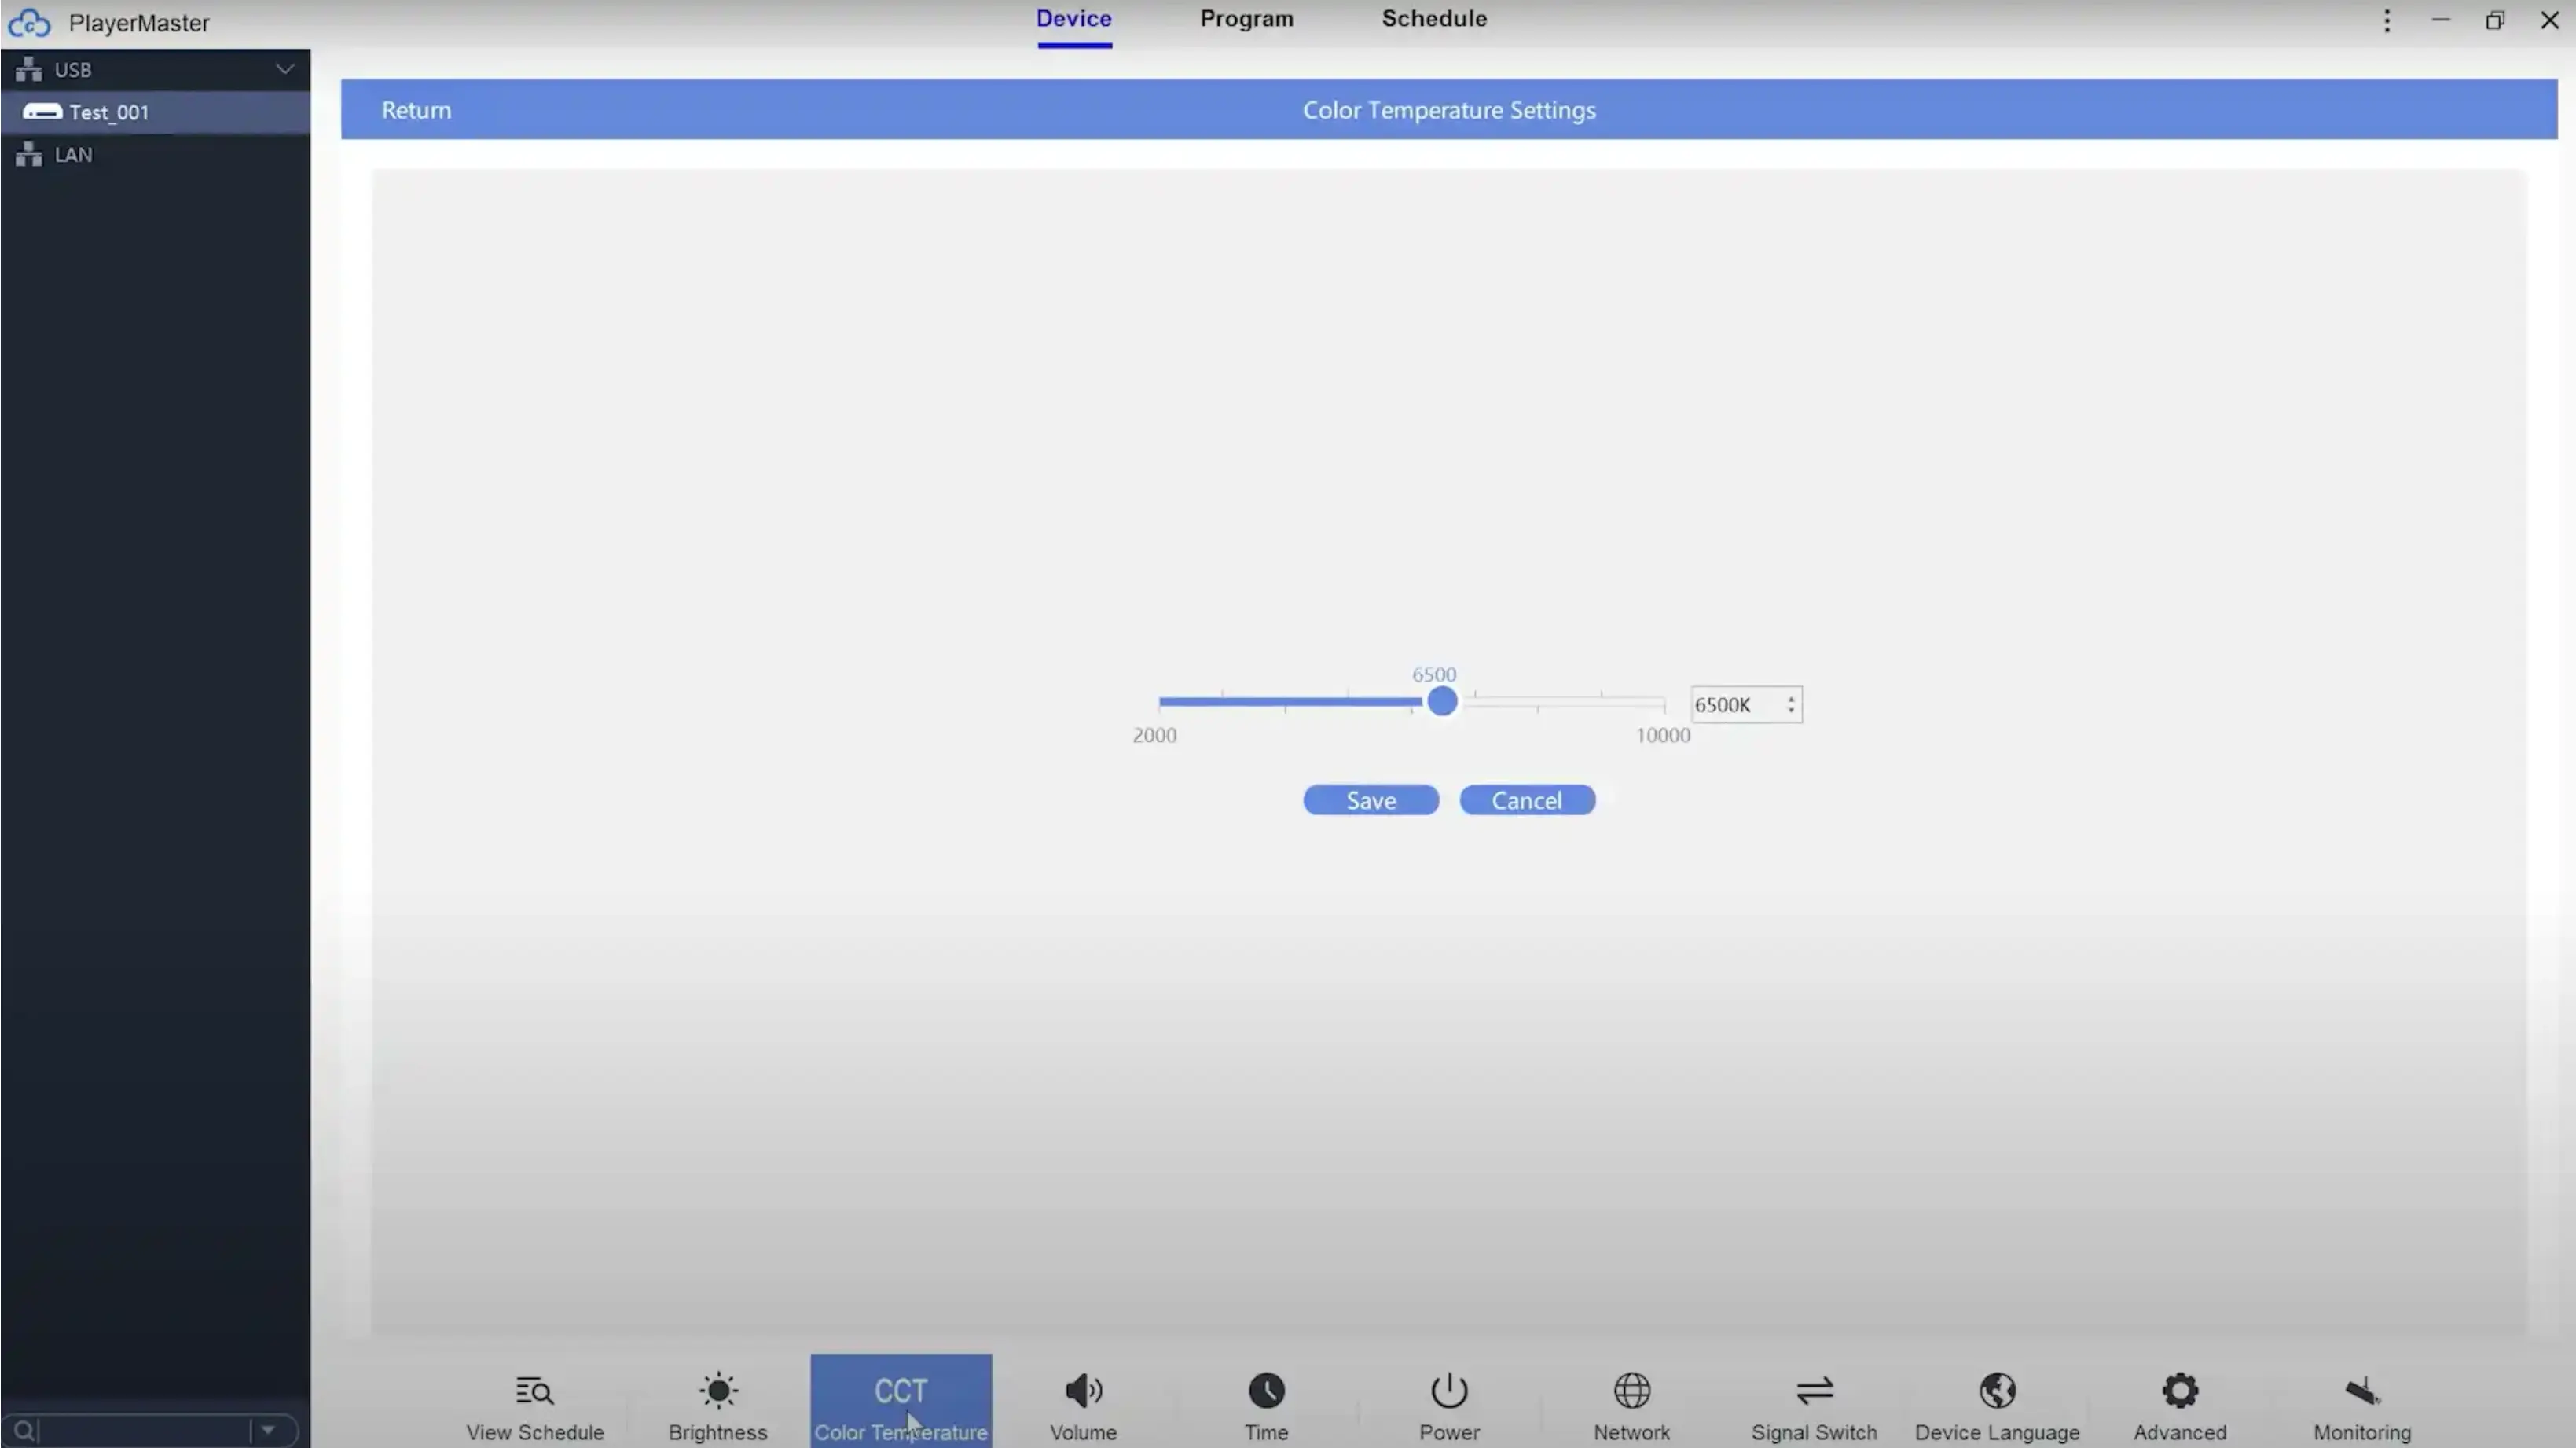
Adjust Color Temperature
Access the bottom menu to click “Color Temperature”.
Set control way
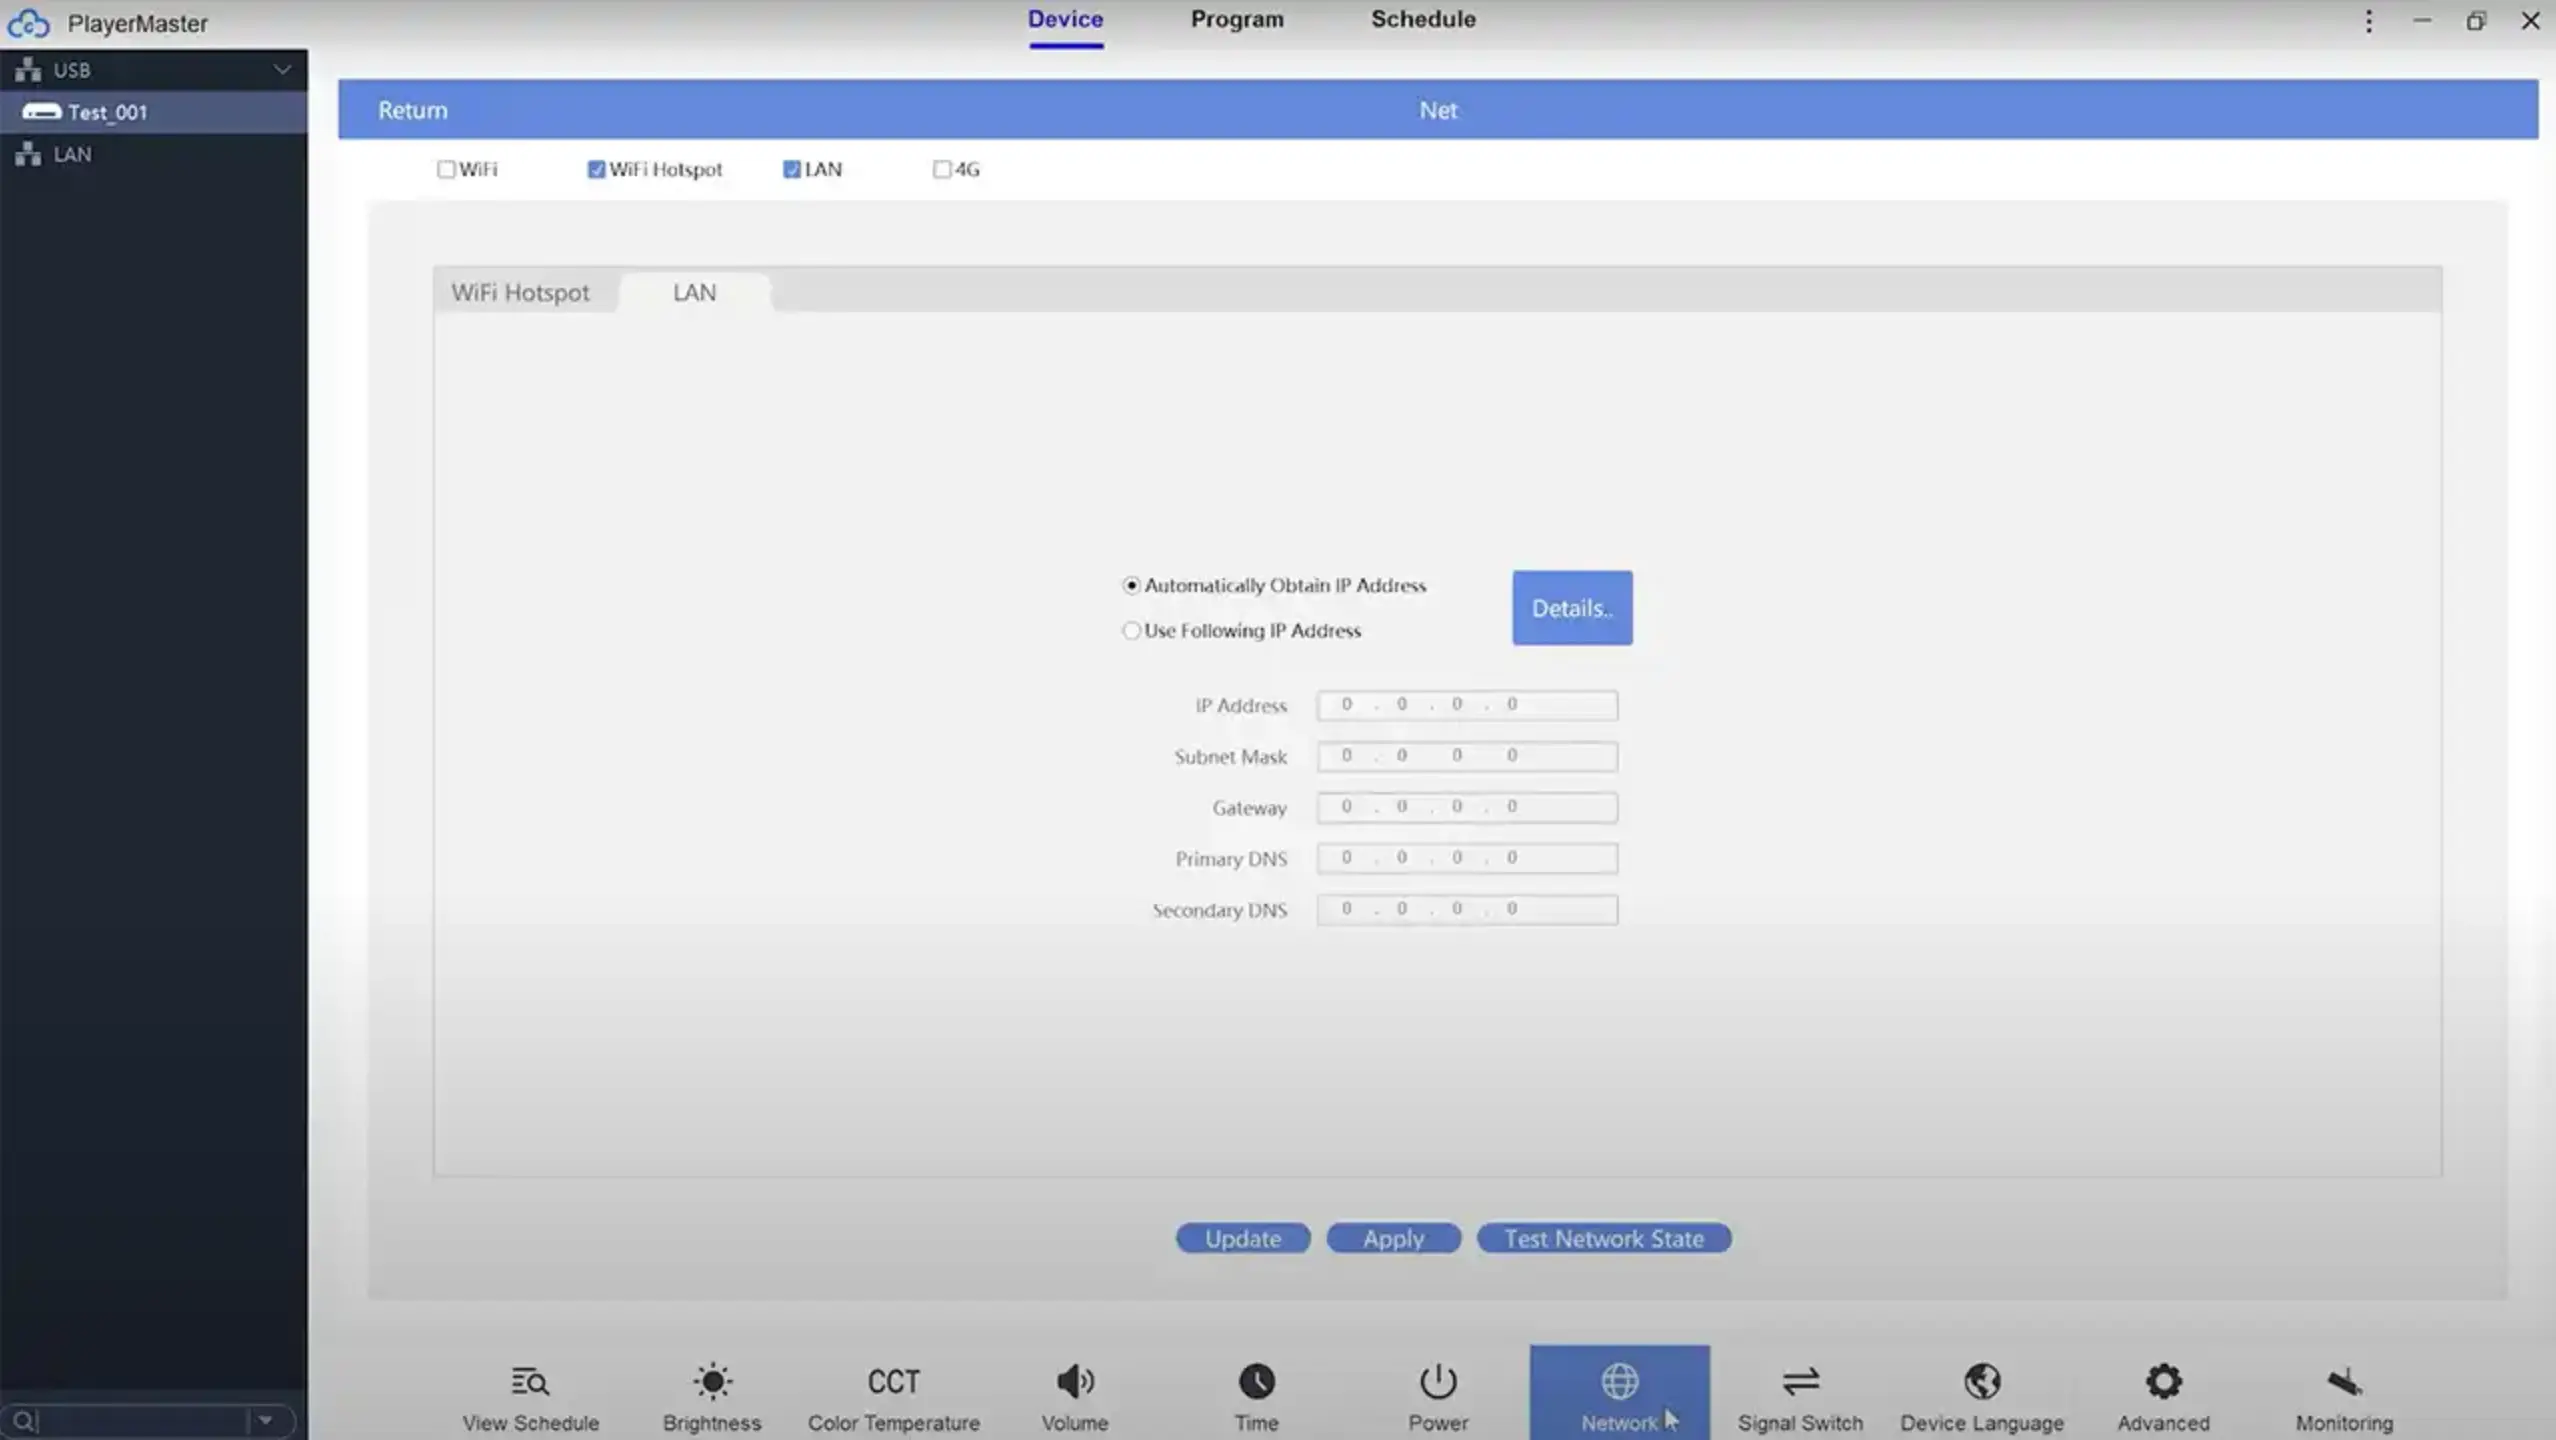
In the lower toolbar of the Playermaster software, you can click on the Network button, where you can choose to use Wi-Fi, Wi-Fi hotspot, LAN, or 4G, to allow your media player to be controlled wirelessly and publish programs.
How to enable Cloud Control
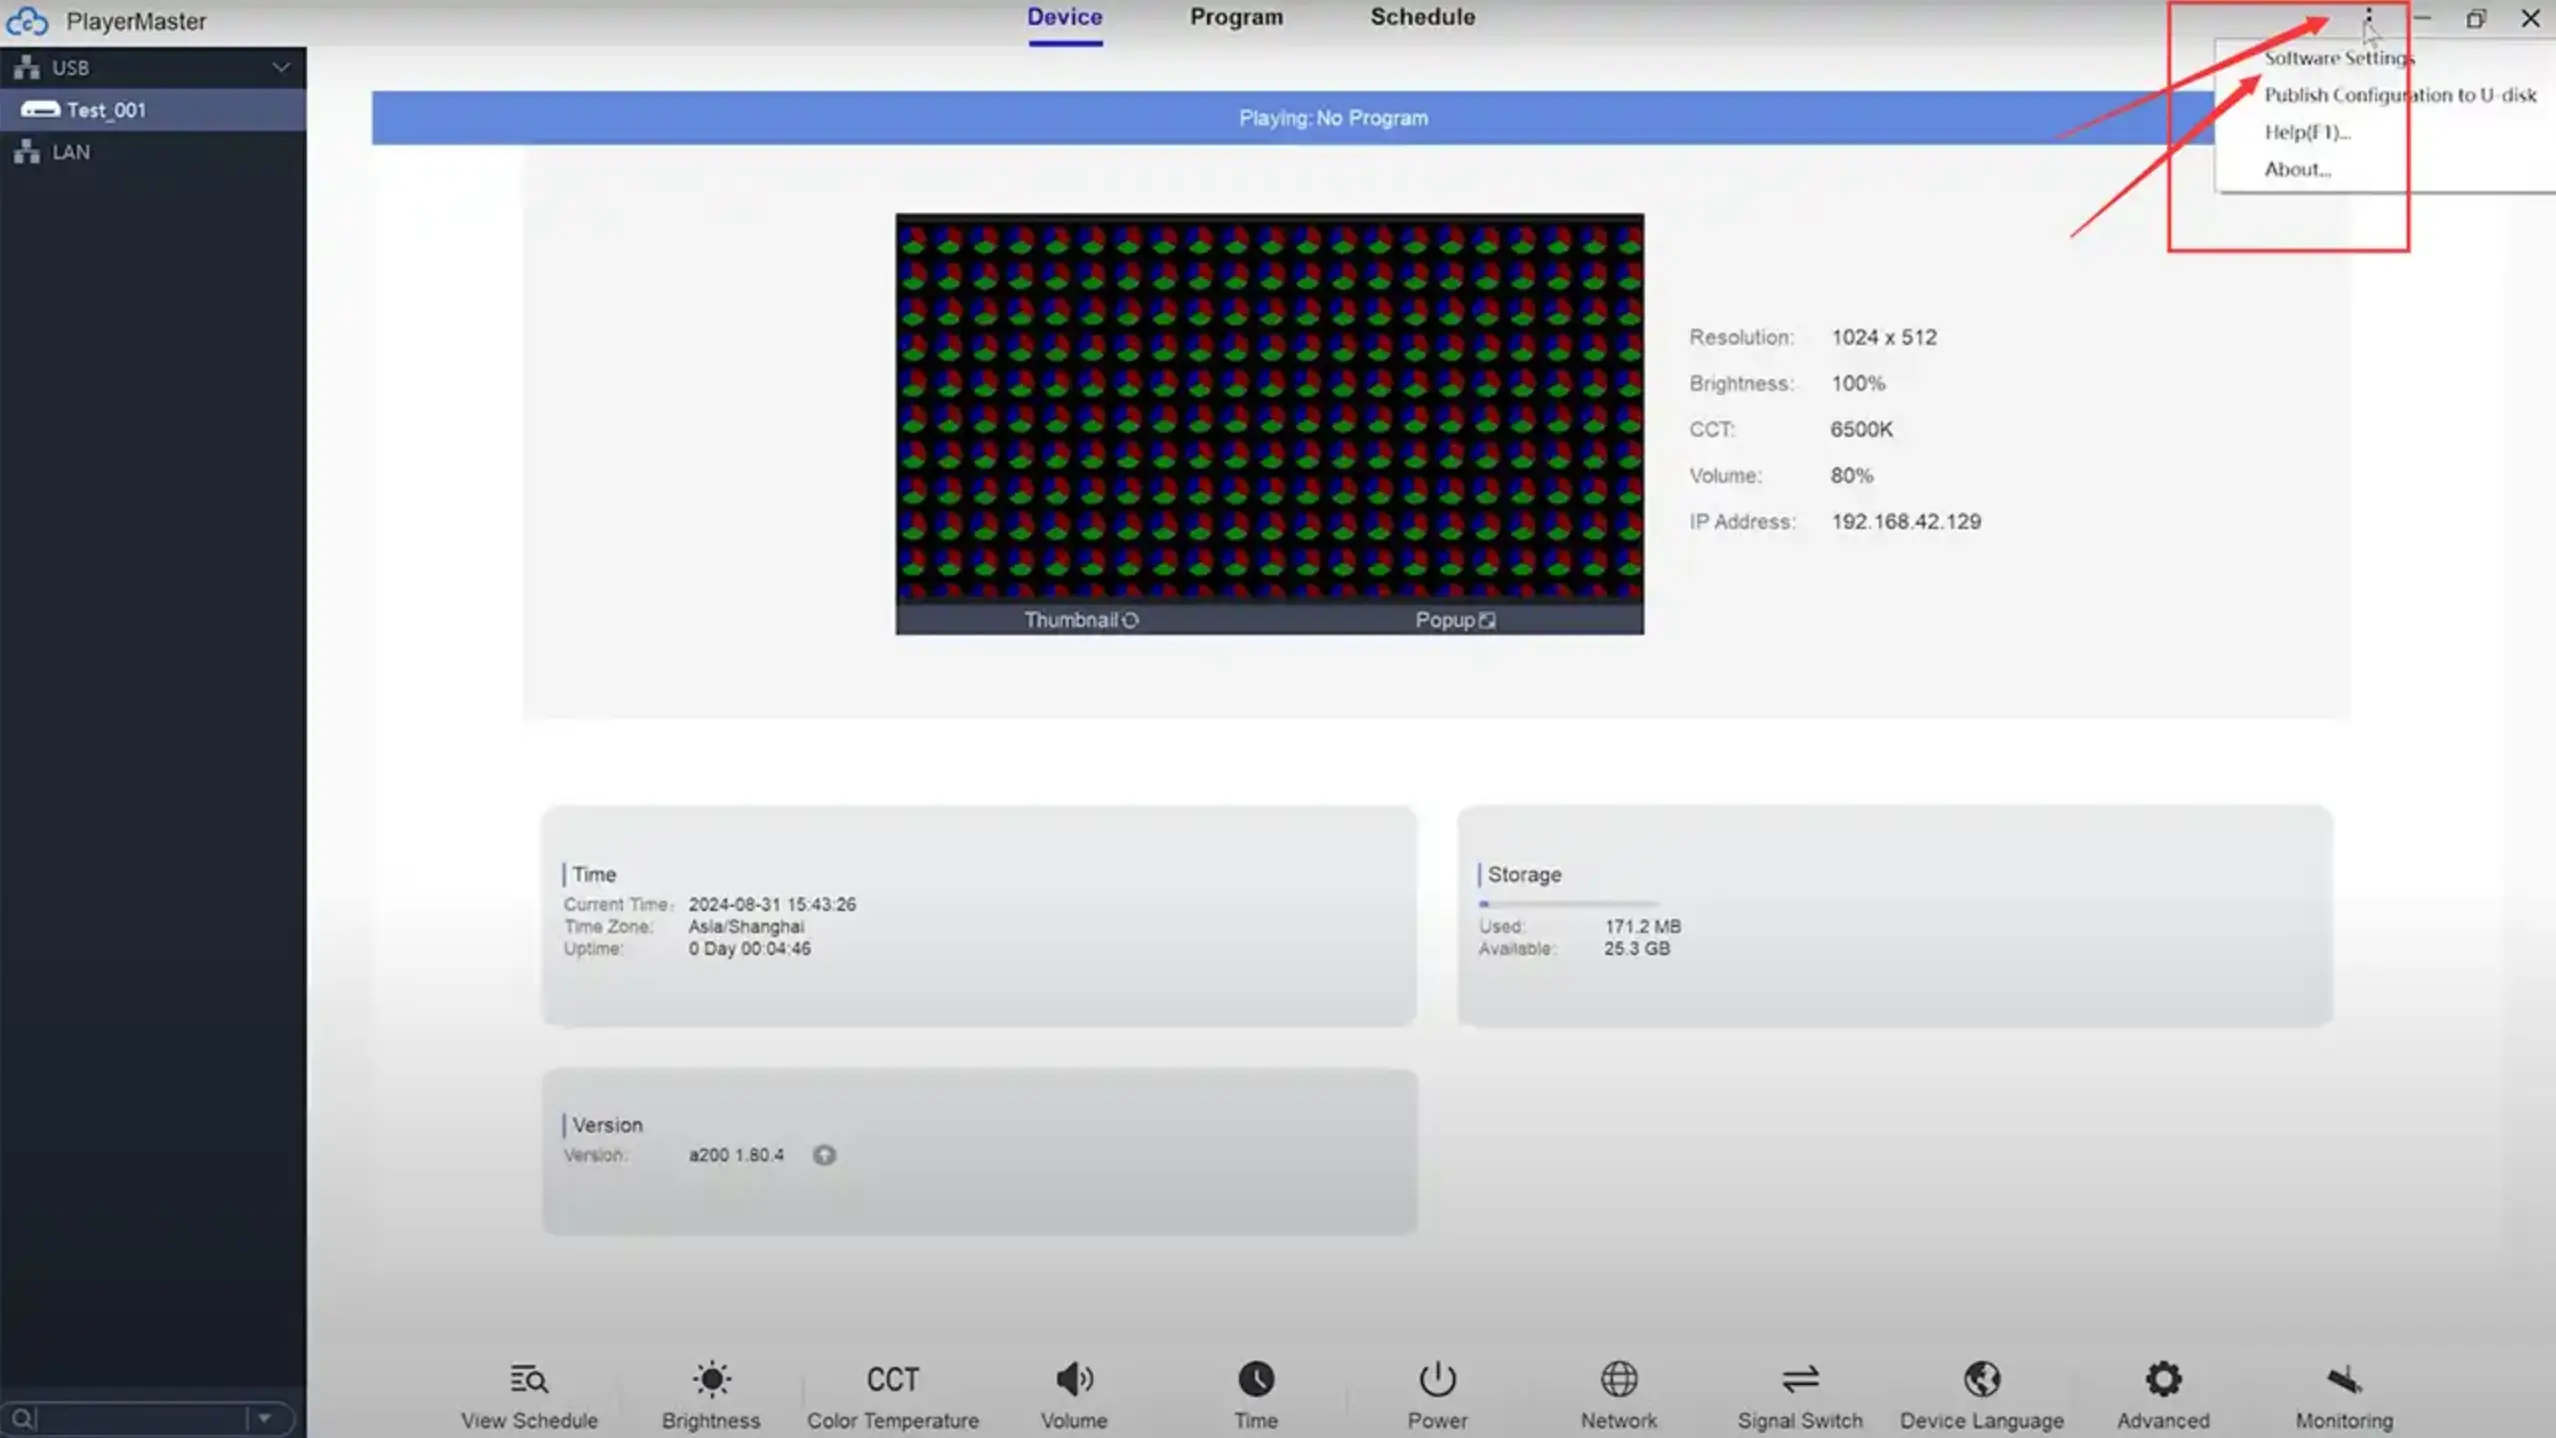
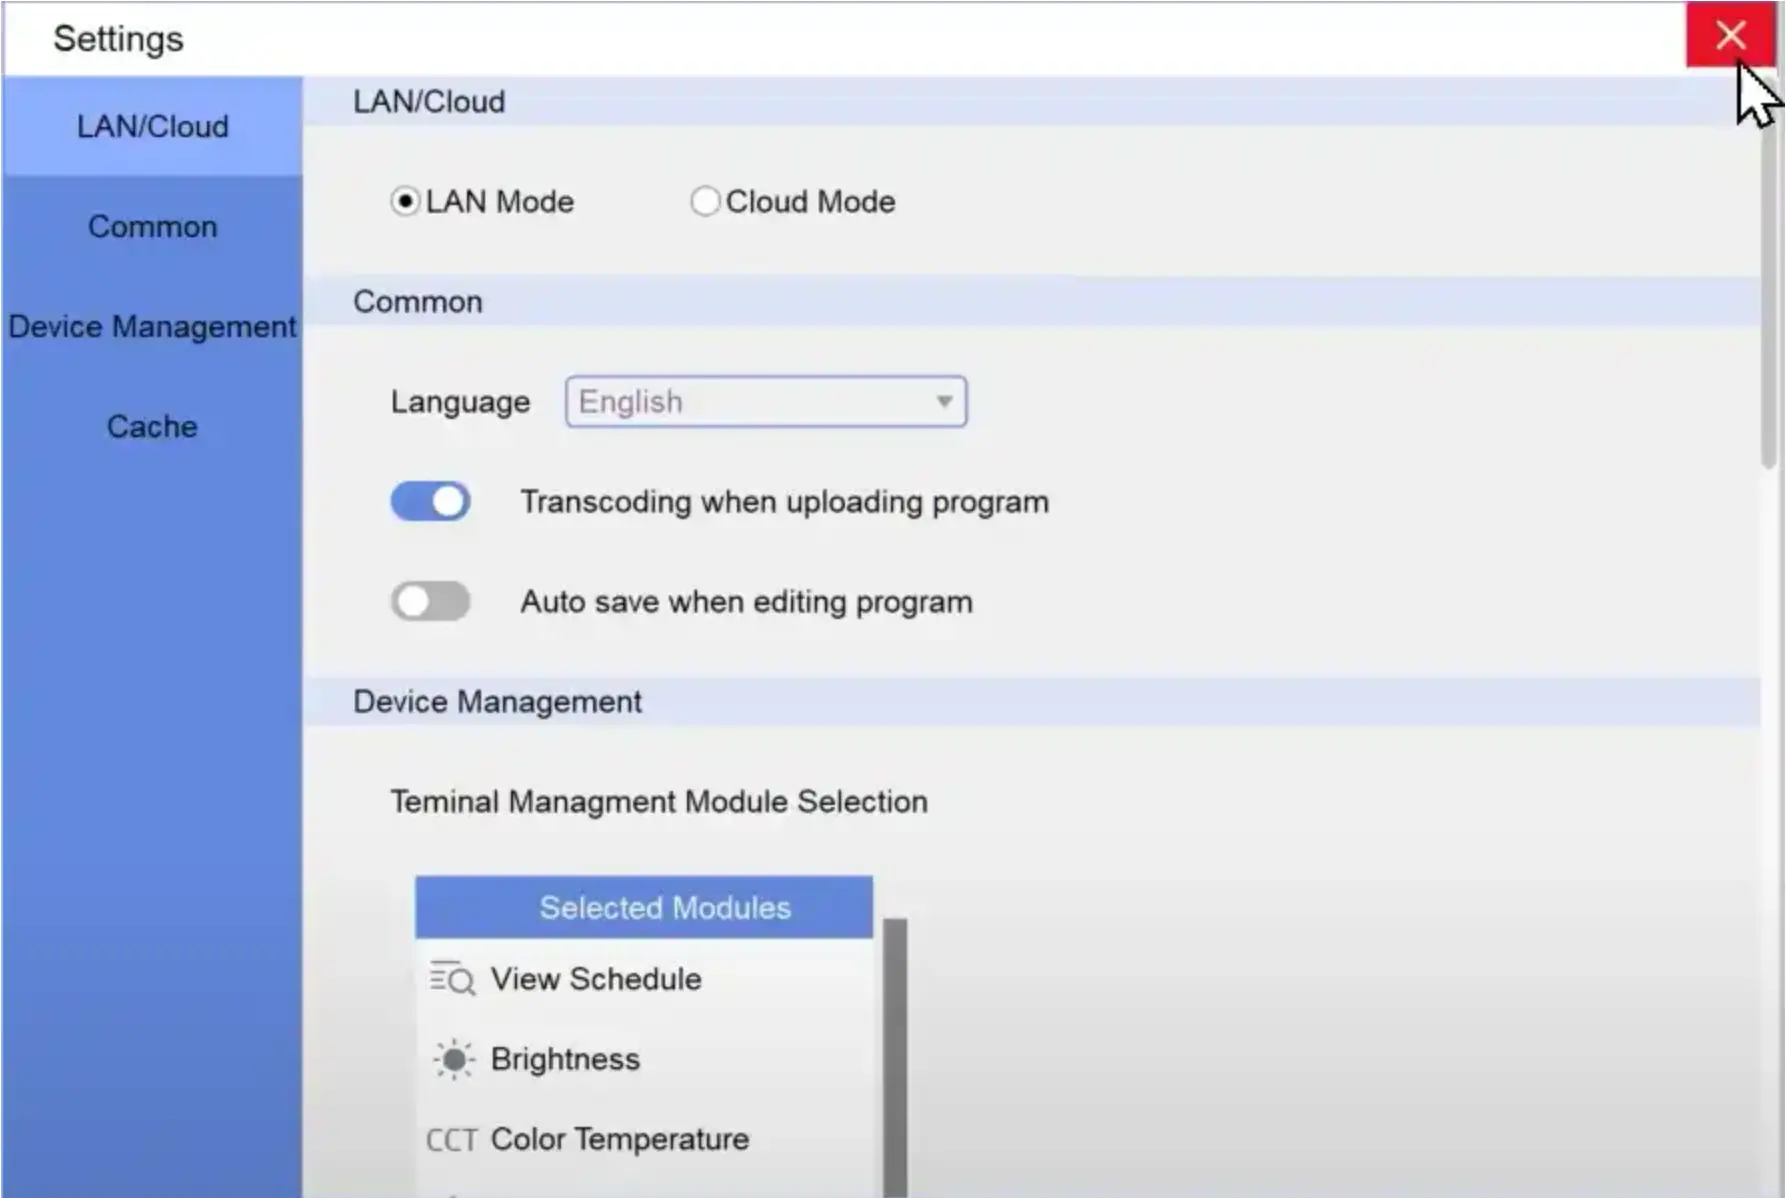
If you want to use cloud control, first, open the software setting in the dropdown list by clicking the upper-right menu.
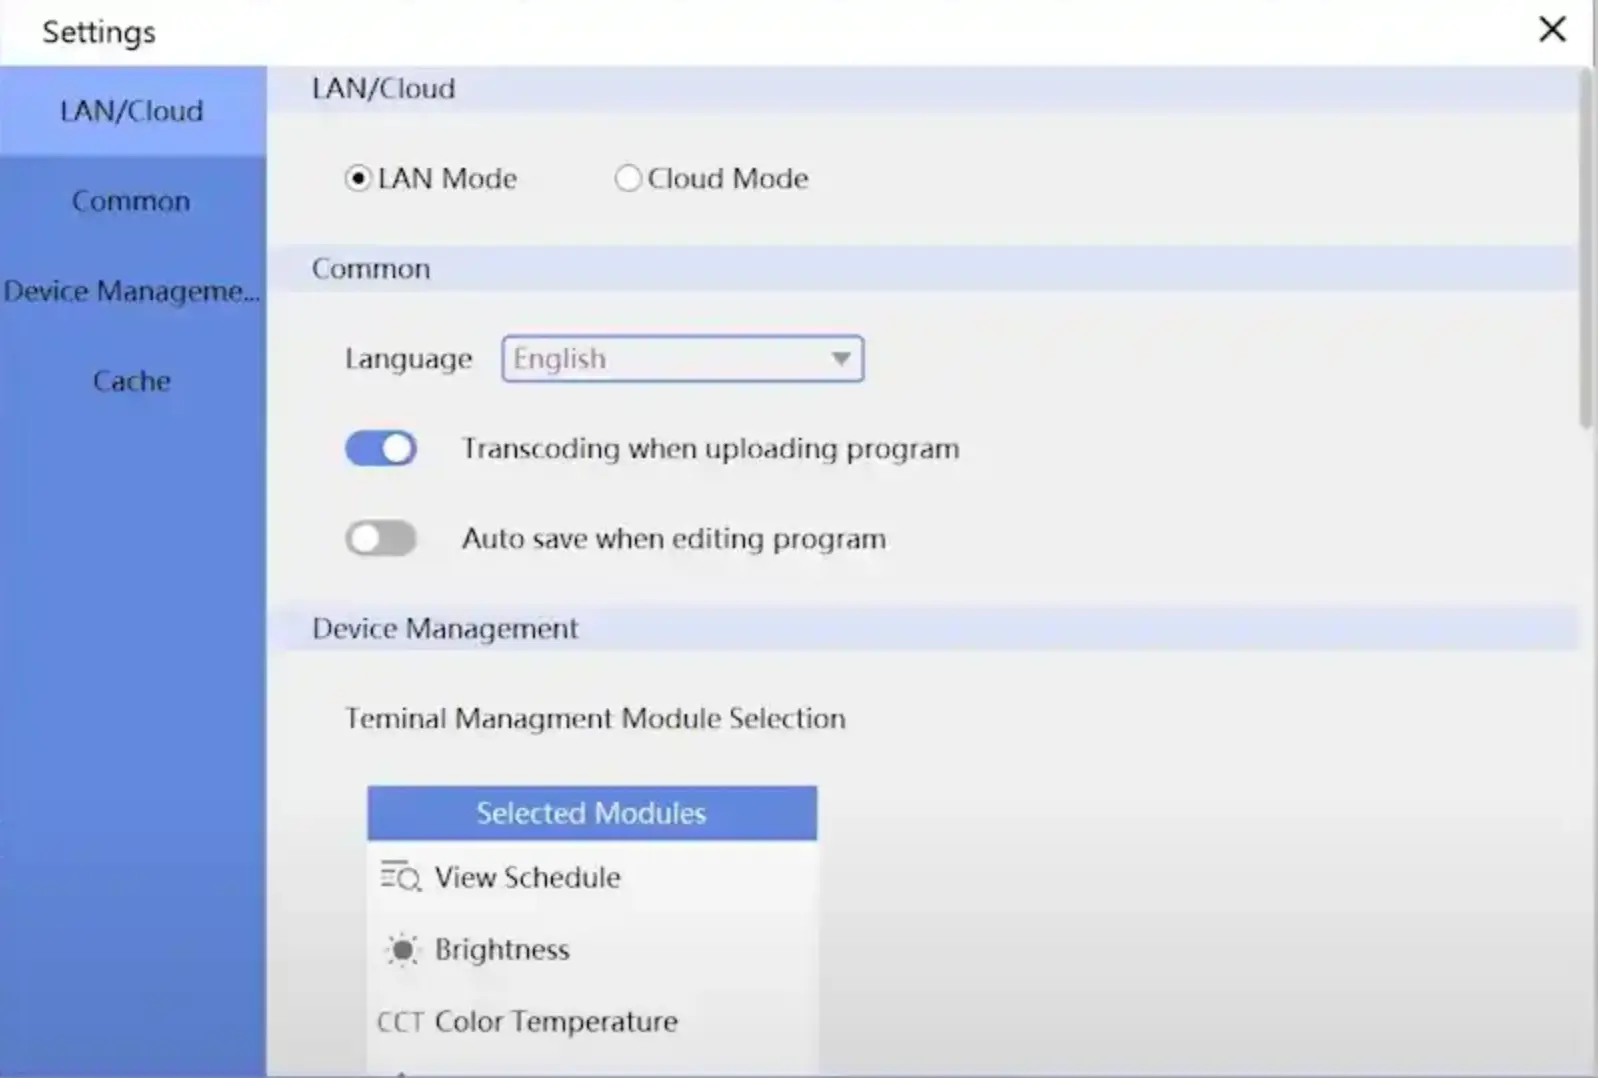
Next, switch Playermaster to cloud mode. As shown in the following image, there are two modes: LAN mode and Cloud Mode. If it is LAN mode, then switch to Cloud Mode.
Next, switch Playermaster to cloud mode, then log in to your cloud account and drag and drop your connected devices onto the cloud so that the cloud platform is ready to use!
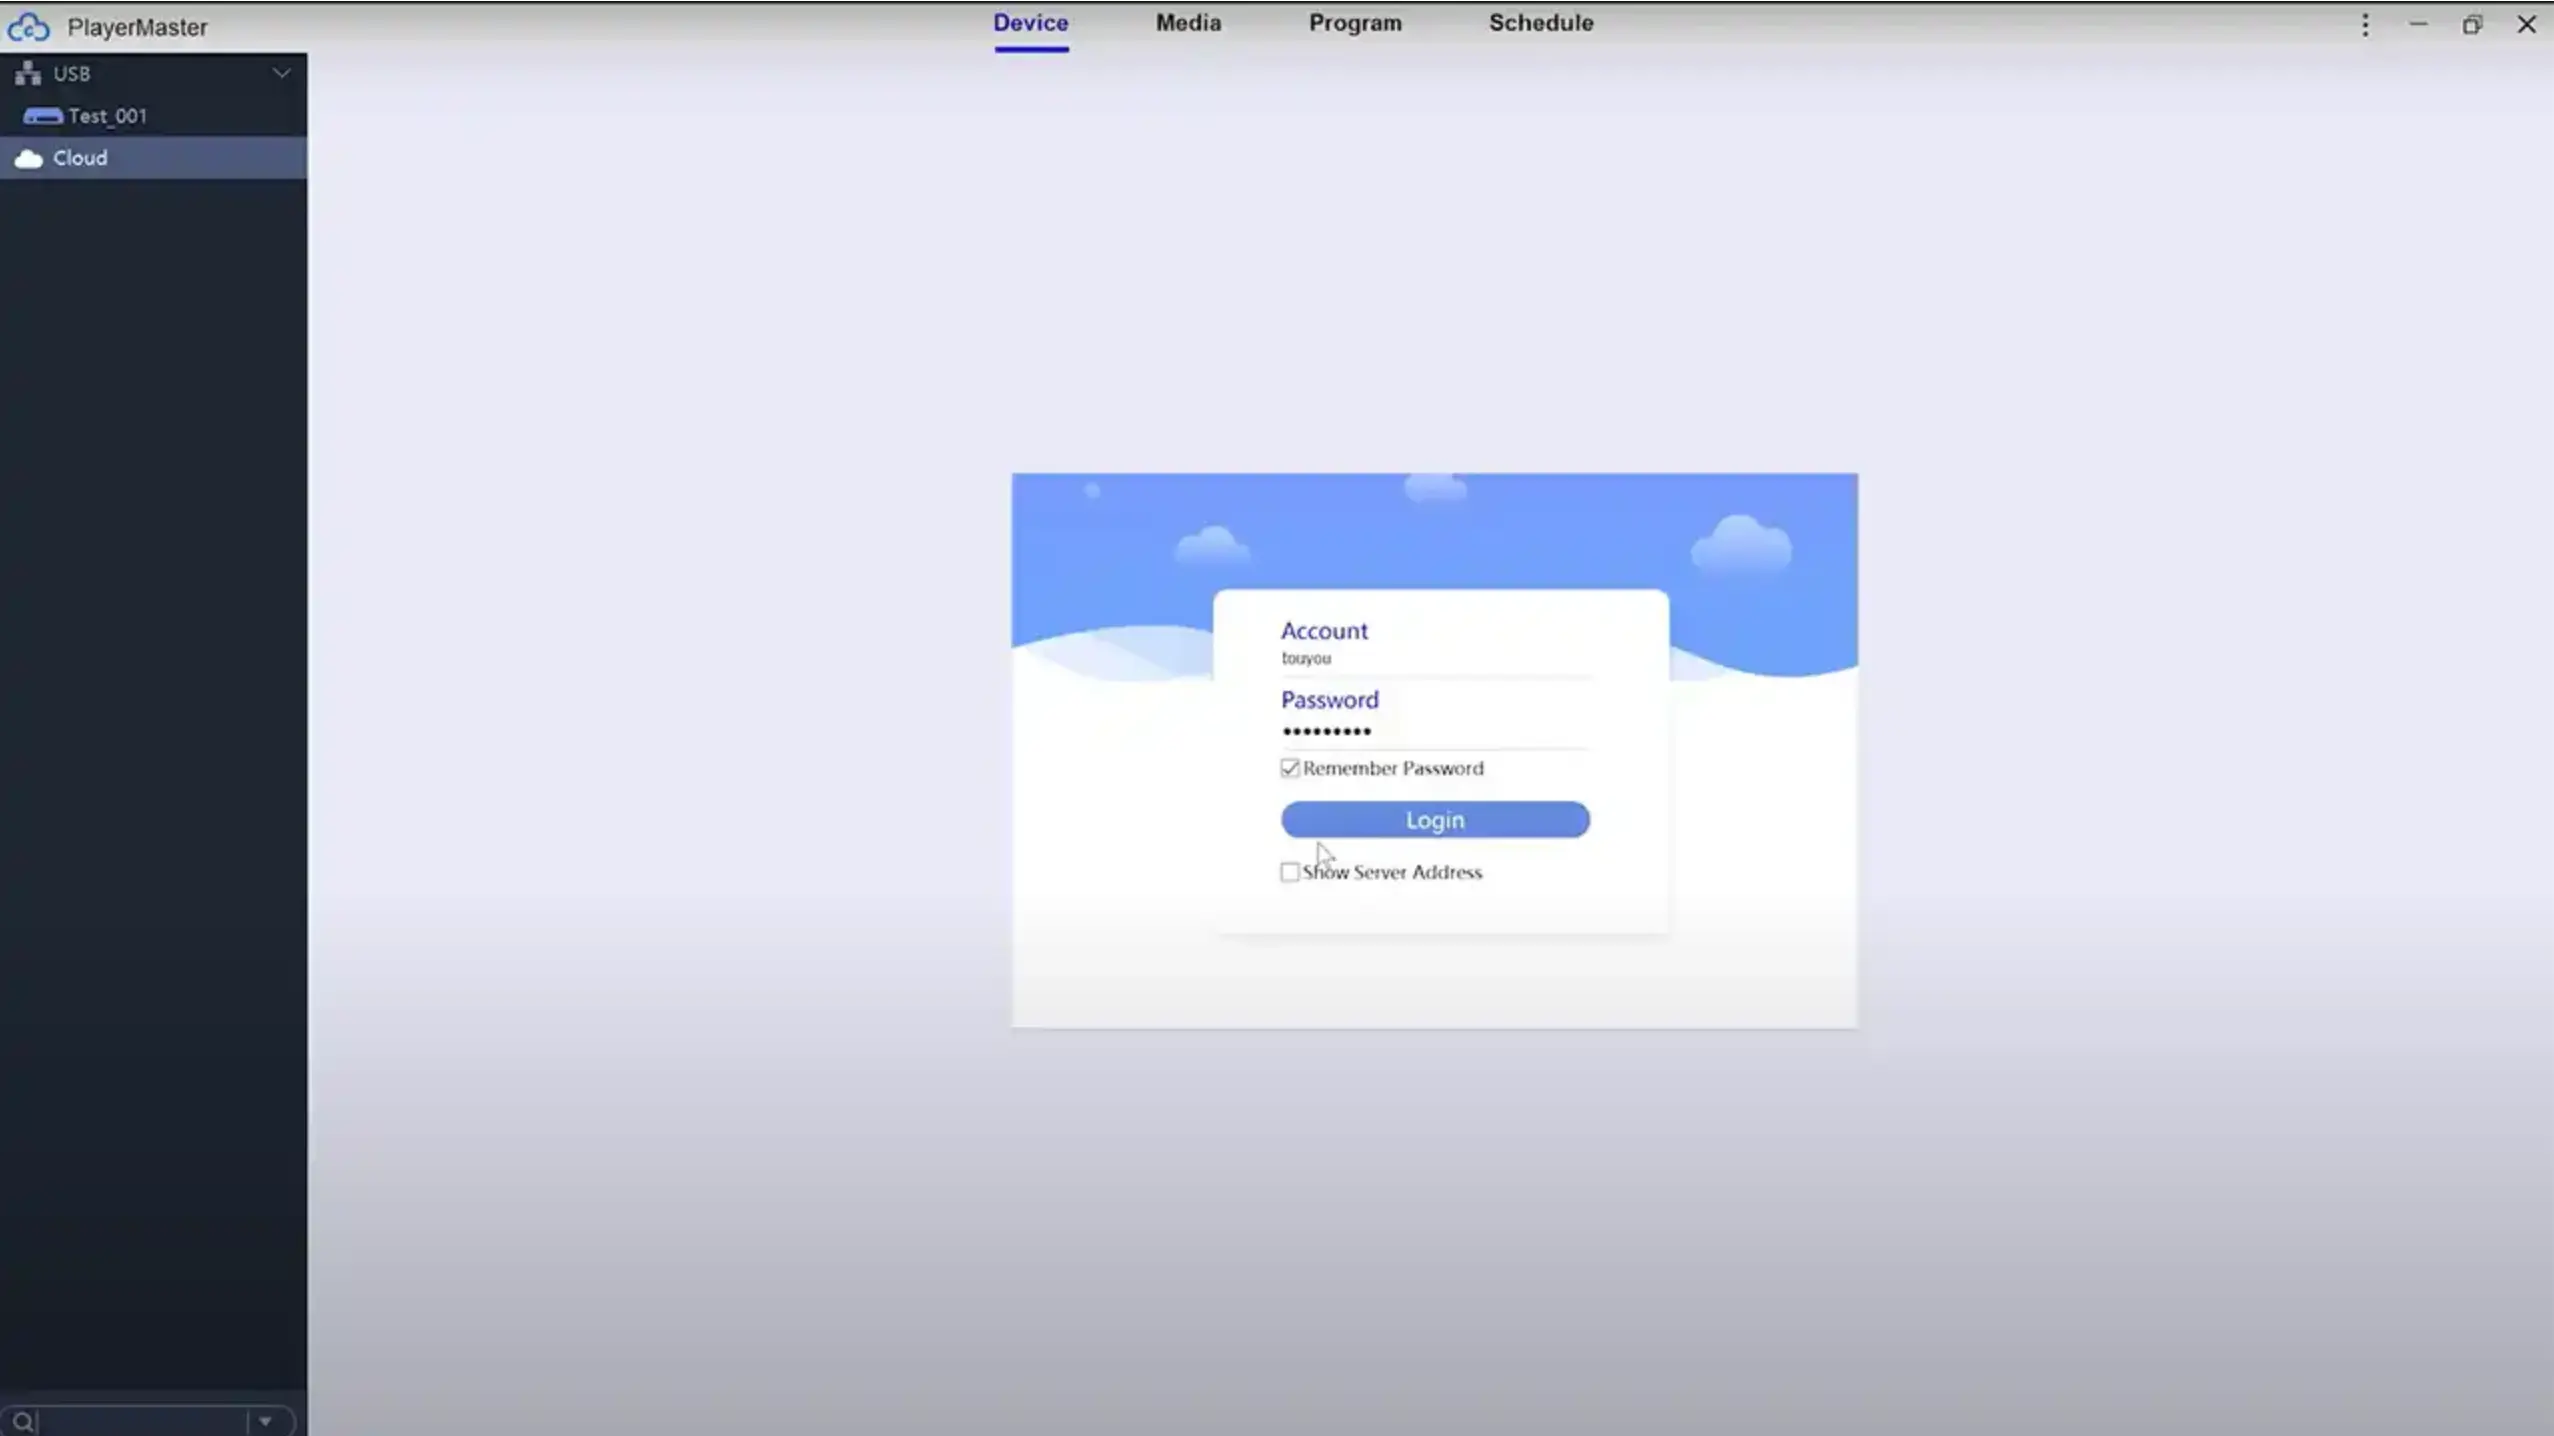
Similarly, you can click the bottom button to progress the corresponding function such as adjust volume, set time (Modify time and timezone), power management (Restart, Sleep, Wakeup), set language, monitor status, etc.
일정 프로그램 작성 및 게시
For creating and editing programs, first, we need to specify the program publishing mode, go to Software Settings, and select between LAN Mode or Cloud Mode.
Here we take LAN Mode as an example. Right-click LAN in the upper-left corner and select Refresh. After that, The blue icons under LAN indicate the normal connection of meida players. Note that when the icons are gray with an X attached, it means the connection failed, please check your network connection.
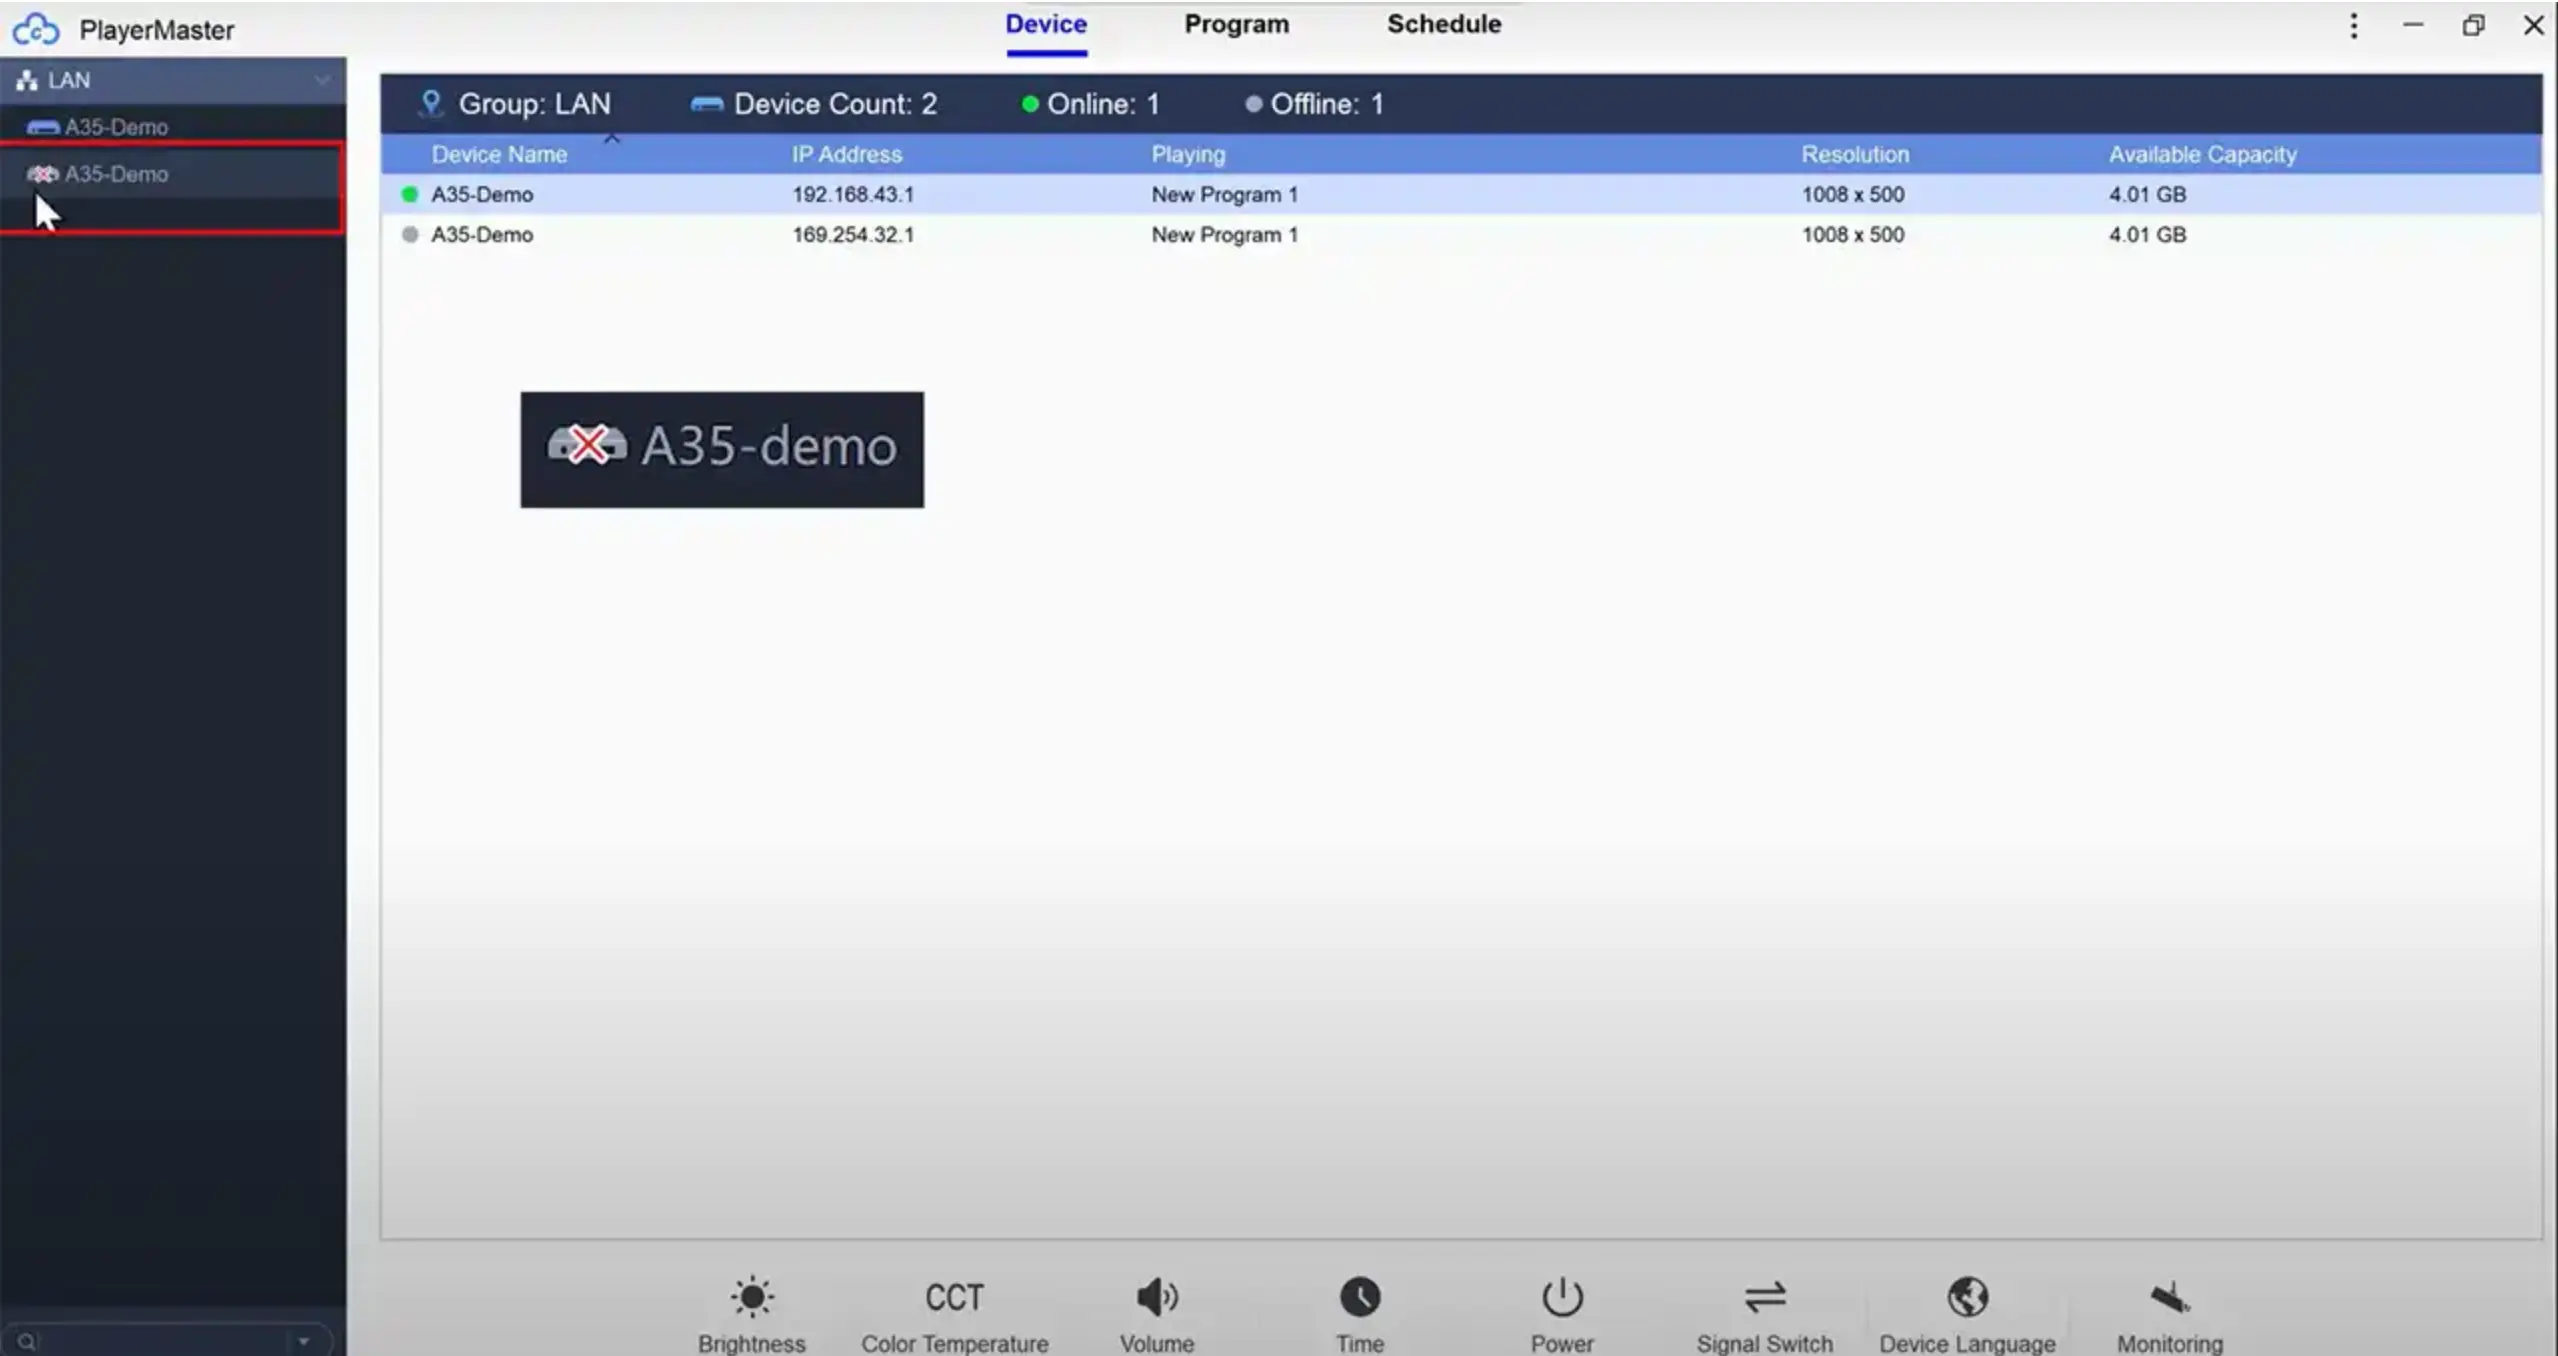
Once the connection is verified, next we proceed to create programs.
프로그램 생성
Select the “Program” tab and click on “New“.
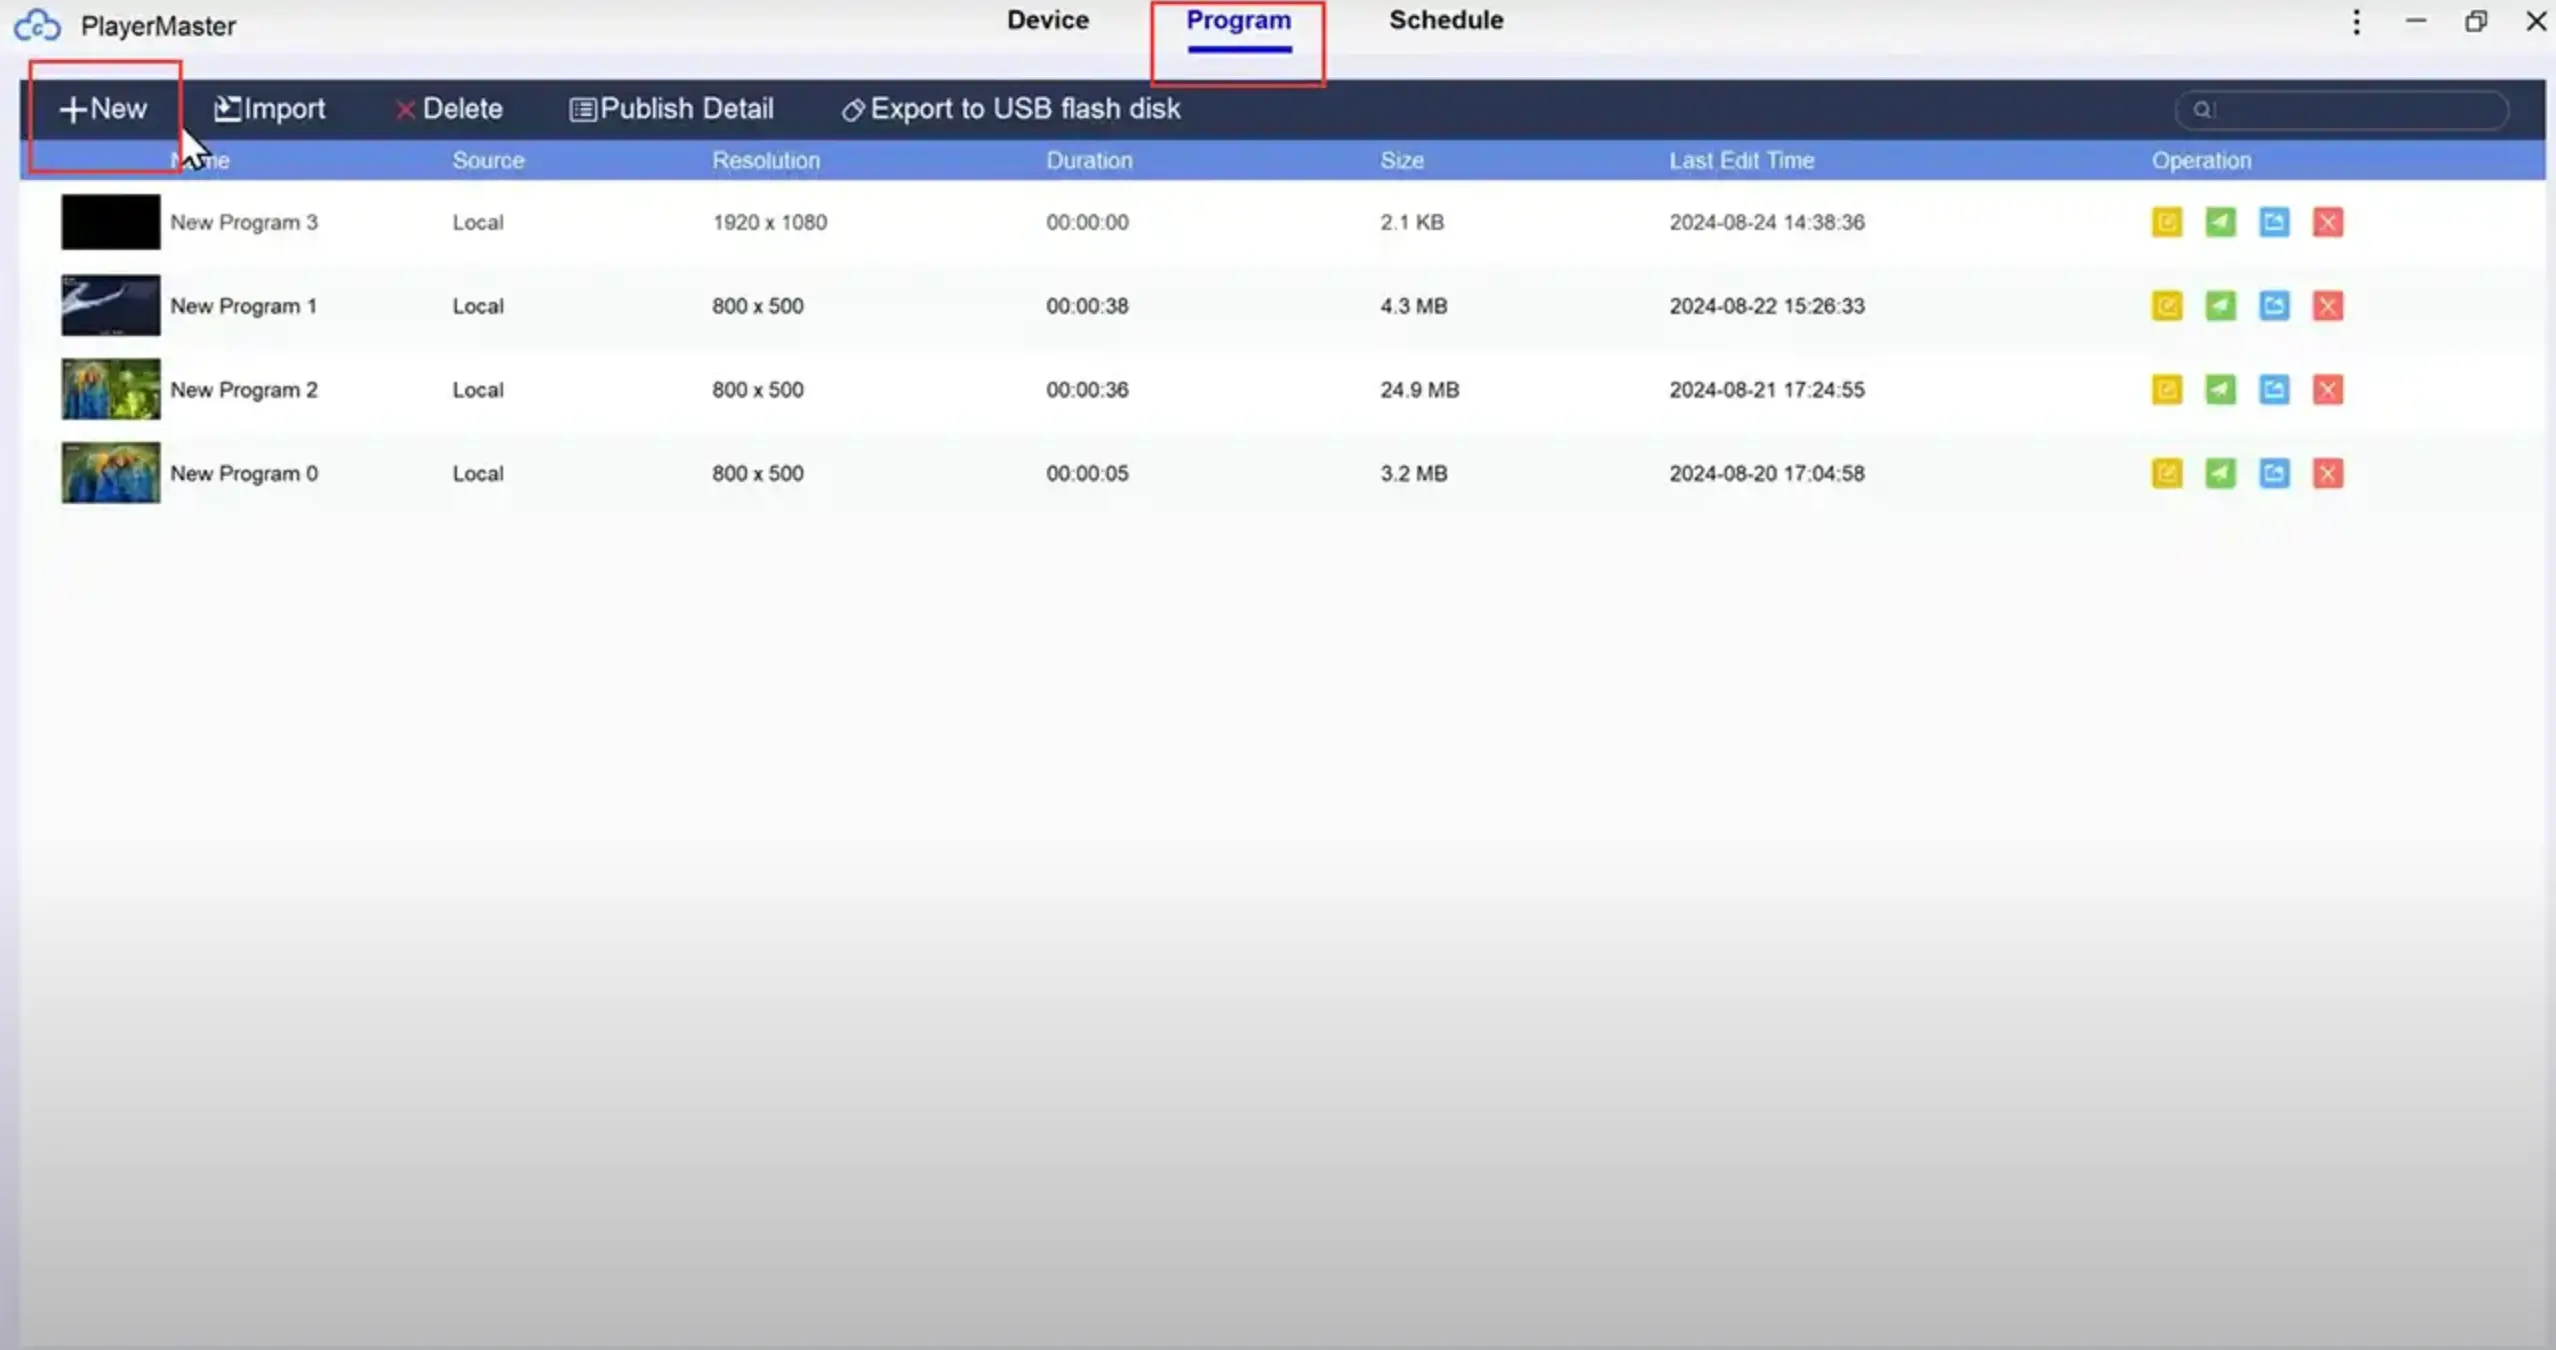
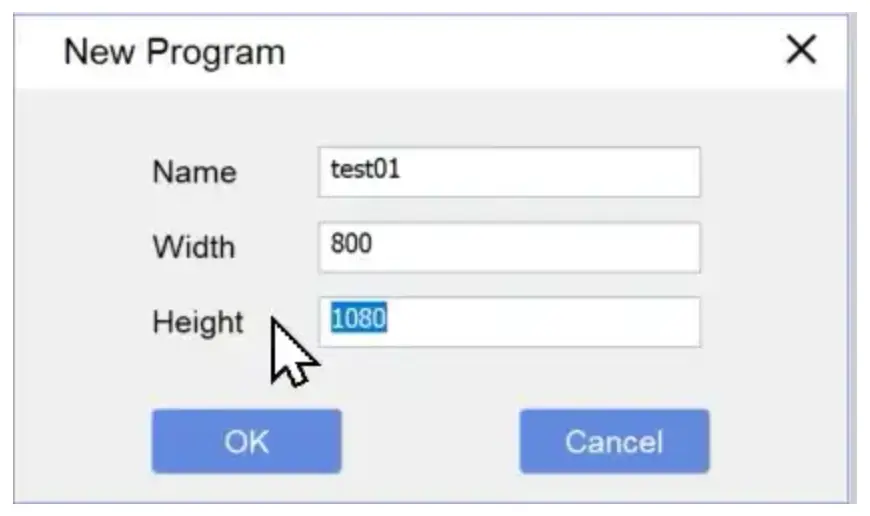
A new pop-up interface will be displayed to let you enter a program name in the field and set the program width and height according to the screen size. After you have entered the correct value, just click button “OK”
프로그램 수정
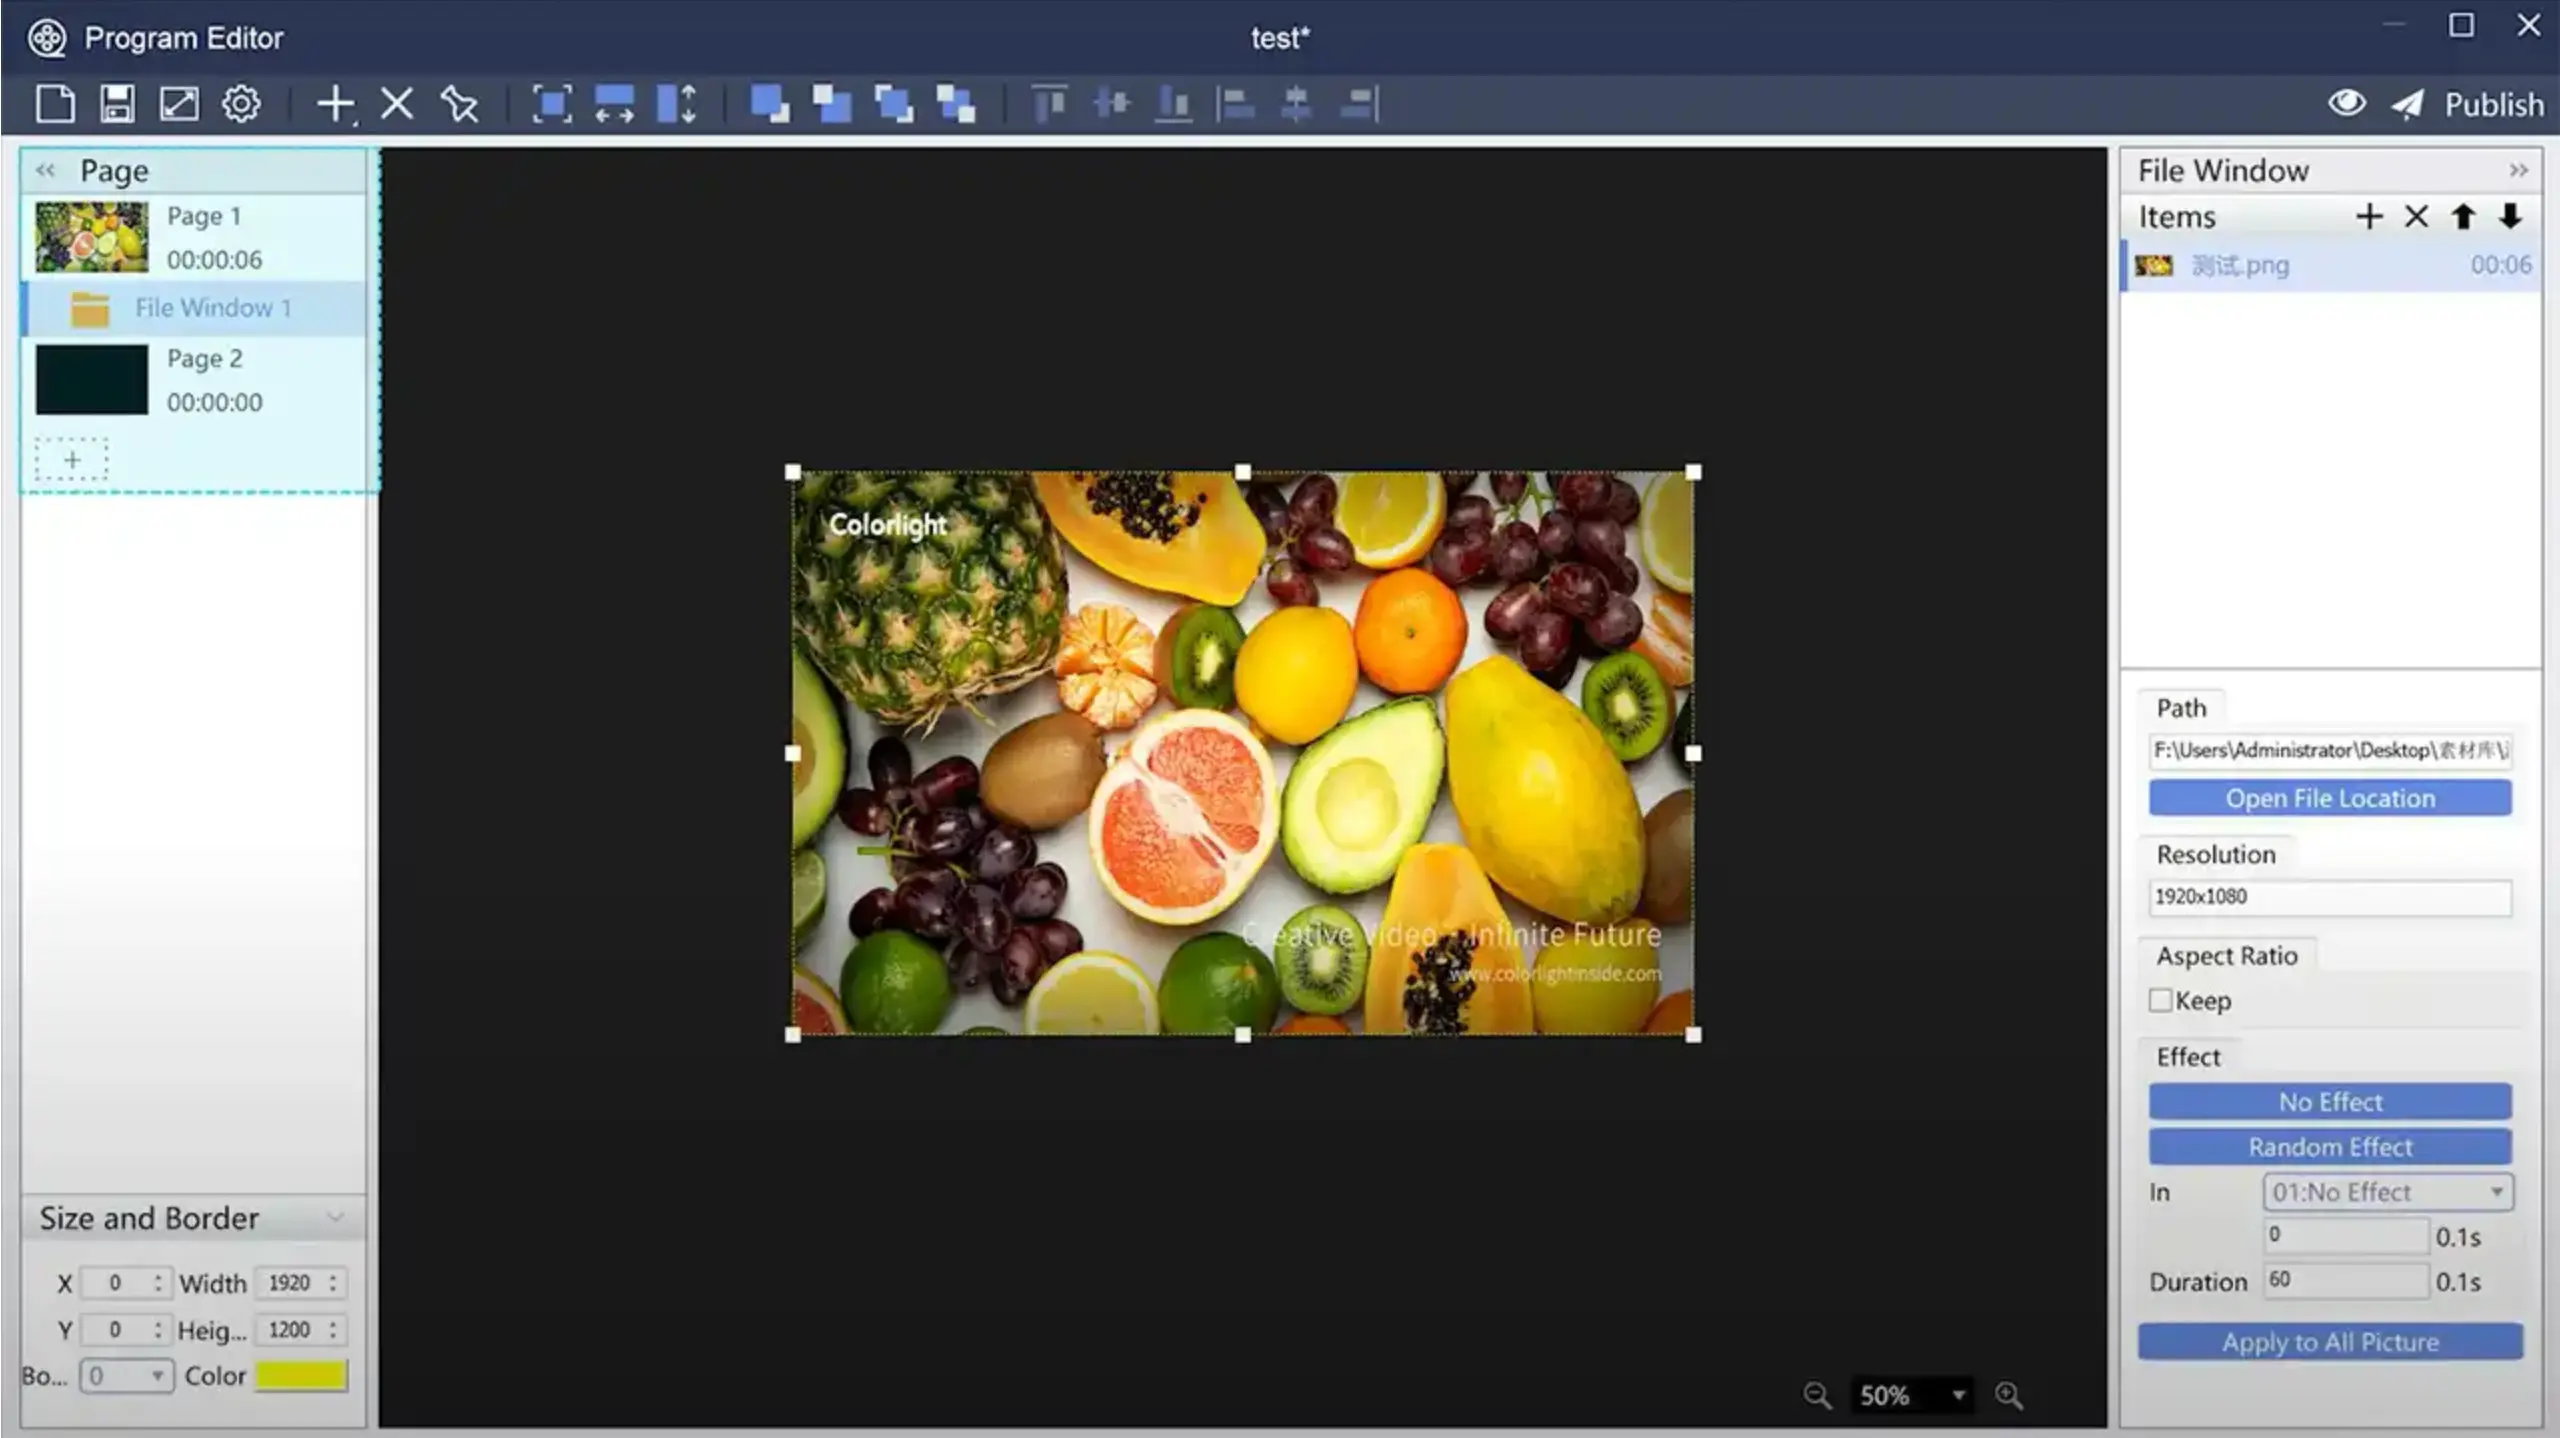
Next, you will reach the Program Editor interface, which consists of four main sections. The toolbar allows you to add, modify, and remove program windows, letting you tailor the program content to your preferences. In the upper-right corner, you’ll find the Preview and Publish buttons. On the left side, the panel displays the program page area, showing the program structure, including program pages and windows.
How to play the programs you create?
A program consists of multiple pages, with each page featuring one or more program windows. The program file plays in the sequence of the program pages, and all program windows on each page are displayed simultaneously. Within each program window, the materials are played in a sequential order.
Program Windown Creation
Click the “+” icon to add the desired type of program window from the available options. For example, to add a picture file, select “+” and choose “File Window“, then specify the image you wish to display.
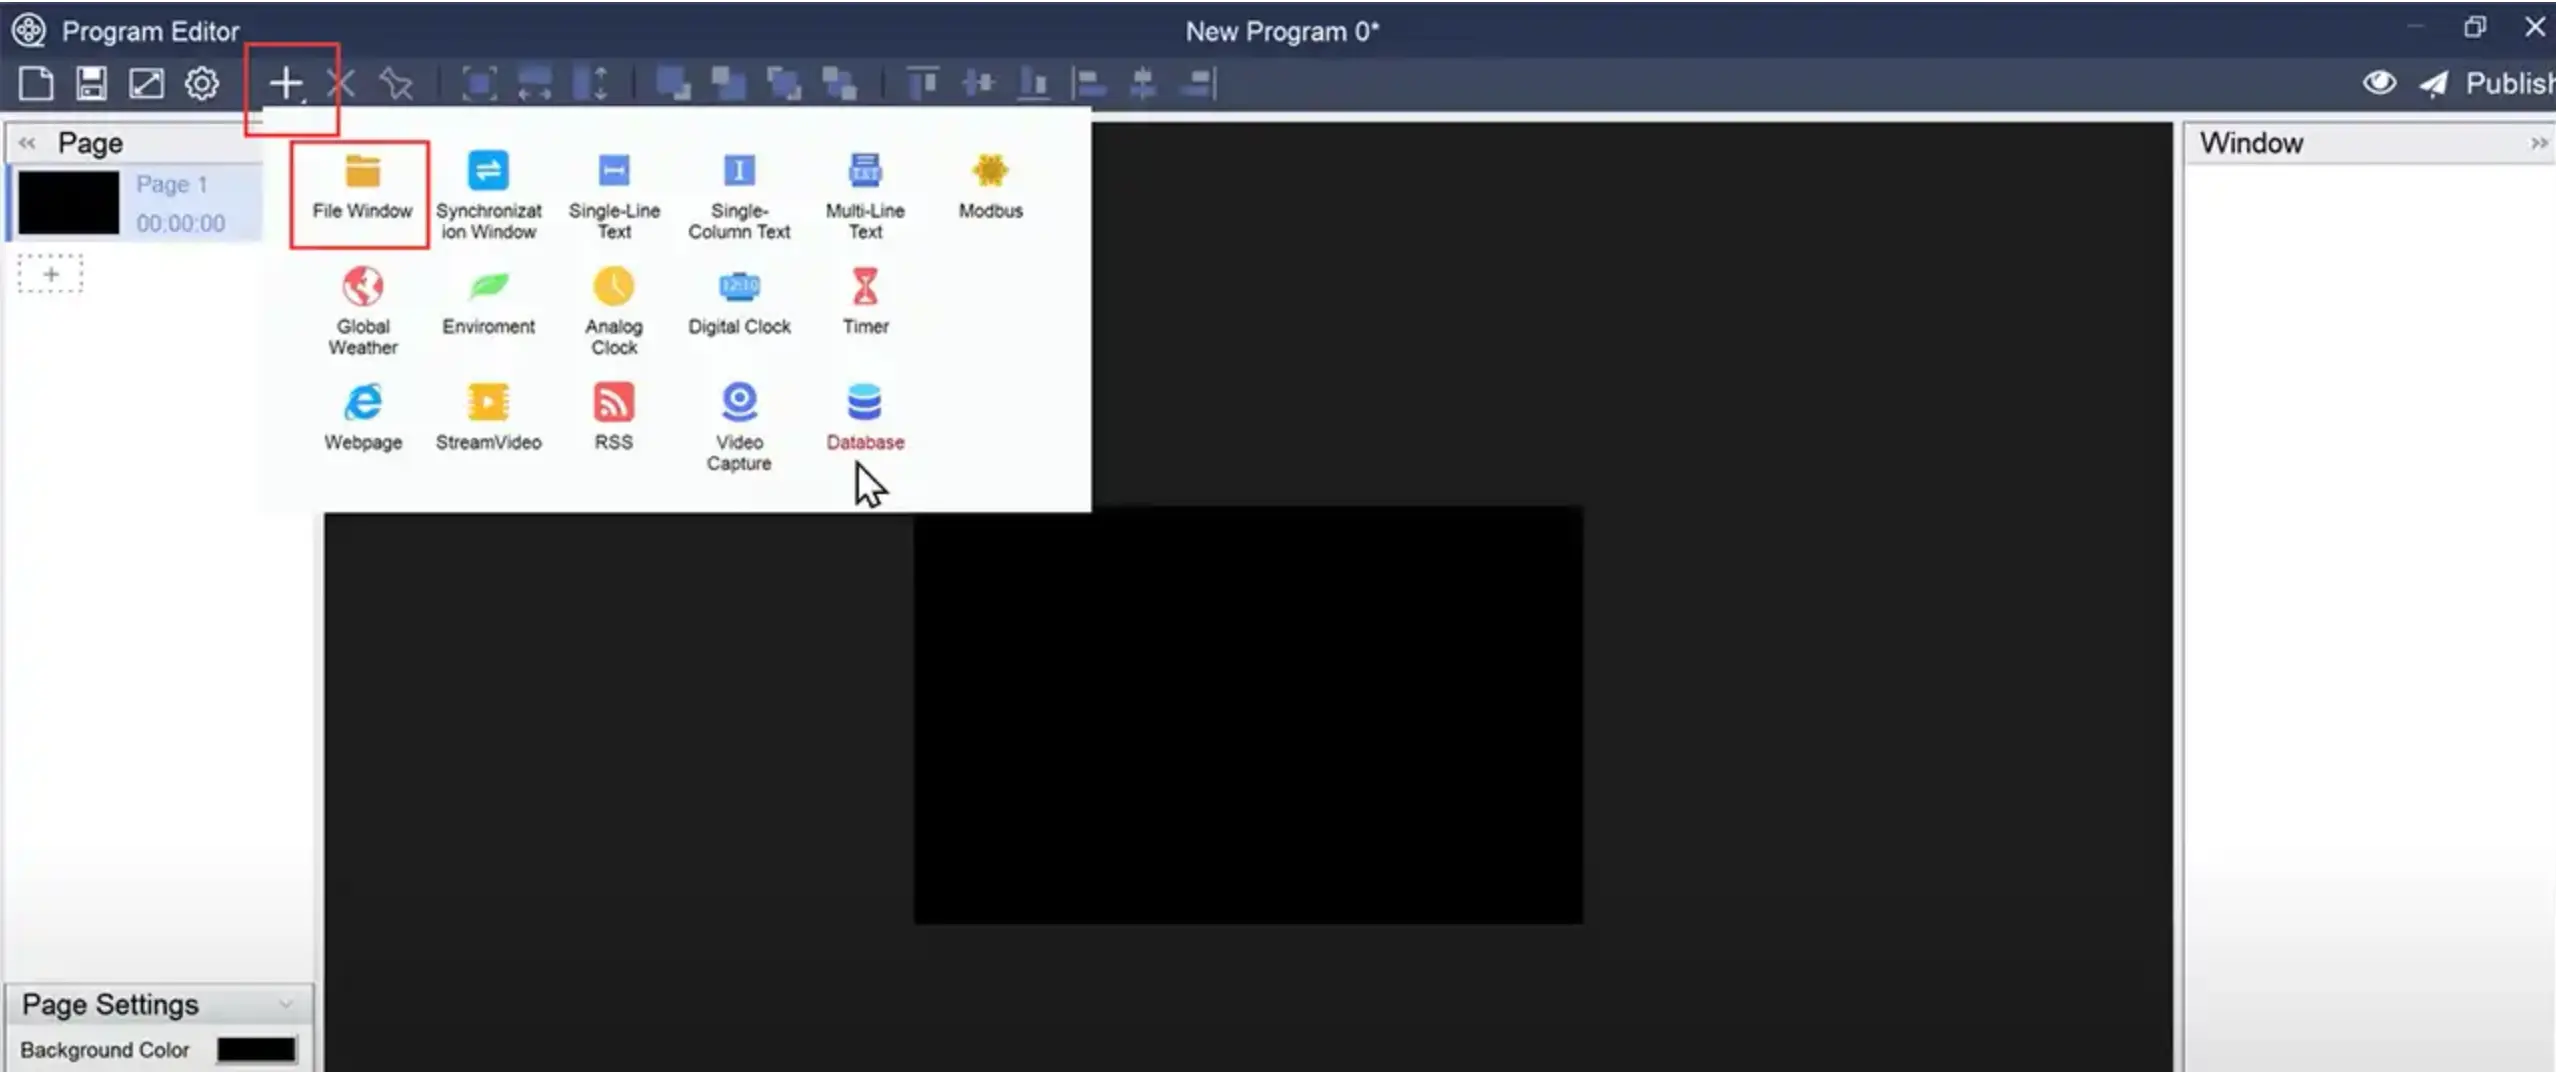
You can reposition the program window by dragging it, and adjust its size by dragging its corners. Alternatively, you can enter values in the lower-left panel to quickly adjust the window’s coordinates and dimensions, which is efficient for editing multiple windows.
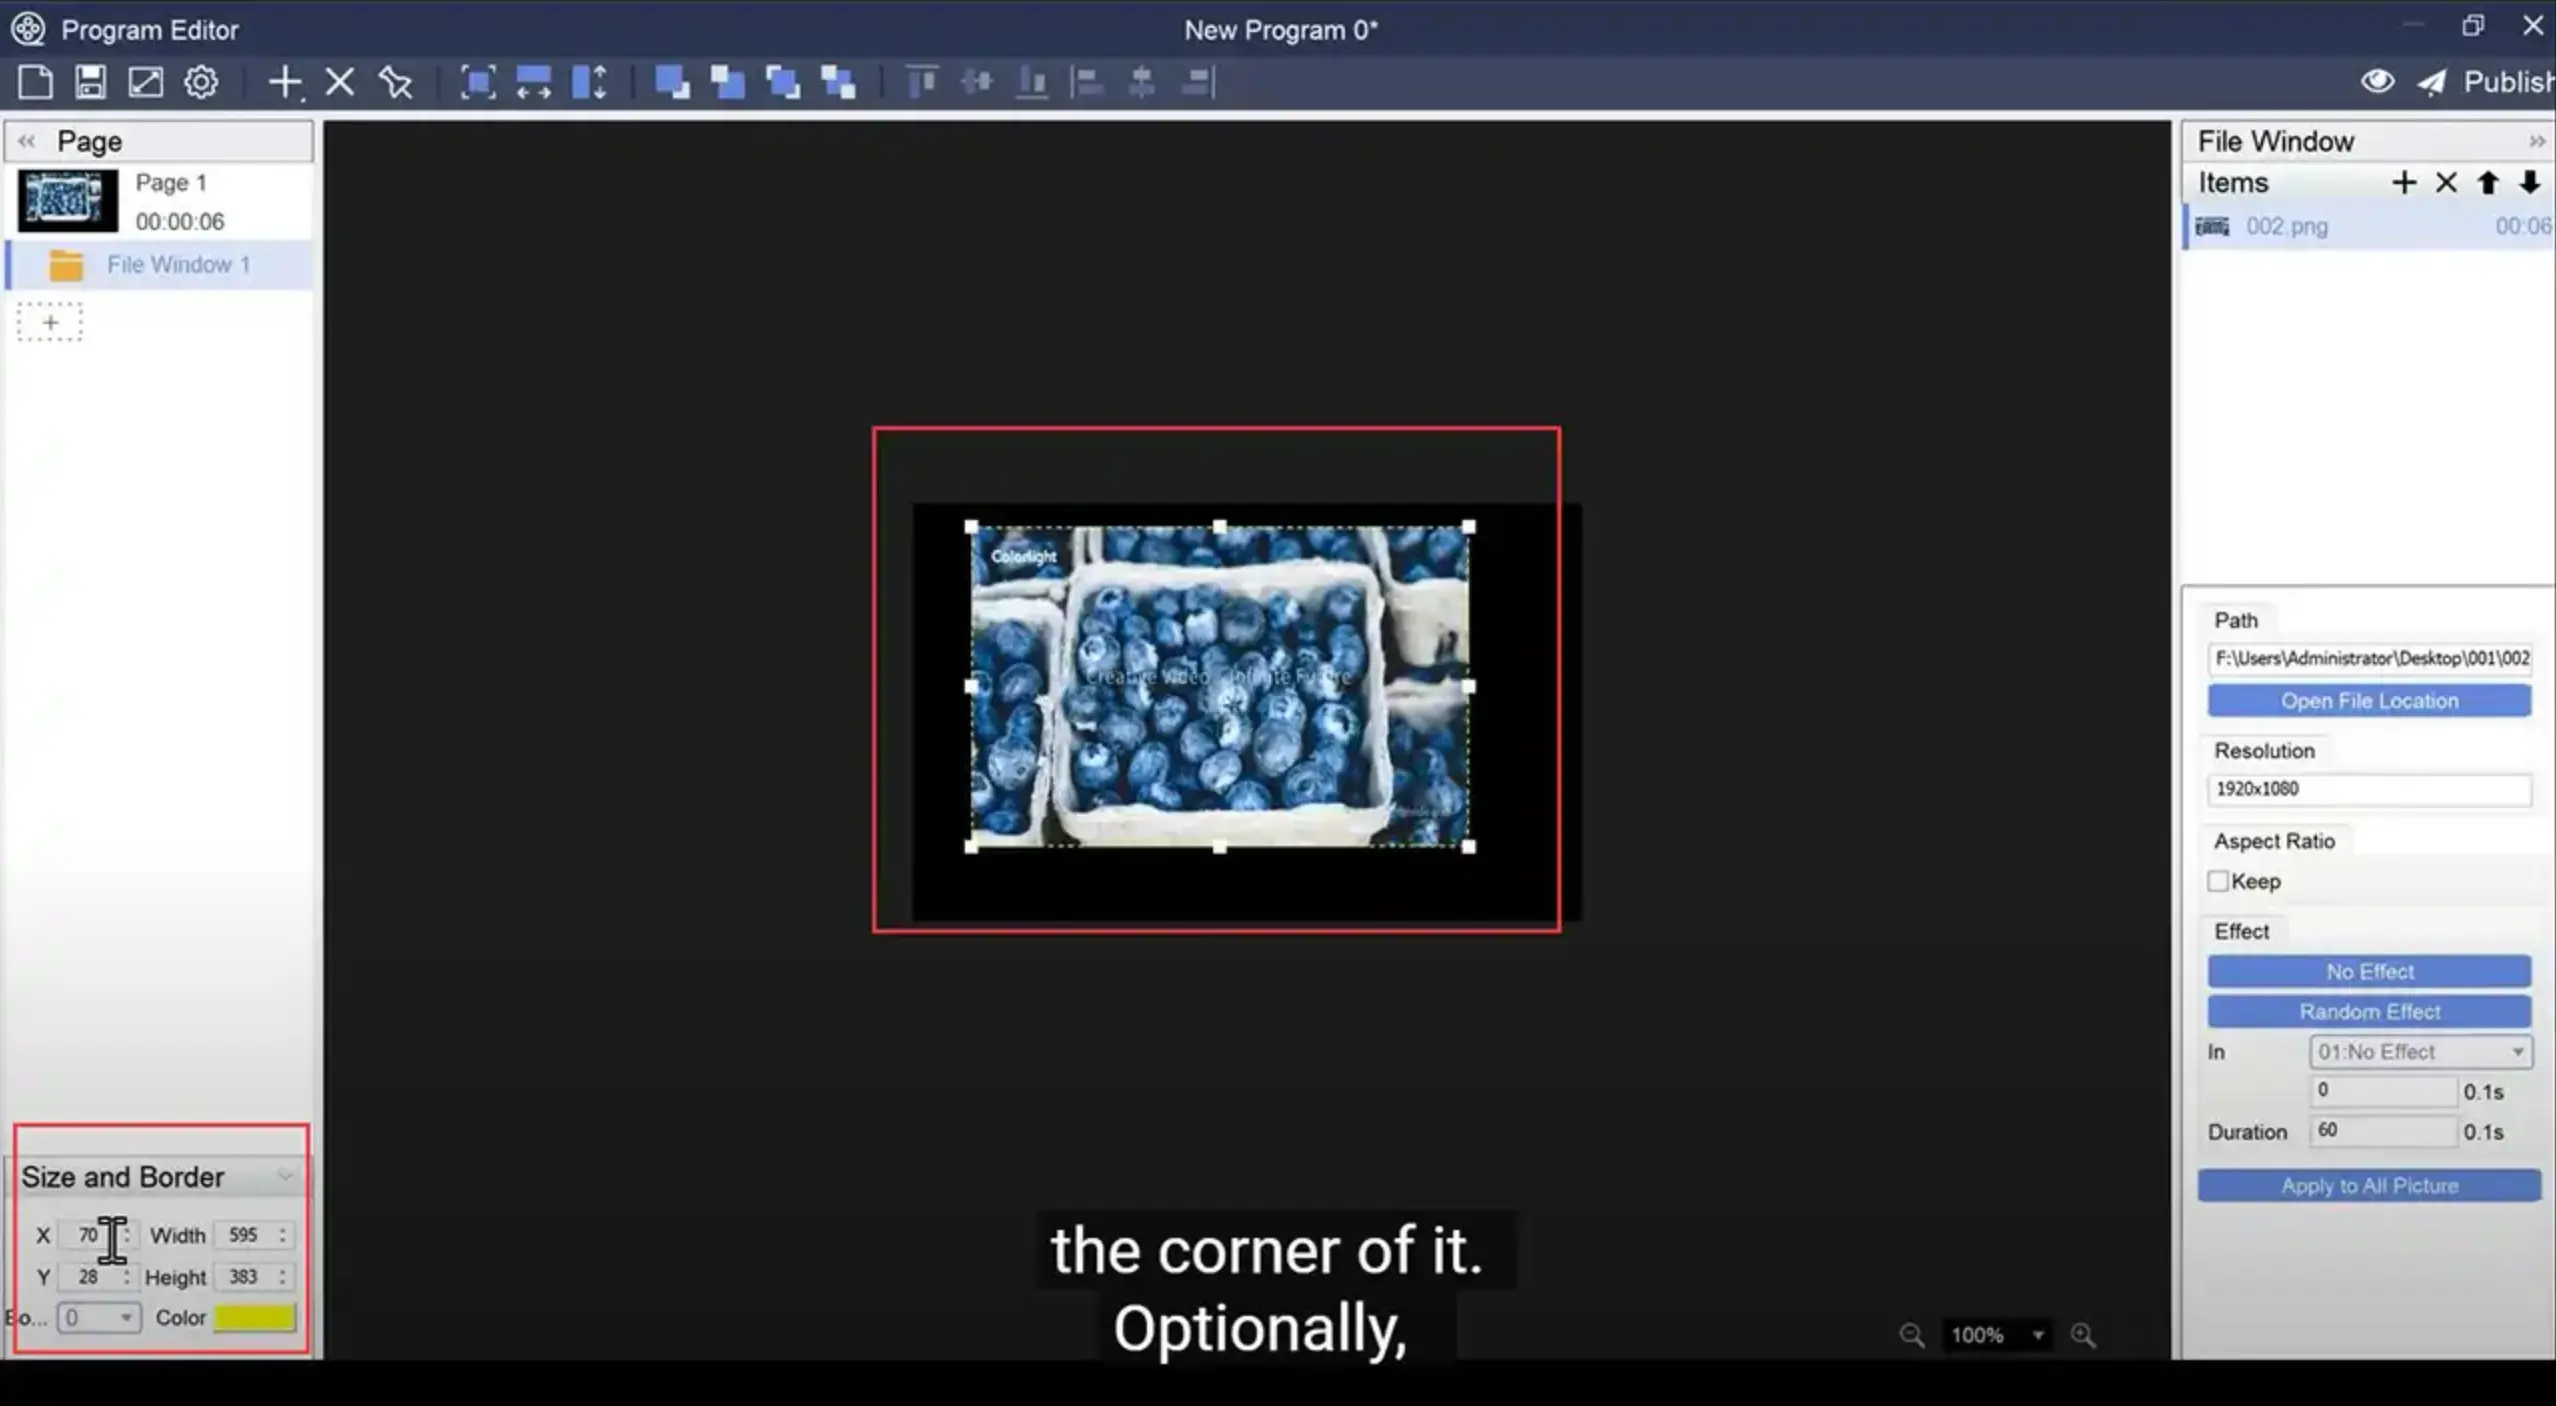
As you can see from the above image, in the lower-left panel, you can set the border width of the program using the drop-down menu and pick a border color using the color picker.
To apply a random entrance effect to the materials within the program window, select “Random Effect” in the Effect panel on the right, or customize the effect from the drop-down menu.
Program Page Creation
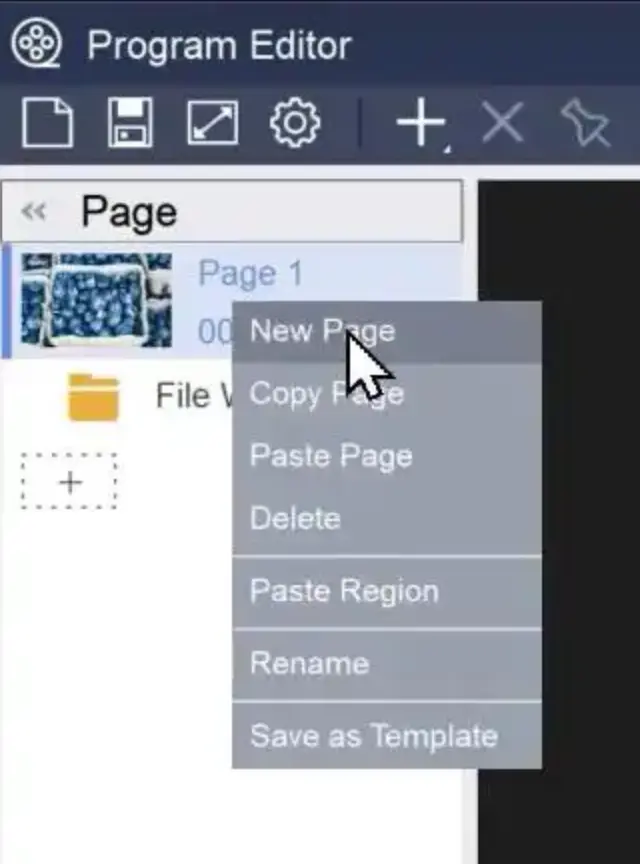
To add a new program page, right-click on an existing program page and choose “New Page” from the pop-up context menu.
표시 효과 미리보기 및 프로그램 게시.
After we have created the program, next we can click on “Preview” in the topper-right panel to check the display effect.
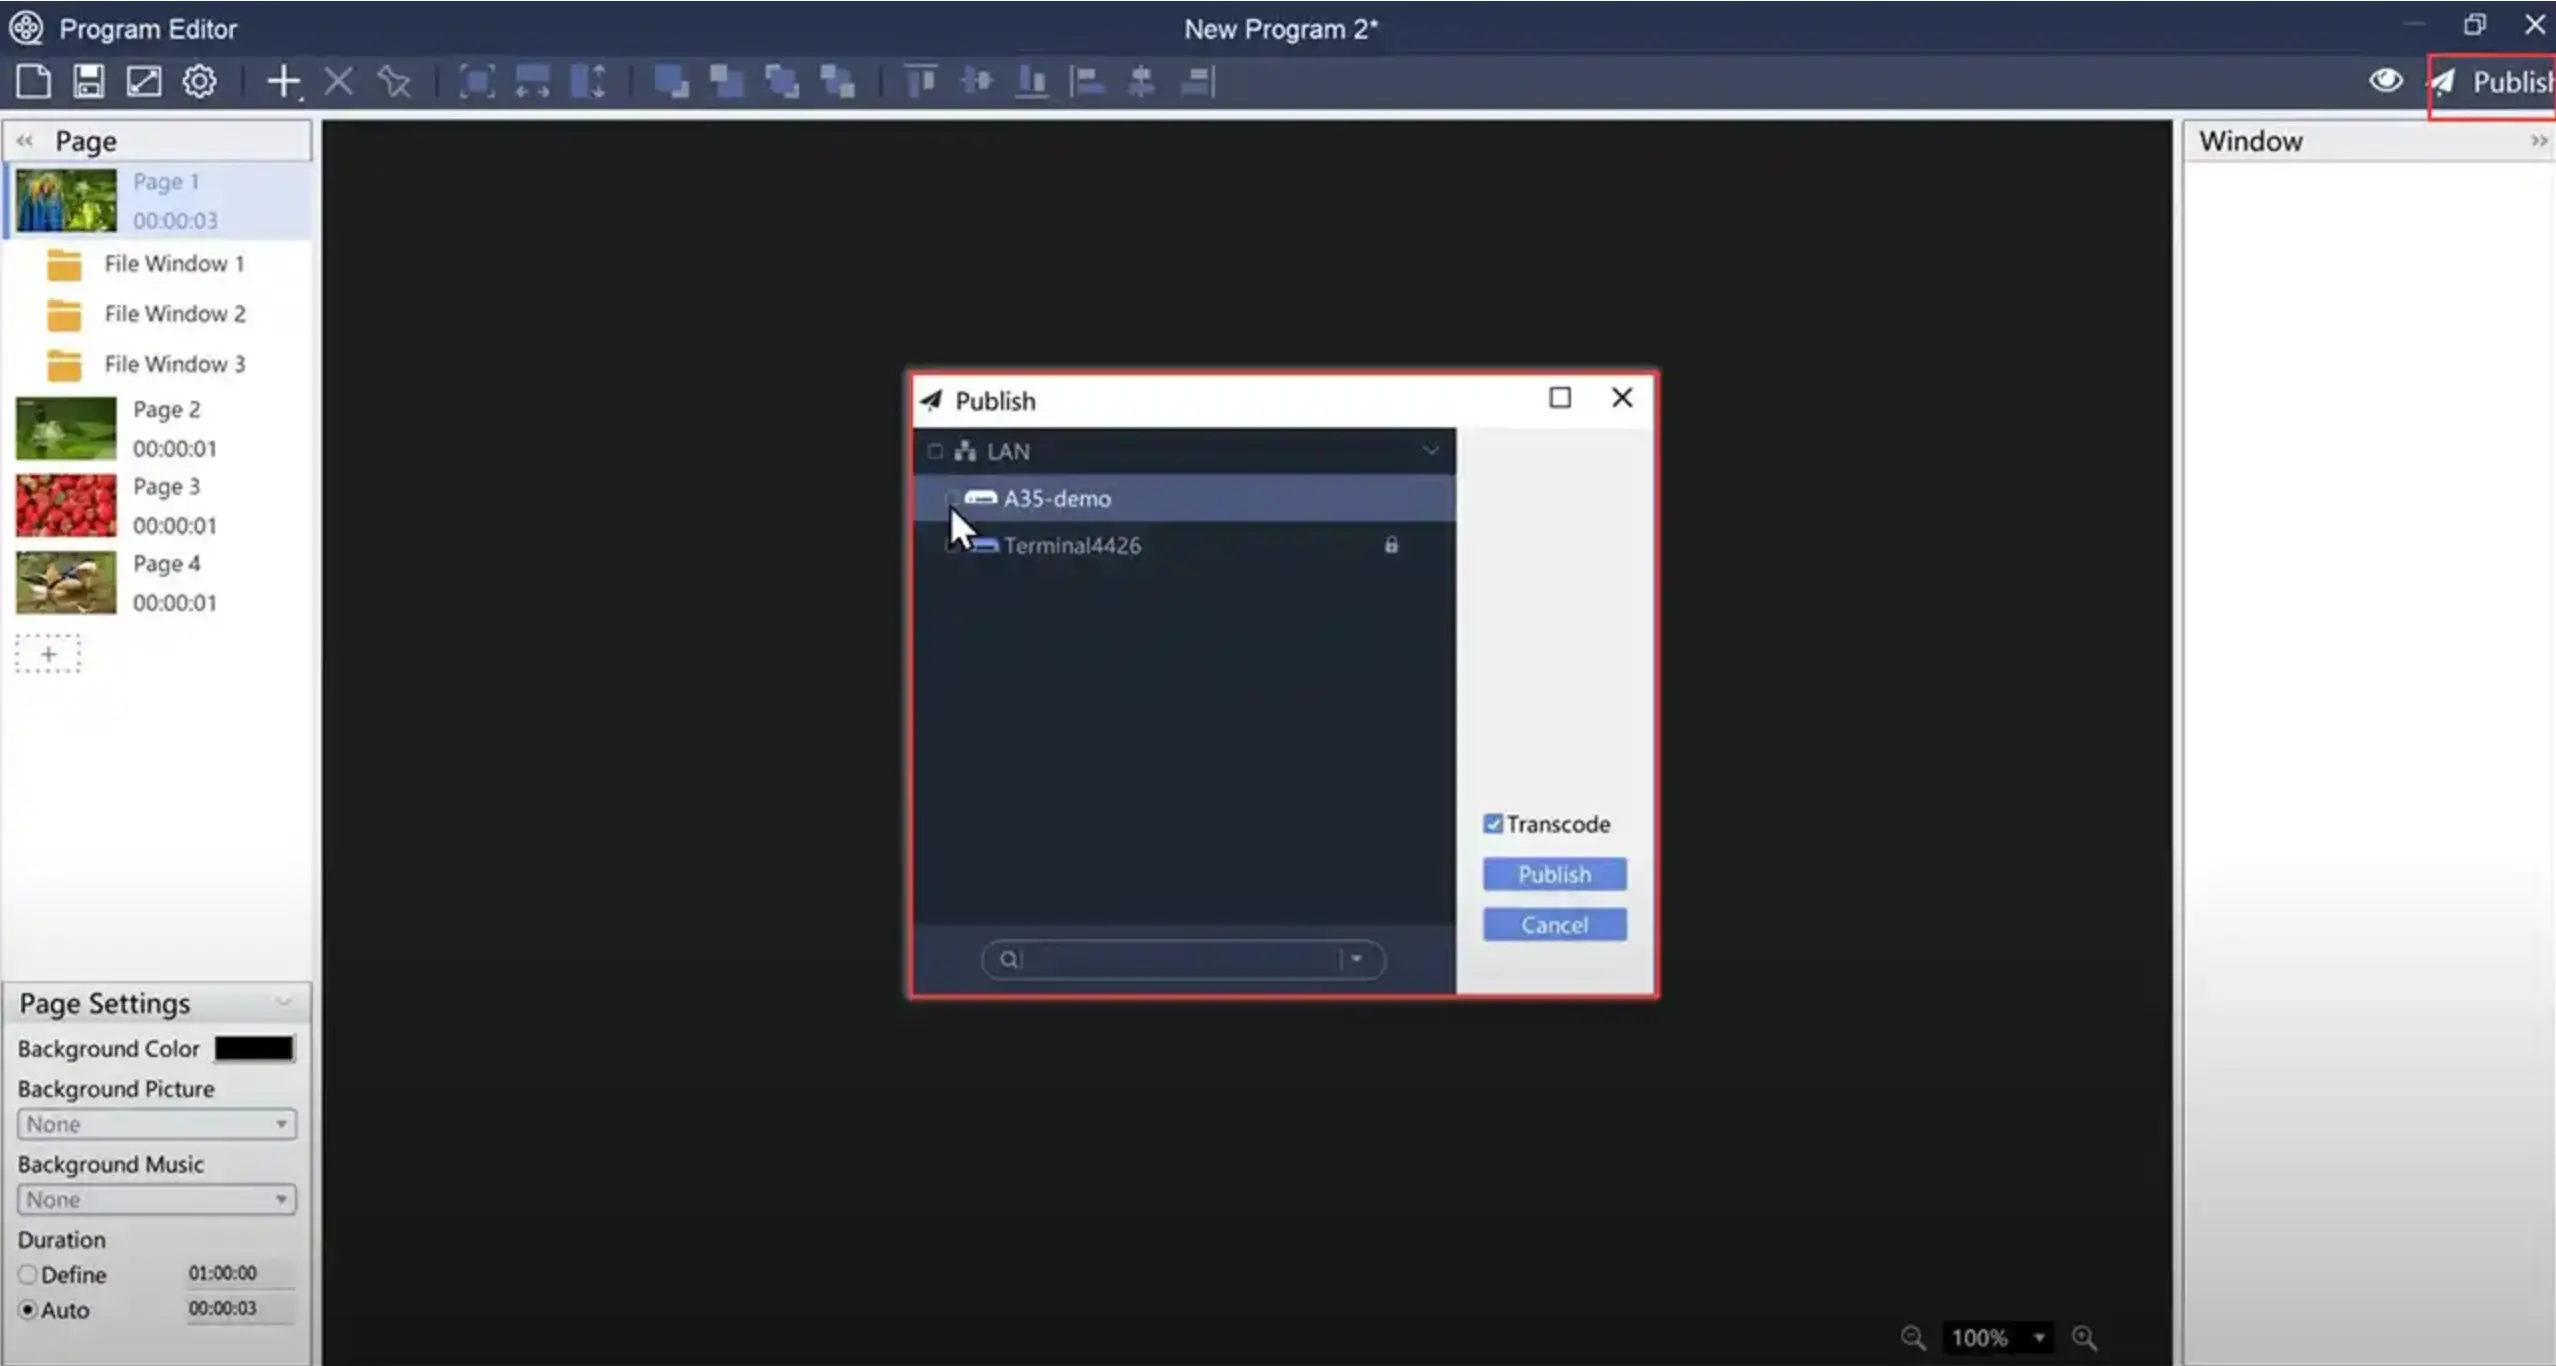
다음으로, “게시”을(를) 툴바에서 선택하십시오. 프로그램을 게시할 장치를 선택한 후 “게시”를 클릭하십시오. 프로그레스 바가 표시되어 프로그램 파일의 다운로드 상태를 확인할 수 있습니다.
화면에서 프로그램 콘텐츠가 올바르게 표시되는지 확인하기 위해 스크린샷을 가져올 수 있습니다. 방법은 다음과 같습니다: 장치 탭을 선택하고 스크린샷을 더블클릭하면 PlayerMaster에서 자동으로 갱신됩니다. 이후 스크린샷을 사용하여 디스플레이 효과를 확인할 수 있습니다.
프로그램 파일 관리
다음은 로컬 플레이어로 다운로드된 프로그램 파일을 관리하는 방법을 설명하겠습니다. 먼저 장치 탭을 선택하고 “프로그램 관리“.
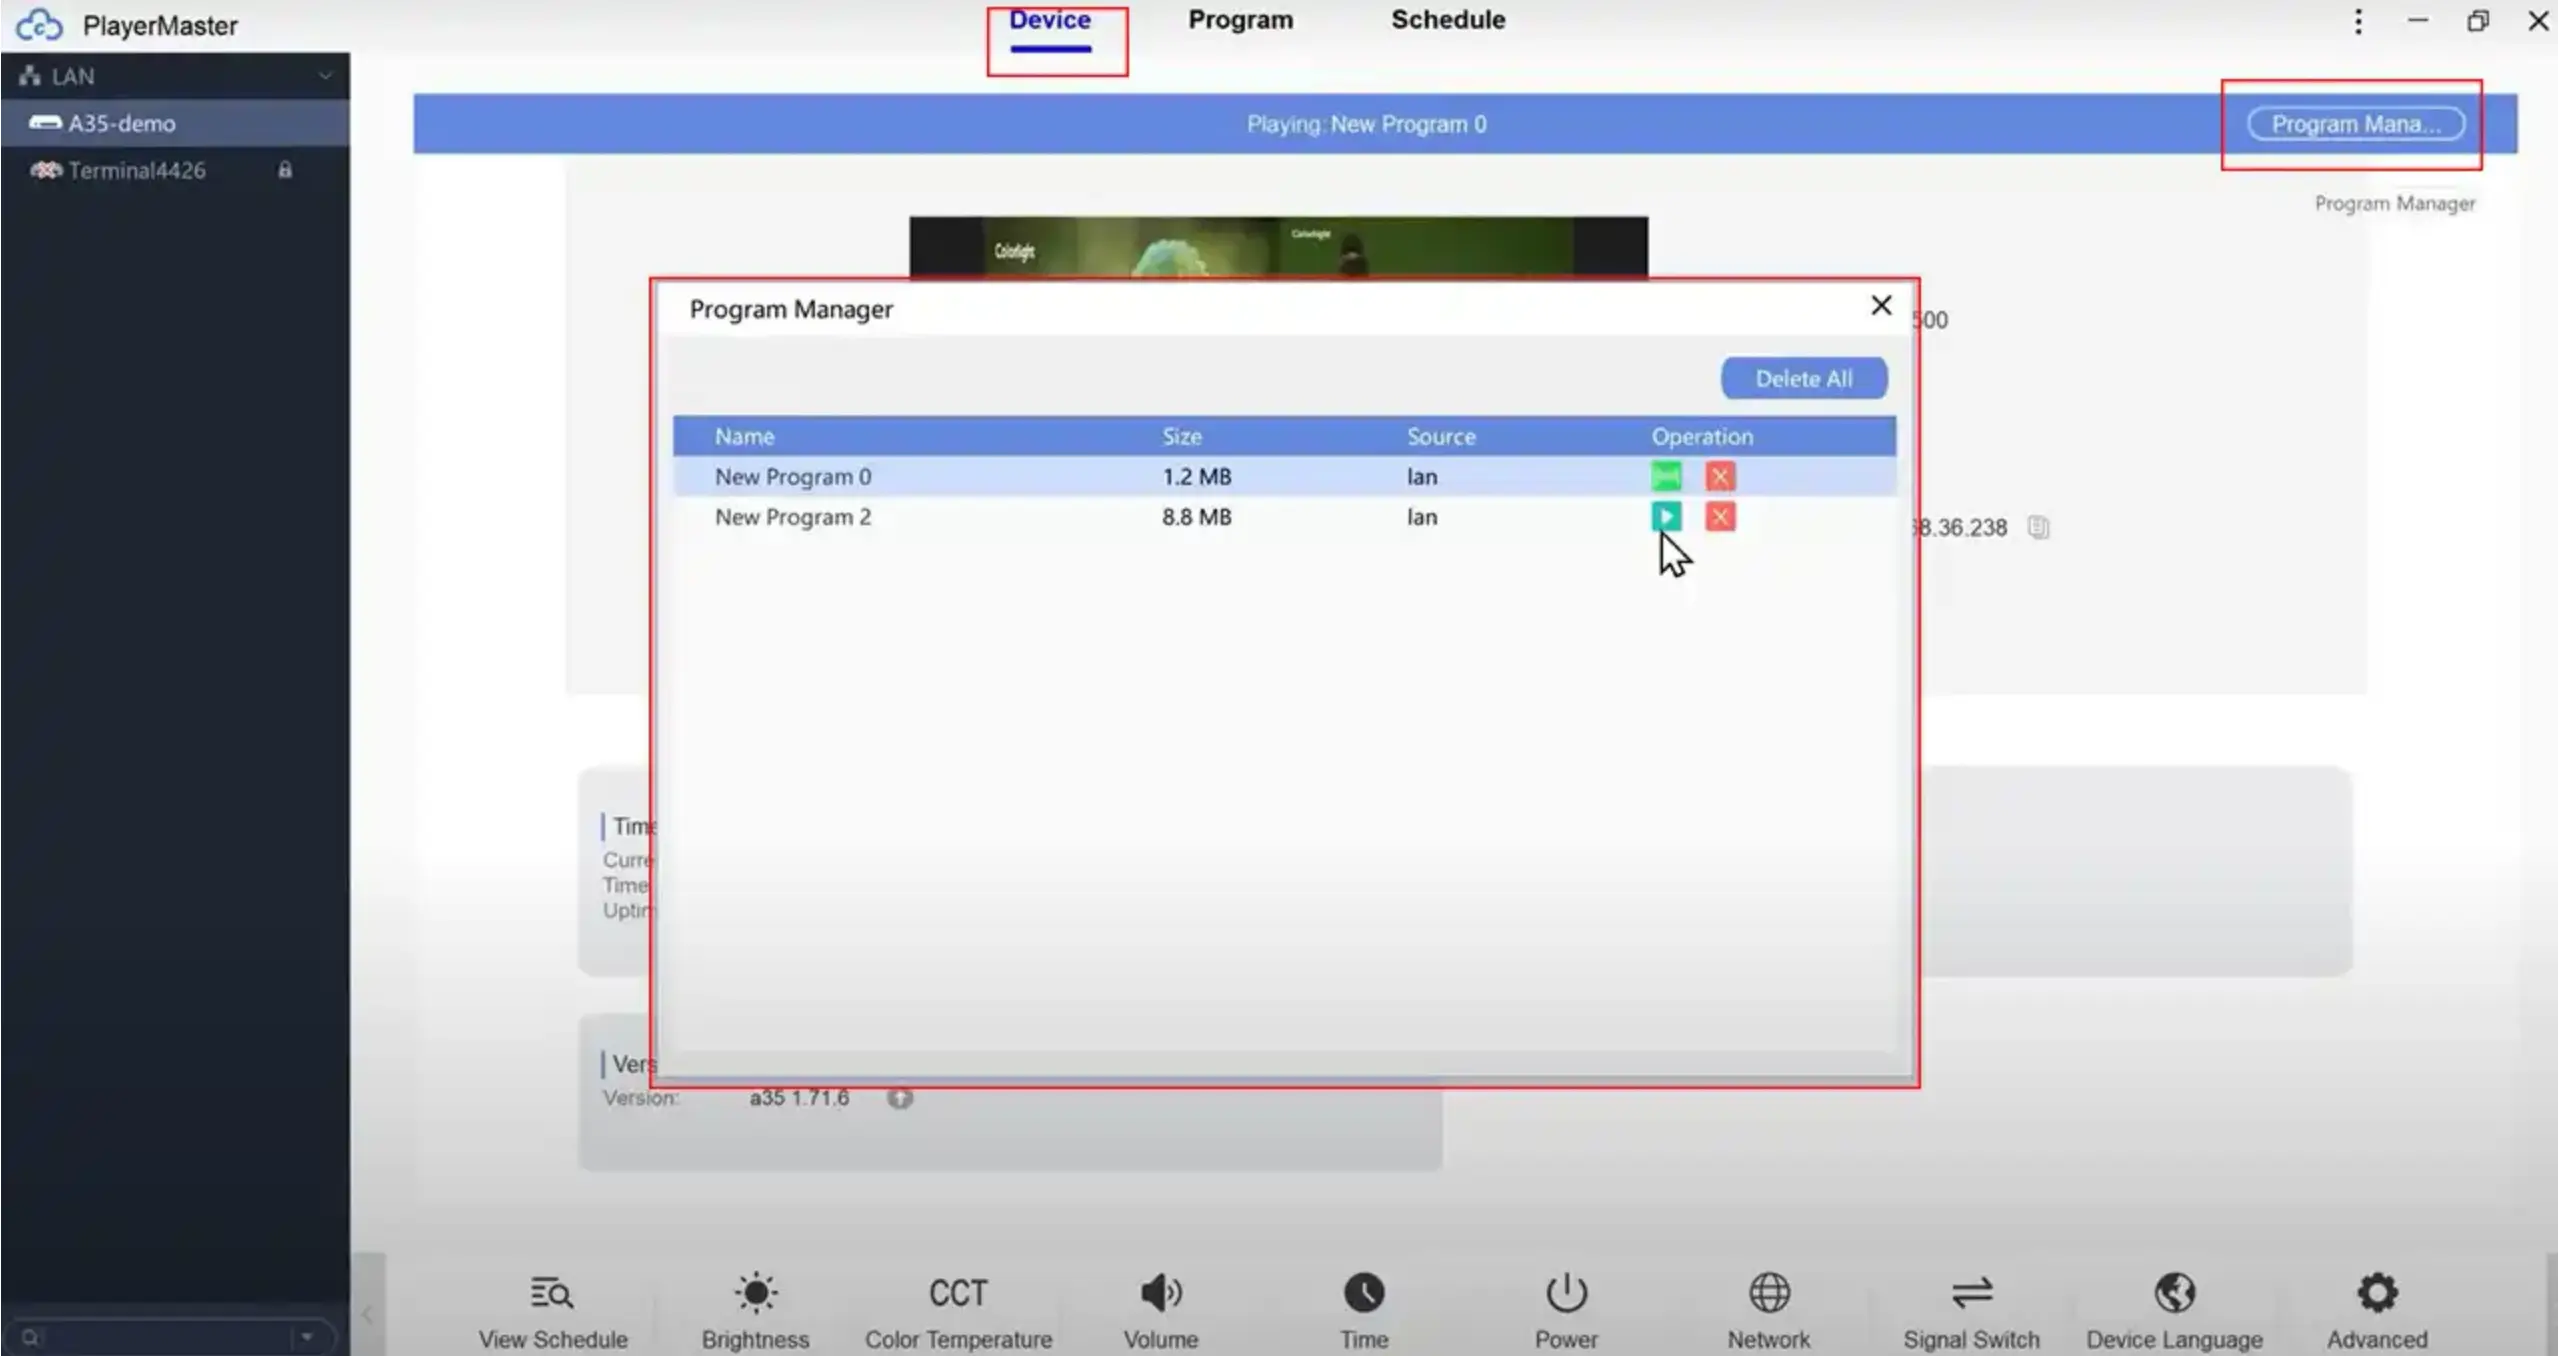
“의 오른쪽 위 상단에서 다운로드된 프로그램을 확인하십시오. “"재생",” 왼쪽의 \“ 프로그램 간 전환하려면 왼쪽의 \" 옵션을 클릭하세요. 로컬 프로그램을 삭제하려면 \"",“"삭제",“.
결론
"이 빠른 가이드에서 컬러라이트 미디어 플레이어의 핵심 기능을 소개했으며, PlayerMaster를 사용하여 미디어 플레이어를 효과적으로 설정하고 관리하는 방법을 시연했습니다.",.
"컬러라이트 미디어 플레이어를 사용하다가 추가 질문이 있으시면 언제든지", 연락 주십시오.
"공장에서 초기화가 필요하면", "컬러라이트 미디어 플레이어 초기화 가이드", "를 따라 플레이어를 다시 설정하십시오.".
관련 기사