

دليل سريع لاستخدام مشغلات ميديا من Colorlight
دليل سريع حول كيفية استخدام مشغلات ميديا من Colorlight مثل A100 وA200 وA35 وغيرها، مع دليل تشغيل سريع لمشغل ميديا شاشات LED.

هل تبحث عن طريقة فعّالة لإعداد وإدارة مشغّلات Colorlight Media لتلبية احتياجات اللافتات الرقمية لديك؟
توفّر مشغّلات Colorlight Media ميزات قوية تعزّز تقديم المحتوى، مما يضمن أن تكون شاشاتك جذّابة وفعّالة.
في هذا الدليل السريع للبداية، ستكتشف كيفية تكوين مشغّلات Colorlight Media وتحسين أدائها بسرعة. والأفضل من ذلك أن العملية بسيطة ولا تتطلب خبرة تقنية واسعة.
في هذا المقال
- ما هو مشغّل Colorlight Media؟
- الاتصال بالمكونات المادية والواجهة
- تكوين الشبكة اللاسلكية (WIFI) والهوائي
- الحصول على عنوان البروتوكول IP
- تحميل البرنامج
- الإدارة باستخدام PlayerMaster
- إنشاء الجدولة الدورية ونشر البرامج
- إنشاء برامج
- تحرير البرامج
- معاينة تأثير العرض ونشر البرامج.
- إدارة ملفات البرامج
- الخاتمة
ما هو مشغّل Colorlight Media؟
معظم مشغلات الوسائط من Colorlight هي أجهزة شبكات سحابية مصممة لتسليم المحتوى بكفاءة عالية. تدعم هذه المشغلات فك ترميز الأجهزة والإخراج عالي الدقة، مما يسهّل توزيع الوسائط بسلاسة. وبتأسيسها على منصات خدمات سحابية قوية من Colorlight، تُمكّن مراقبة الأجهزة بكفاءة، وإنشاء البرامج، والجدولة، والنشر المركزي، والإدارة متعددة المستويات.
بصفتها رائدة في تقديم تقنية شاشات LED، تقدّم Colorlight مجموعة متنوعة من نماذج مشغلات الوسائط لتلبية متطلبات مختلفة. إليك نظرة سريعة على بعض الخيارات الشائعة:
- A100
- A200
- A35
- A2K
- A4K
- C3Pro
- وكثير من النماذج الأخرى
الاتصال بالمكونات المادية والواجهة
باستخدام مشغل الوسائط LED من Colorlight A200 كنموذج، إليك نظرة على واجهته واتصاله الأساسي بالمكونات المادية مع شاشة LED:
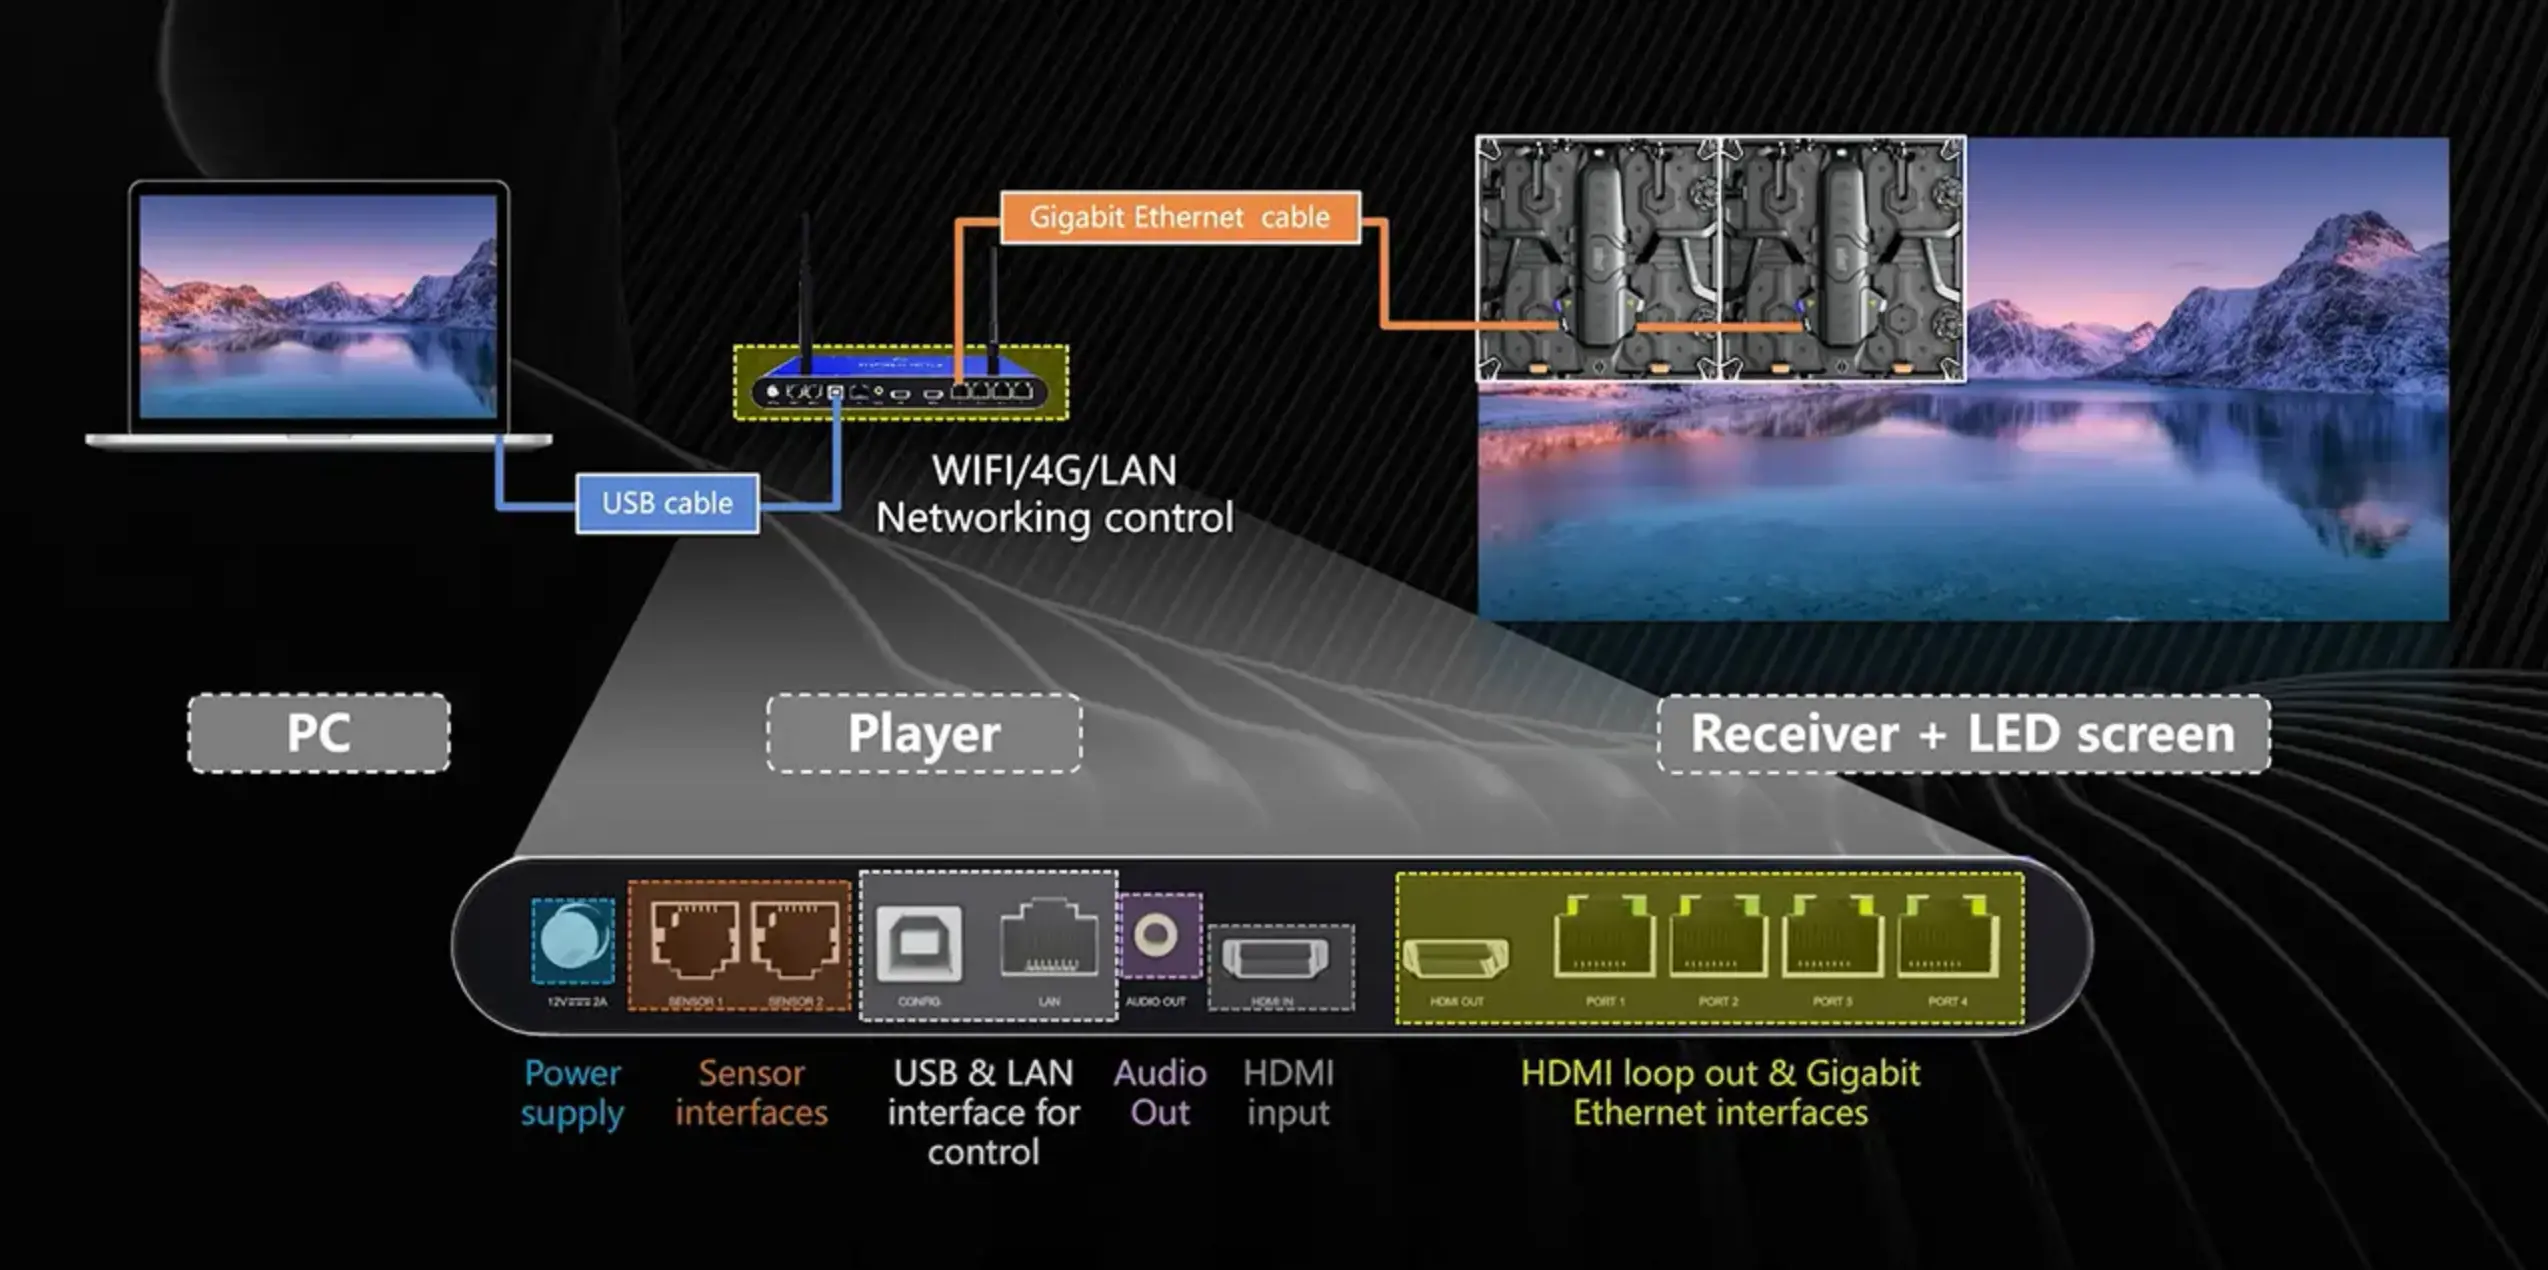
كما هو موضح في الصورة، يدعم مشغل الوسائط منفذ USB للتحكم به من جهاز كمبيوتر للتحكم، أو يدعم التحكم عبر شبكة WIFI/4F/LAN. وتشمل المنافذ الرئيسية:
- موصل الطاقة: يعمل المشغل بتيار 12 فولت مستمر مع تصميم لولبي مقفل لتعزيز الاستقرار.
- واجهات المستشعرات: منفذان RJ11 لاتصالات المستشعرات التي تراقب الظروف البيئية للشاشة.
- USB Port: For direct connectivity to computers via USB cable, facilitating control.
- Ethernet Port: A 100Mbps port enables control over a Local Area Network and access to cloud services.
- Audio Outputs: A 3.5mm audio output for stereo sound.
- HDMI Input: HDMI video input port which is used to input the video signal source when the player is in sync working mode
- HDMI loop port and Ethernet port: which is used to output the HDMI signal and Ethernet signal, according to the number of pixels on your screen, there are different numbers of Ethernet port media player for your choice. .
Please note that other models may have different interface ports depending on the functions they can offer.
تكوين الشبكة اللاسلكية (WIFI) والهوائي
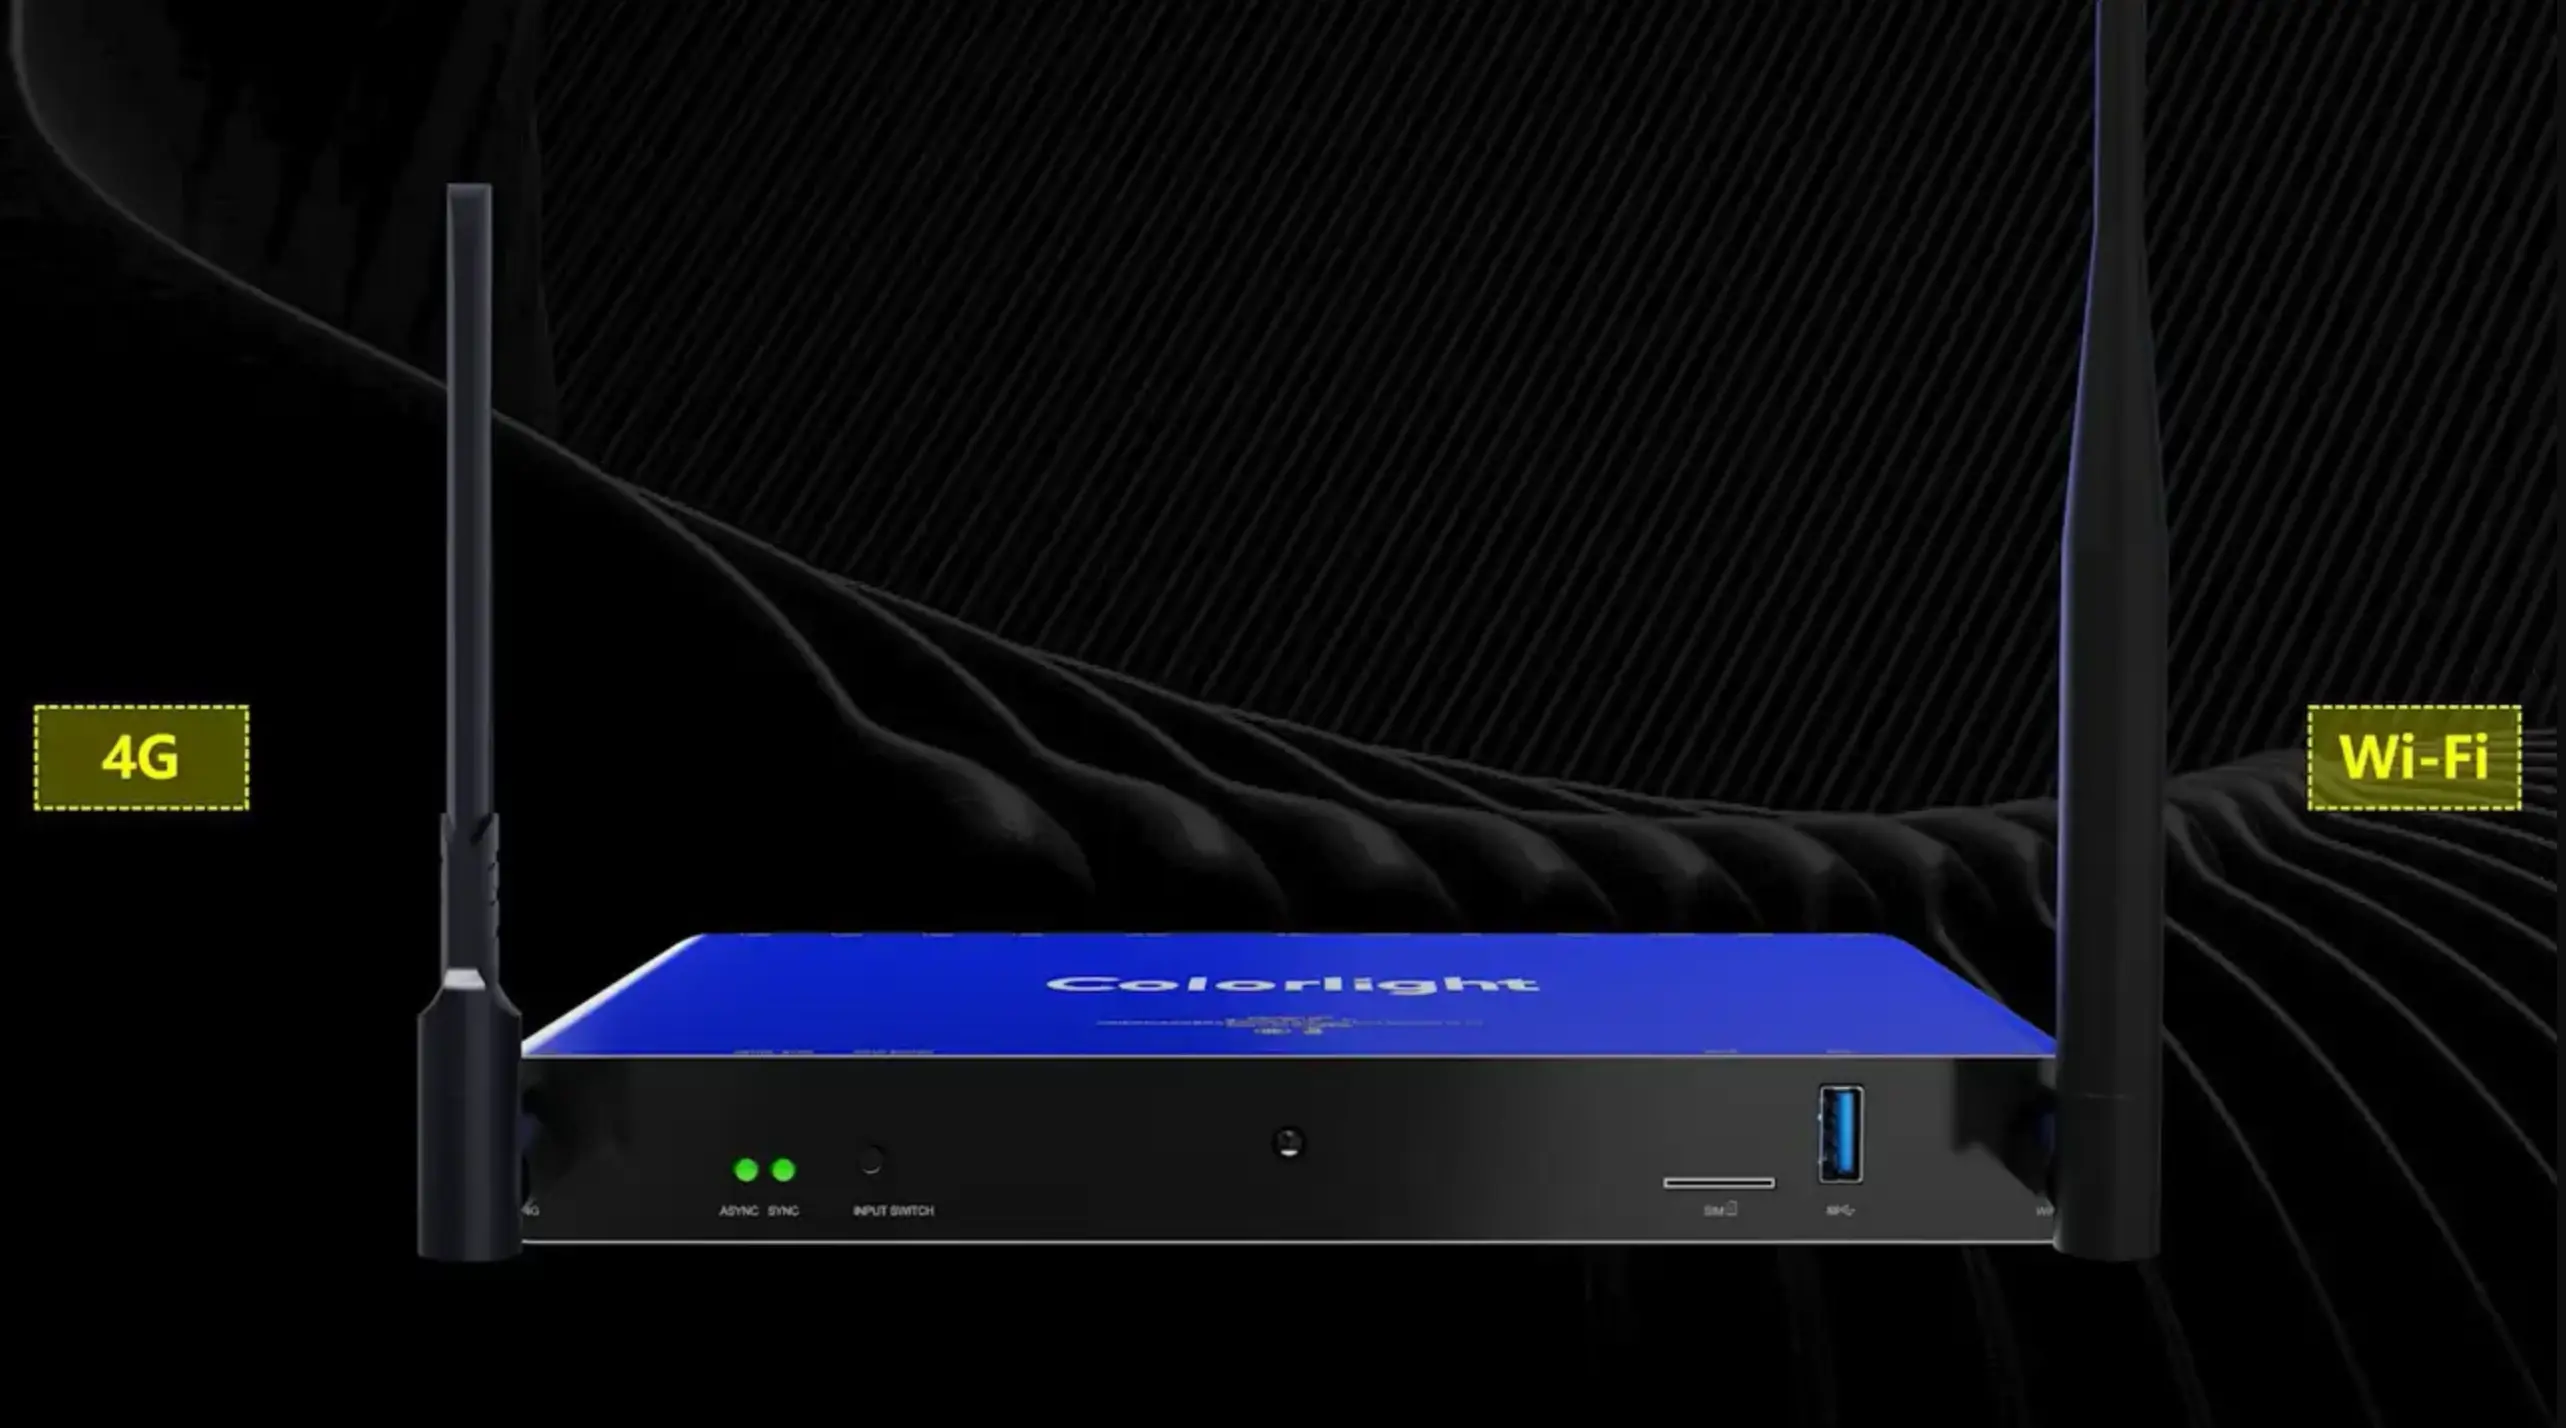
As mentioned above, the Colorlight media player supports wifi and a 4G connection. The WiFi antenna and 4G antenna are located at the two ends of the player. Note that the WiFi antenna is cylindrical, and the 4G antenna is flat, so they should not be mixed up.
الحصول على عنوان البروتوكول IP
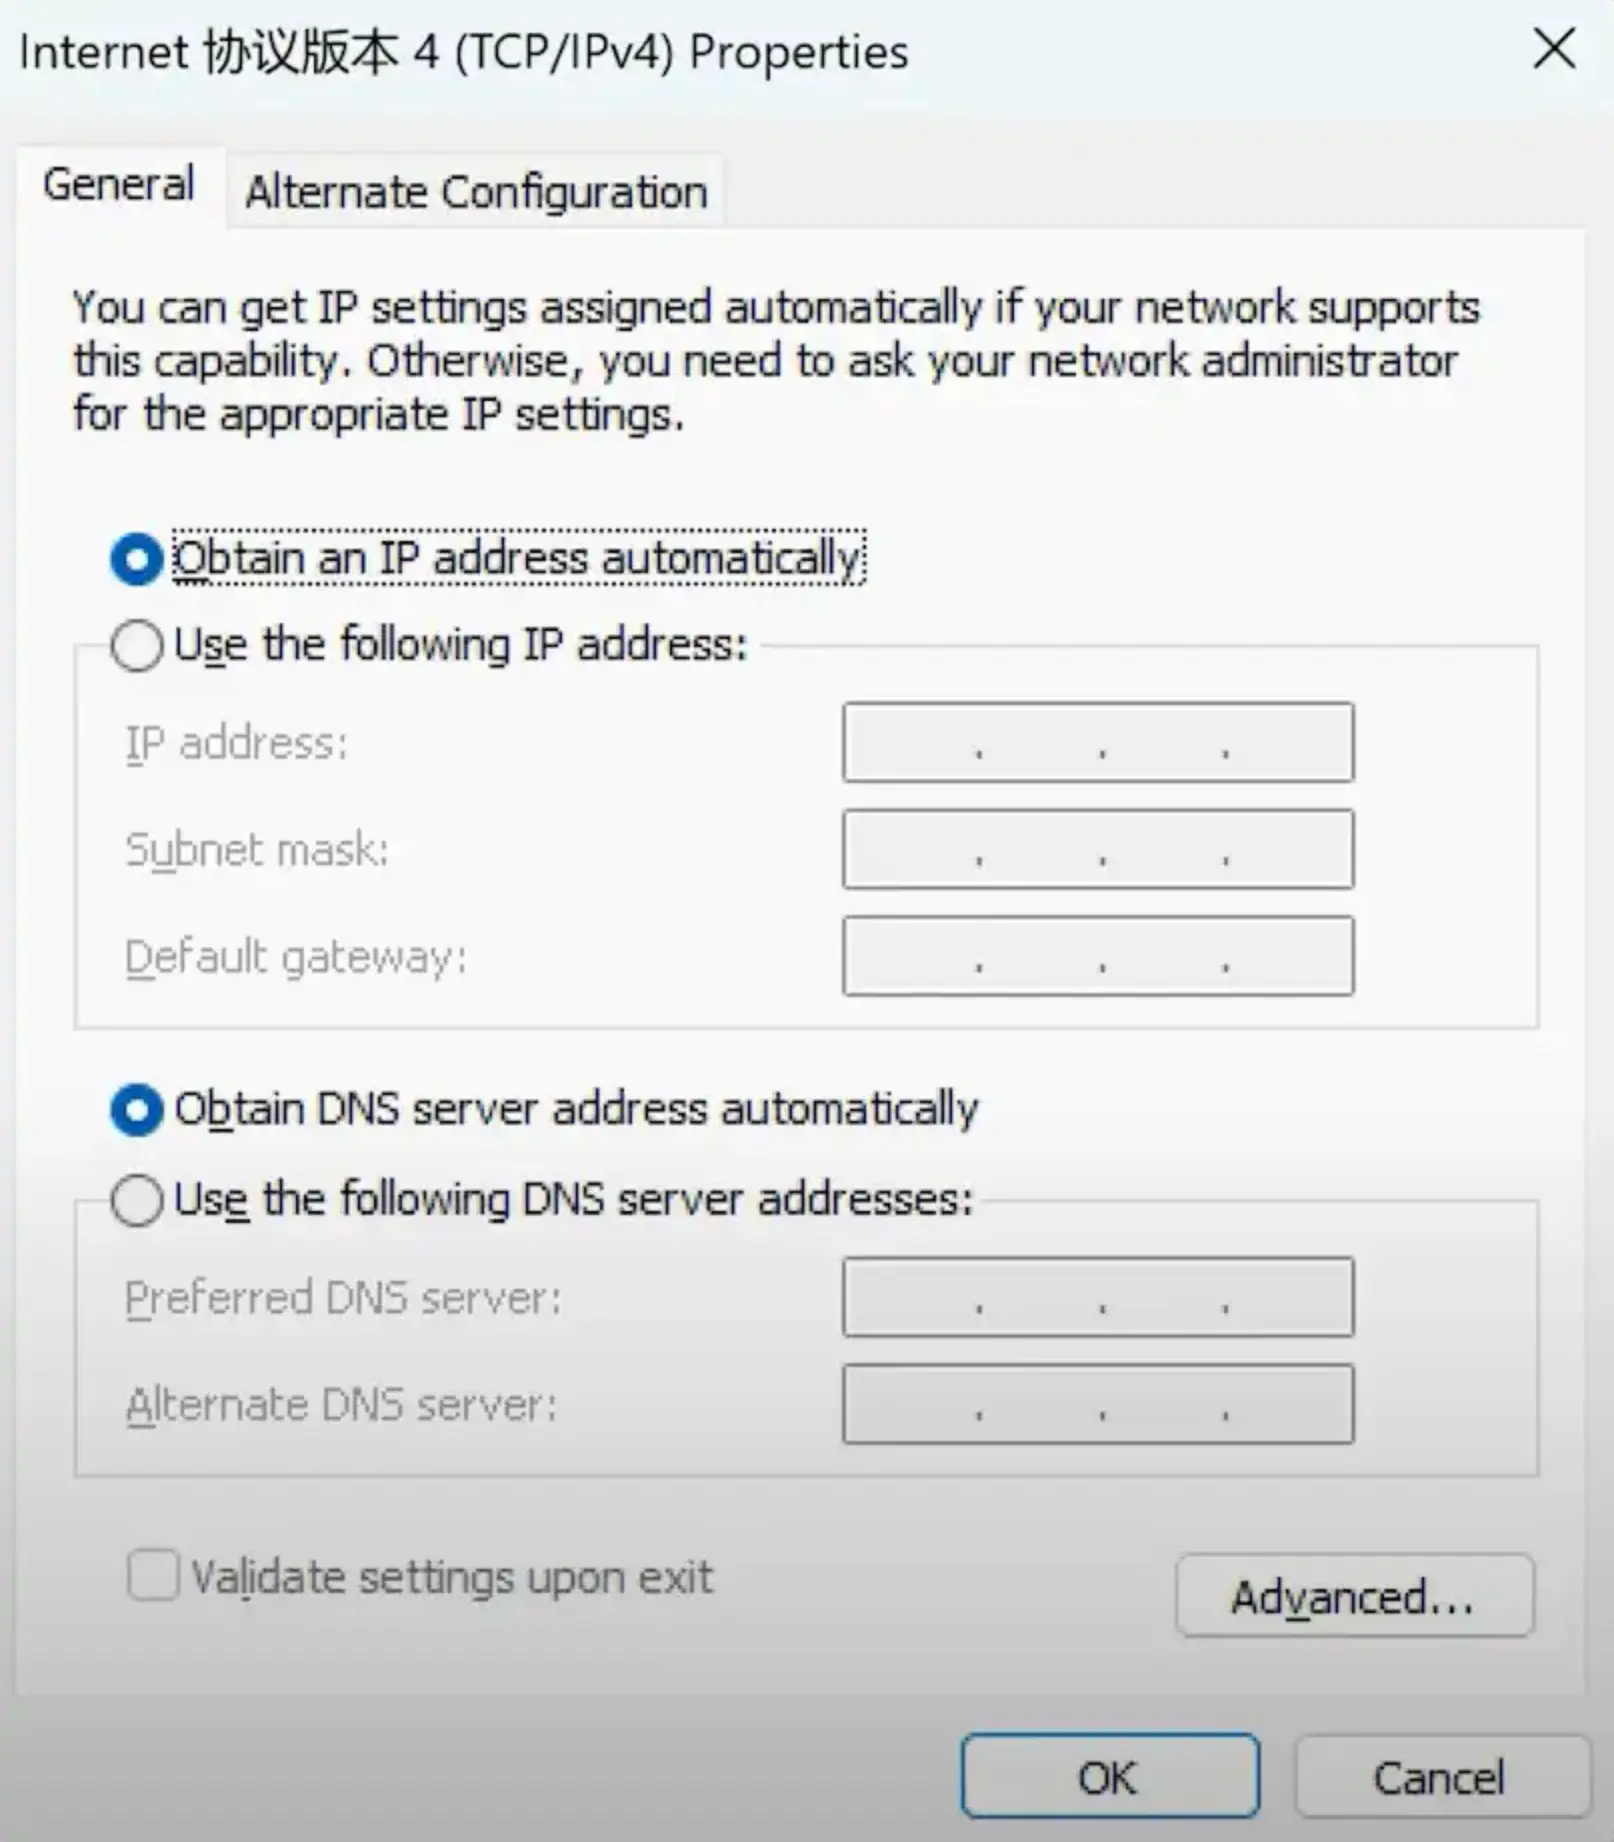
After you have set up the hardware connection for the media player, next we need to assign a IP to it.
Upon receiving a new media player, use the USB or LAN ports for the initial computer connection. It should be noted that if the Ethernet cable is connected to directly the player, the computer’s IP should be set to obtained automatically mode.
تحميل البرنامج
Once the media player obtains an IP address, we need to prepare the LED control software. For Colorlight media players, the software is available as a PC client, Playermaster, and as a mobile application, LEDAssistant, which can be downloaded from the Colorlight website.
الإدارة باستخدام PlayerMaster
Here we use PlayerMaster as a test.
To use Playermaster, connect the media player to a computer through a USB or LAN port. Then, open the Playermaster software. Here is the main interface for your reivew.
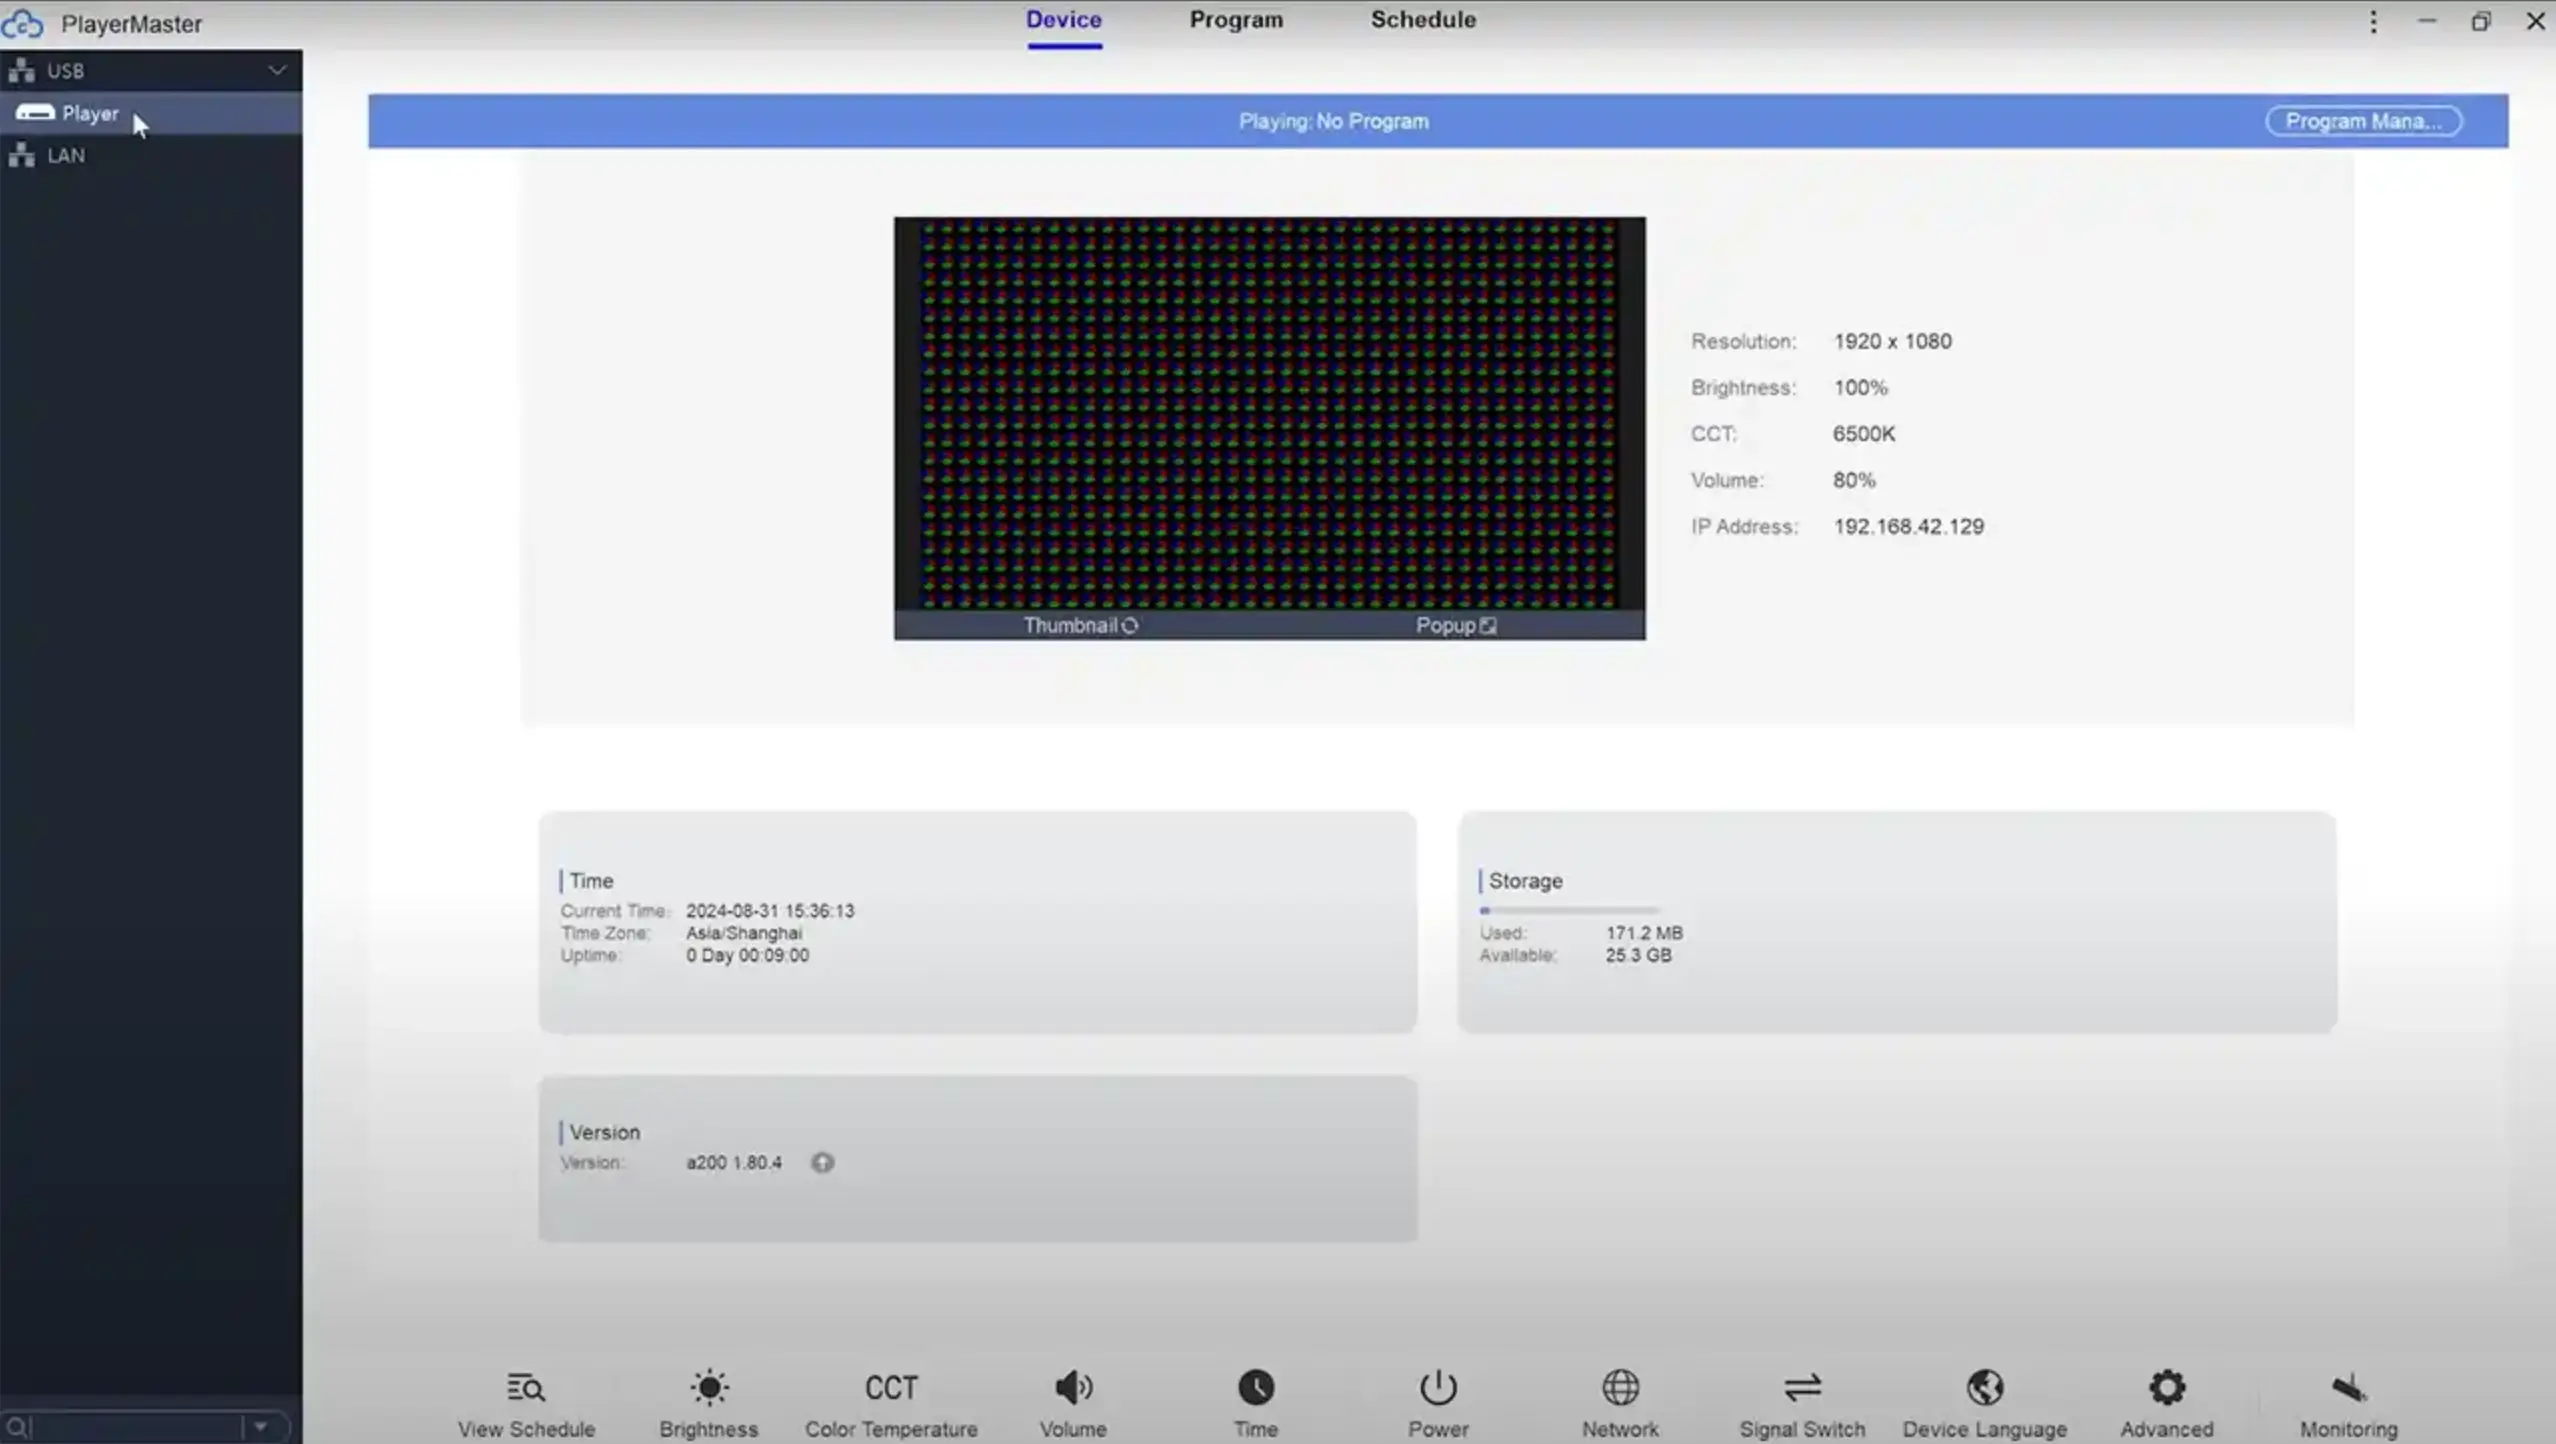
As shown in the image, there are 3 tab interfaces with “Device”, “Program”, and “Schedule”.
- Device: used for viewing terminal information as well as manage and control terminals
- Program: used for managing programs, such as adding, editing, publishing, exporting, and deleting programs.
- Schedule: used for managing schedules, such as adding, editing, publishing, exporting, and deleting schedules.
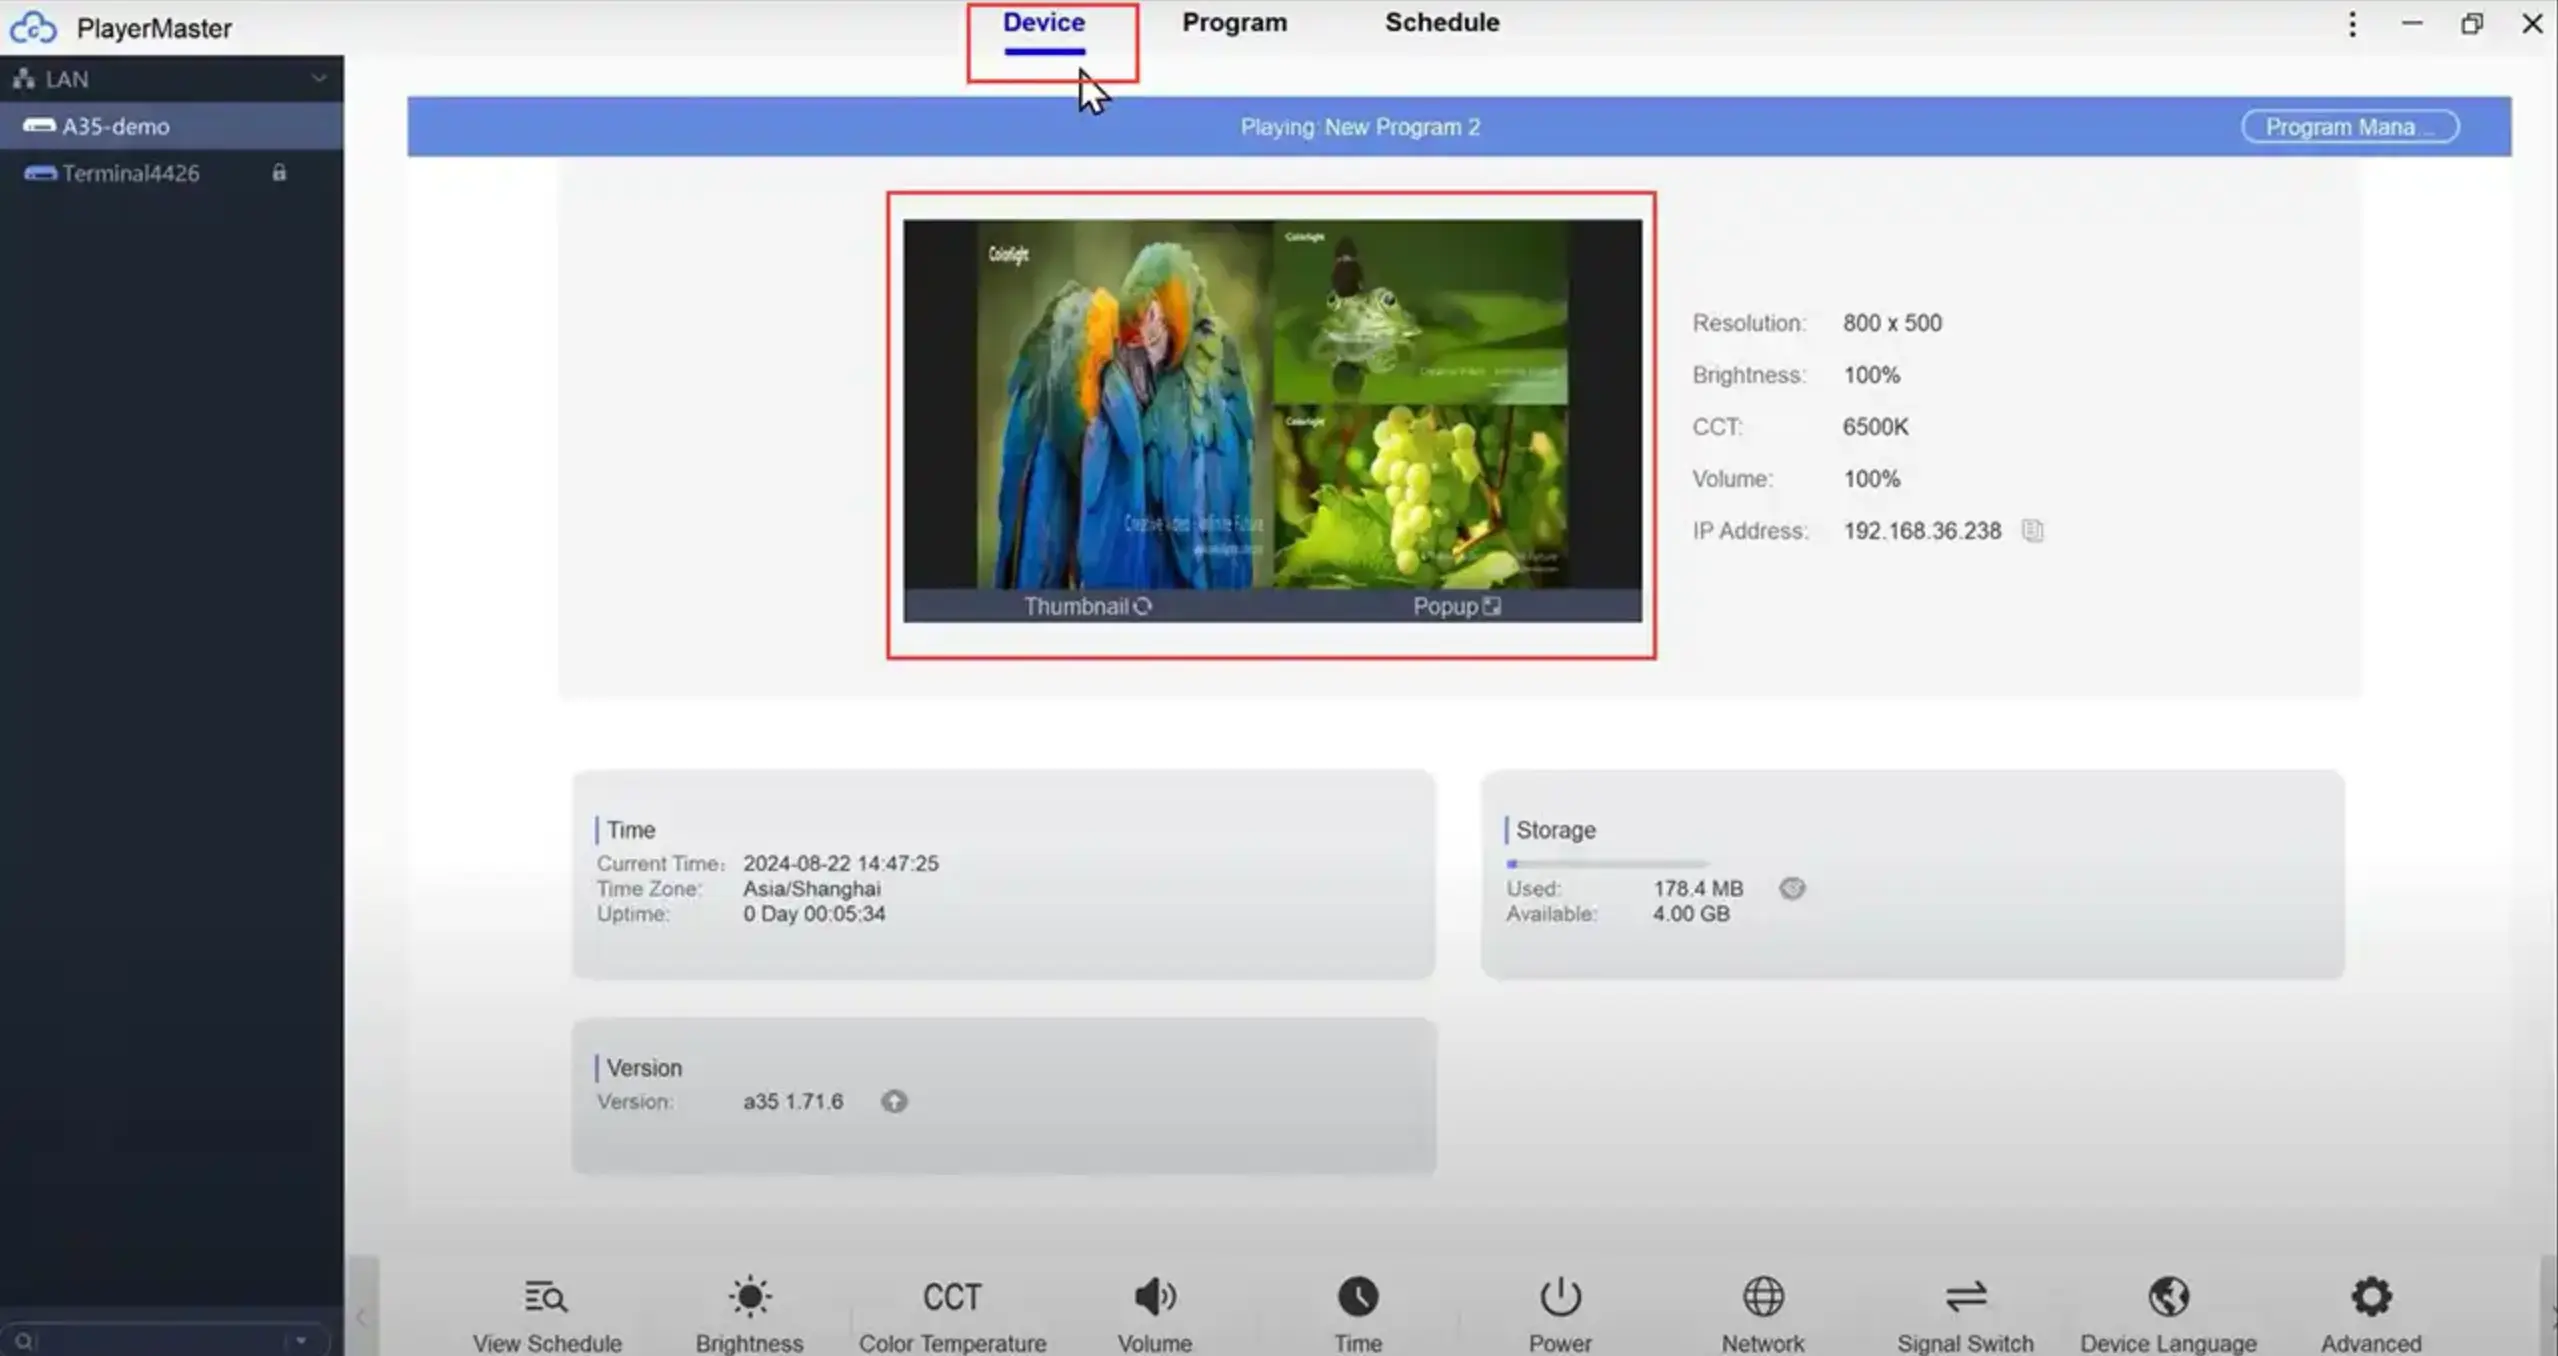
In the interface of “Device”, you can see that there is various information display such as screen resolution, brightness, CCT, column, IP address, system current time/Time zone/Uptime, system storage status used and available, and version information.
On the left side, there is a terminal tree, you can see the media player in the same local area network as your computer in the terminal tree. Right-click the media player then it will display a list of operation menus: “Publish Program”, “Publish Program Schedule”, “Publish Command Schedule”, “Delete Program Schedule”, “Delete Command Schedule”, “Publish Detail”, and “Rename”. You can click the corresponding menu to progress the associated task.
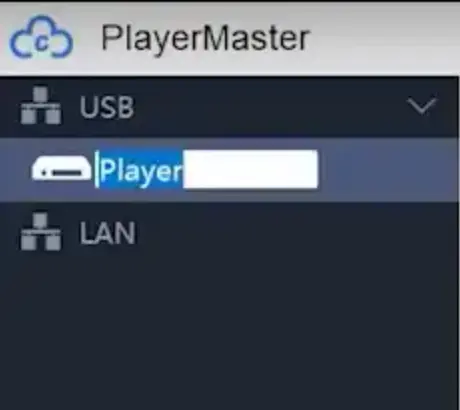
Rename media player
Right-click media player, click the “Rename” operation menu, then set a new name.
View Schedules
Access the bottom menu to click “View Schedule”.
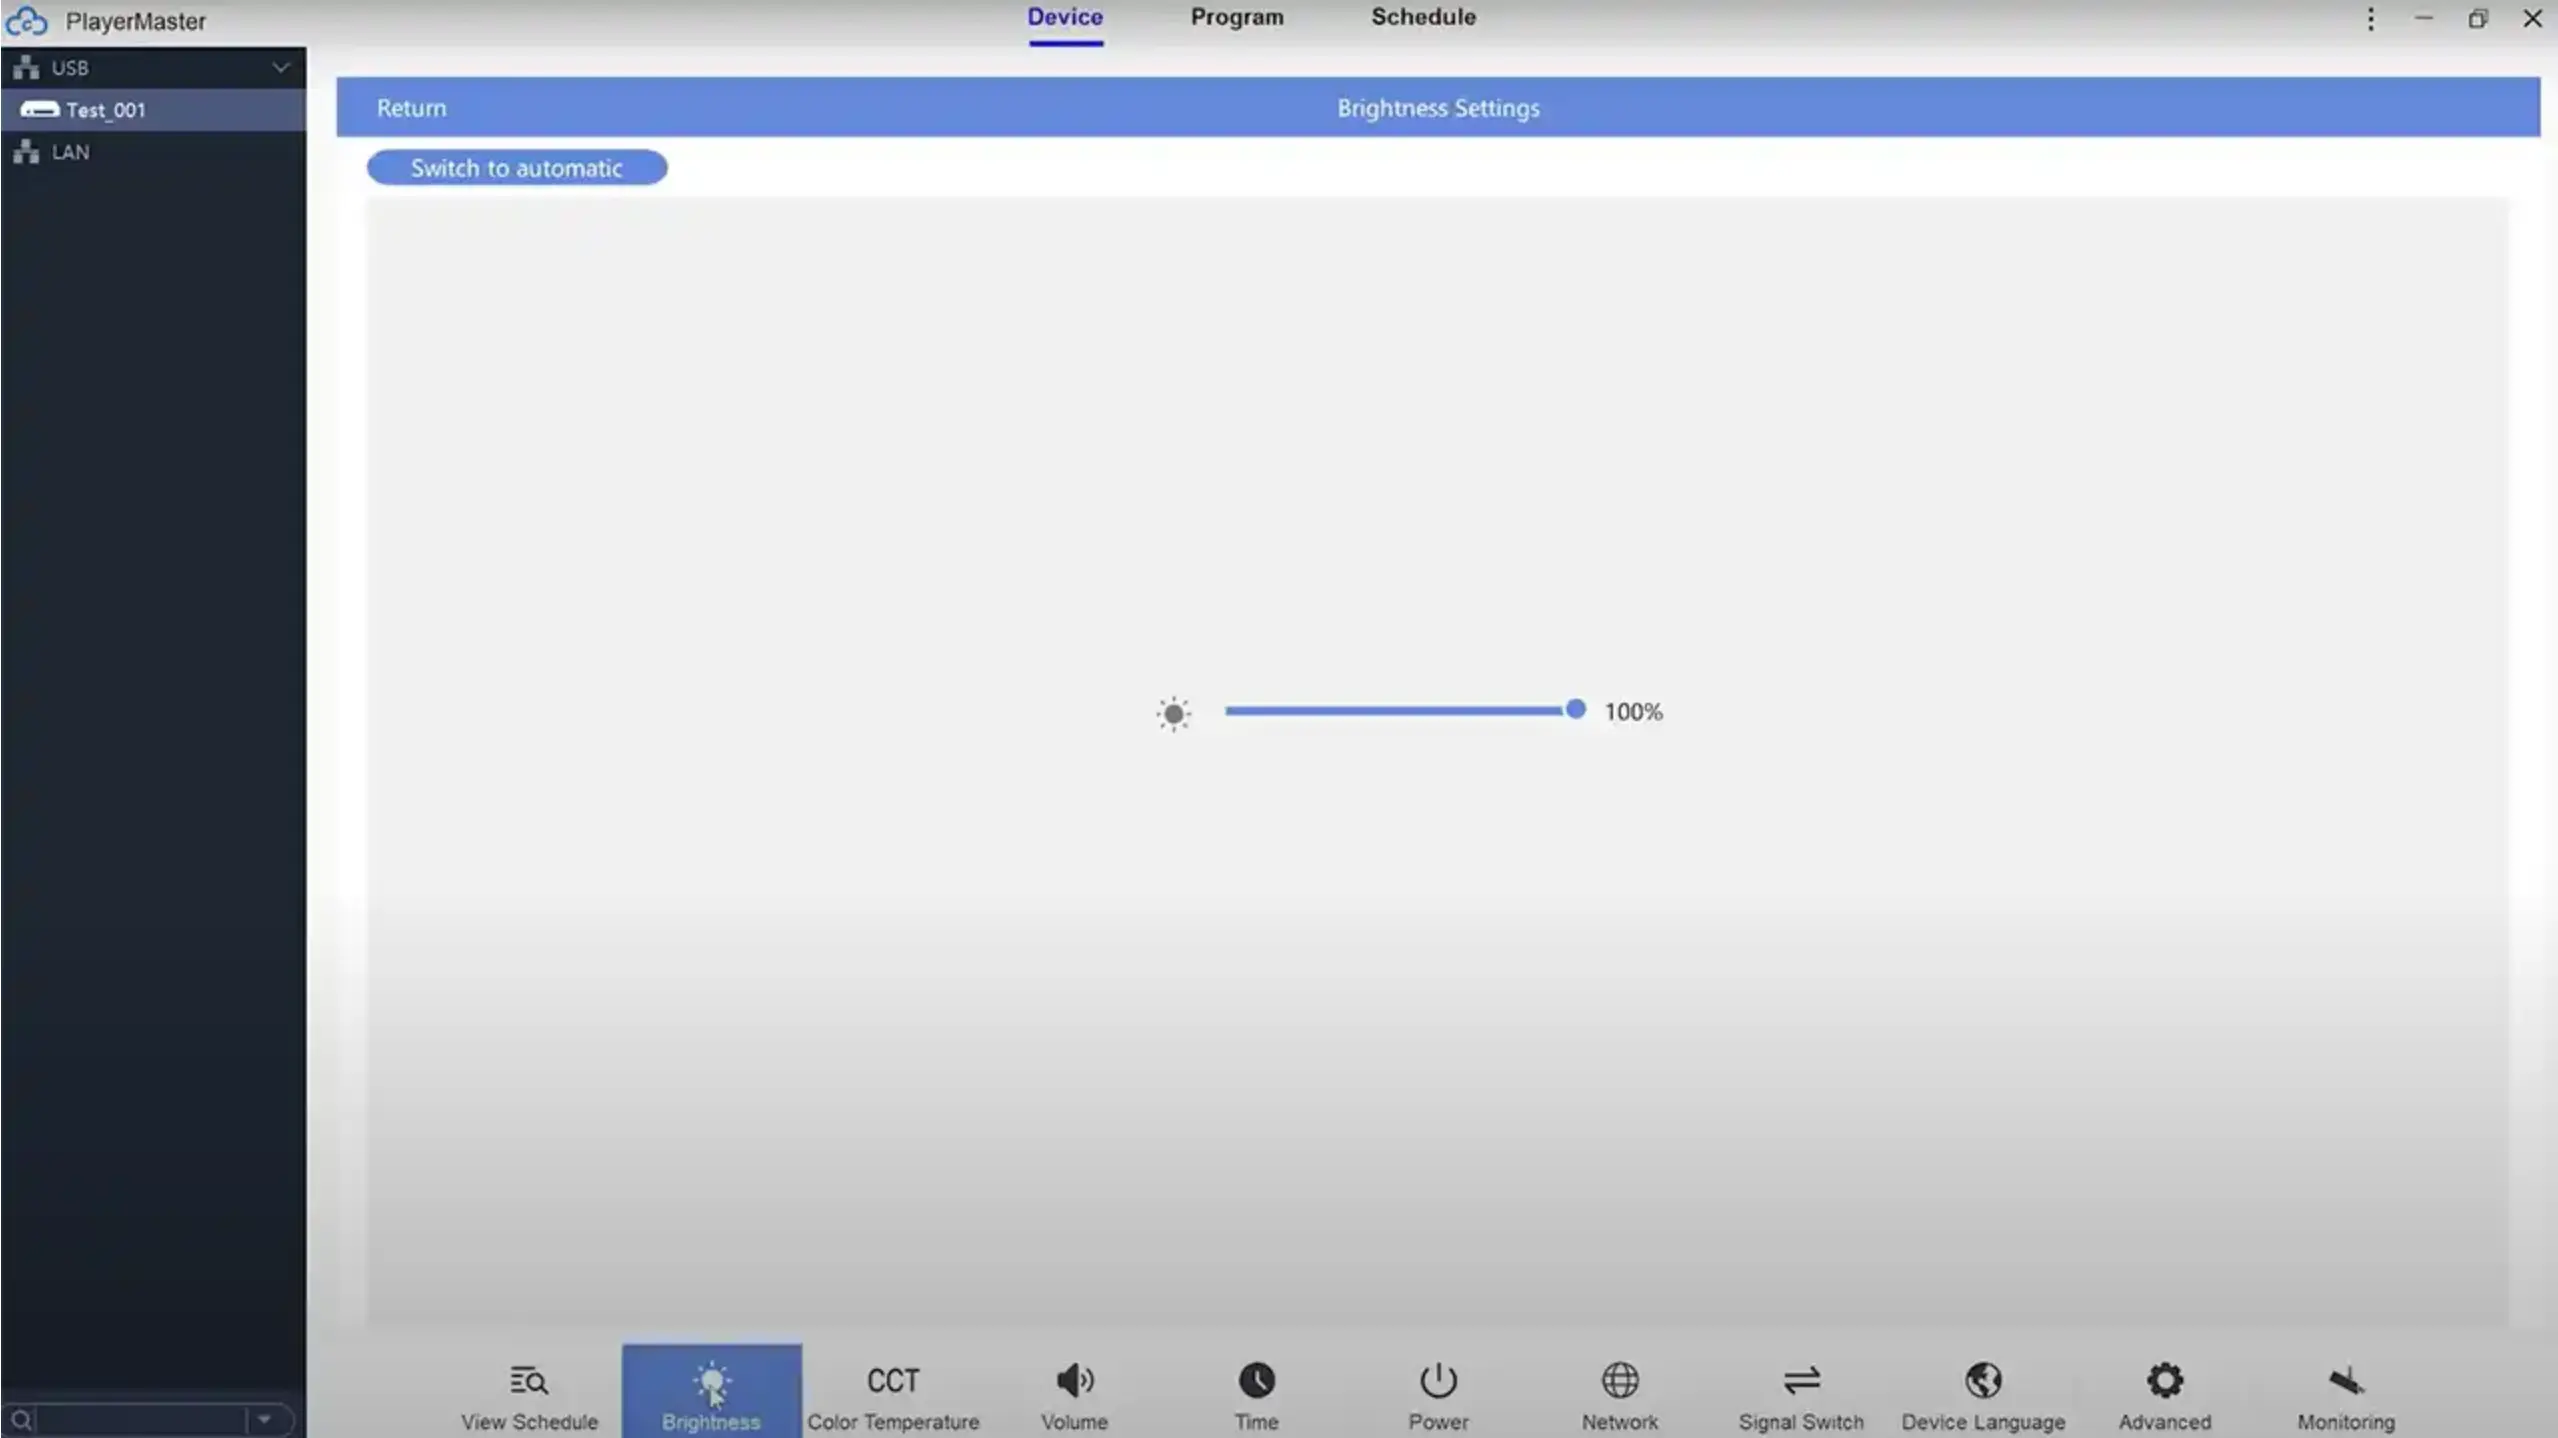
Adjust Brightness
Access the bottom menu to click “Brightness”.
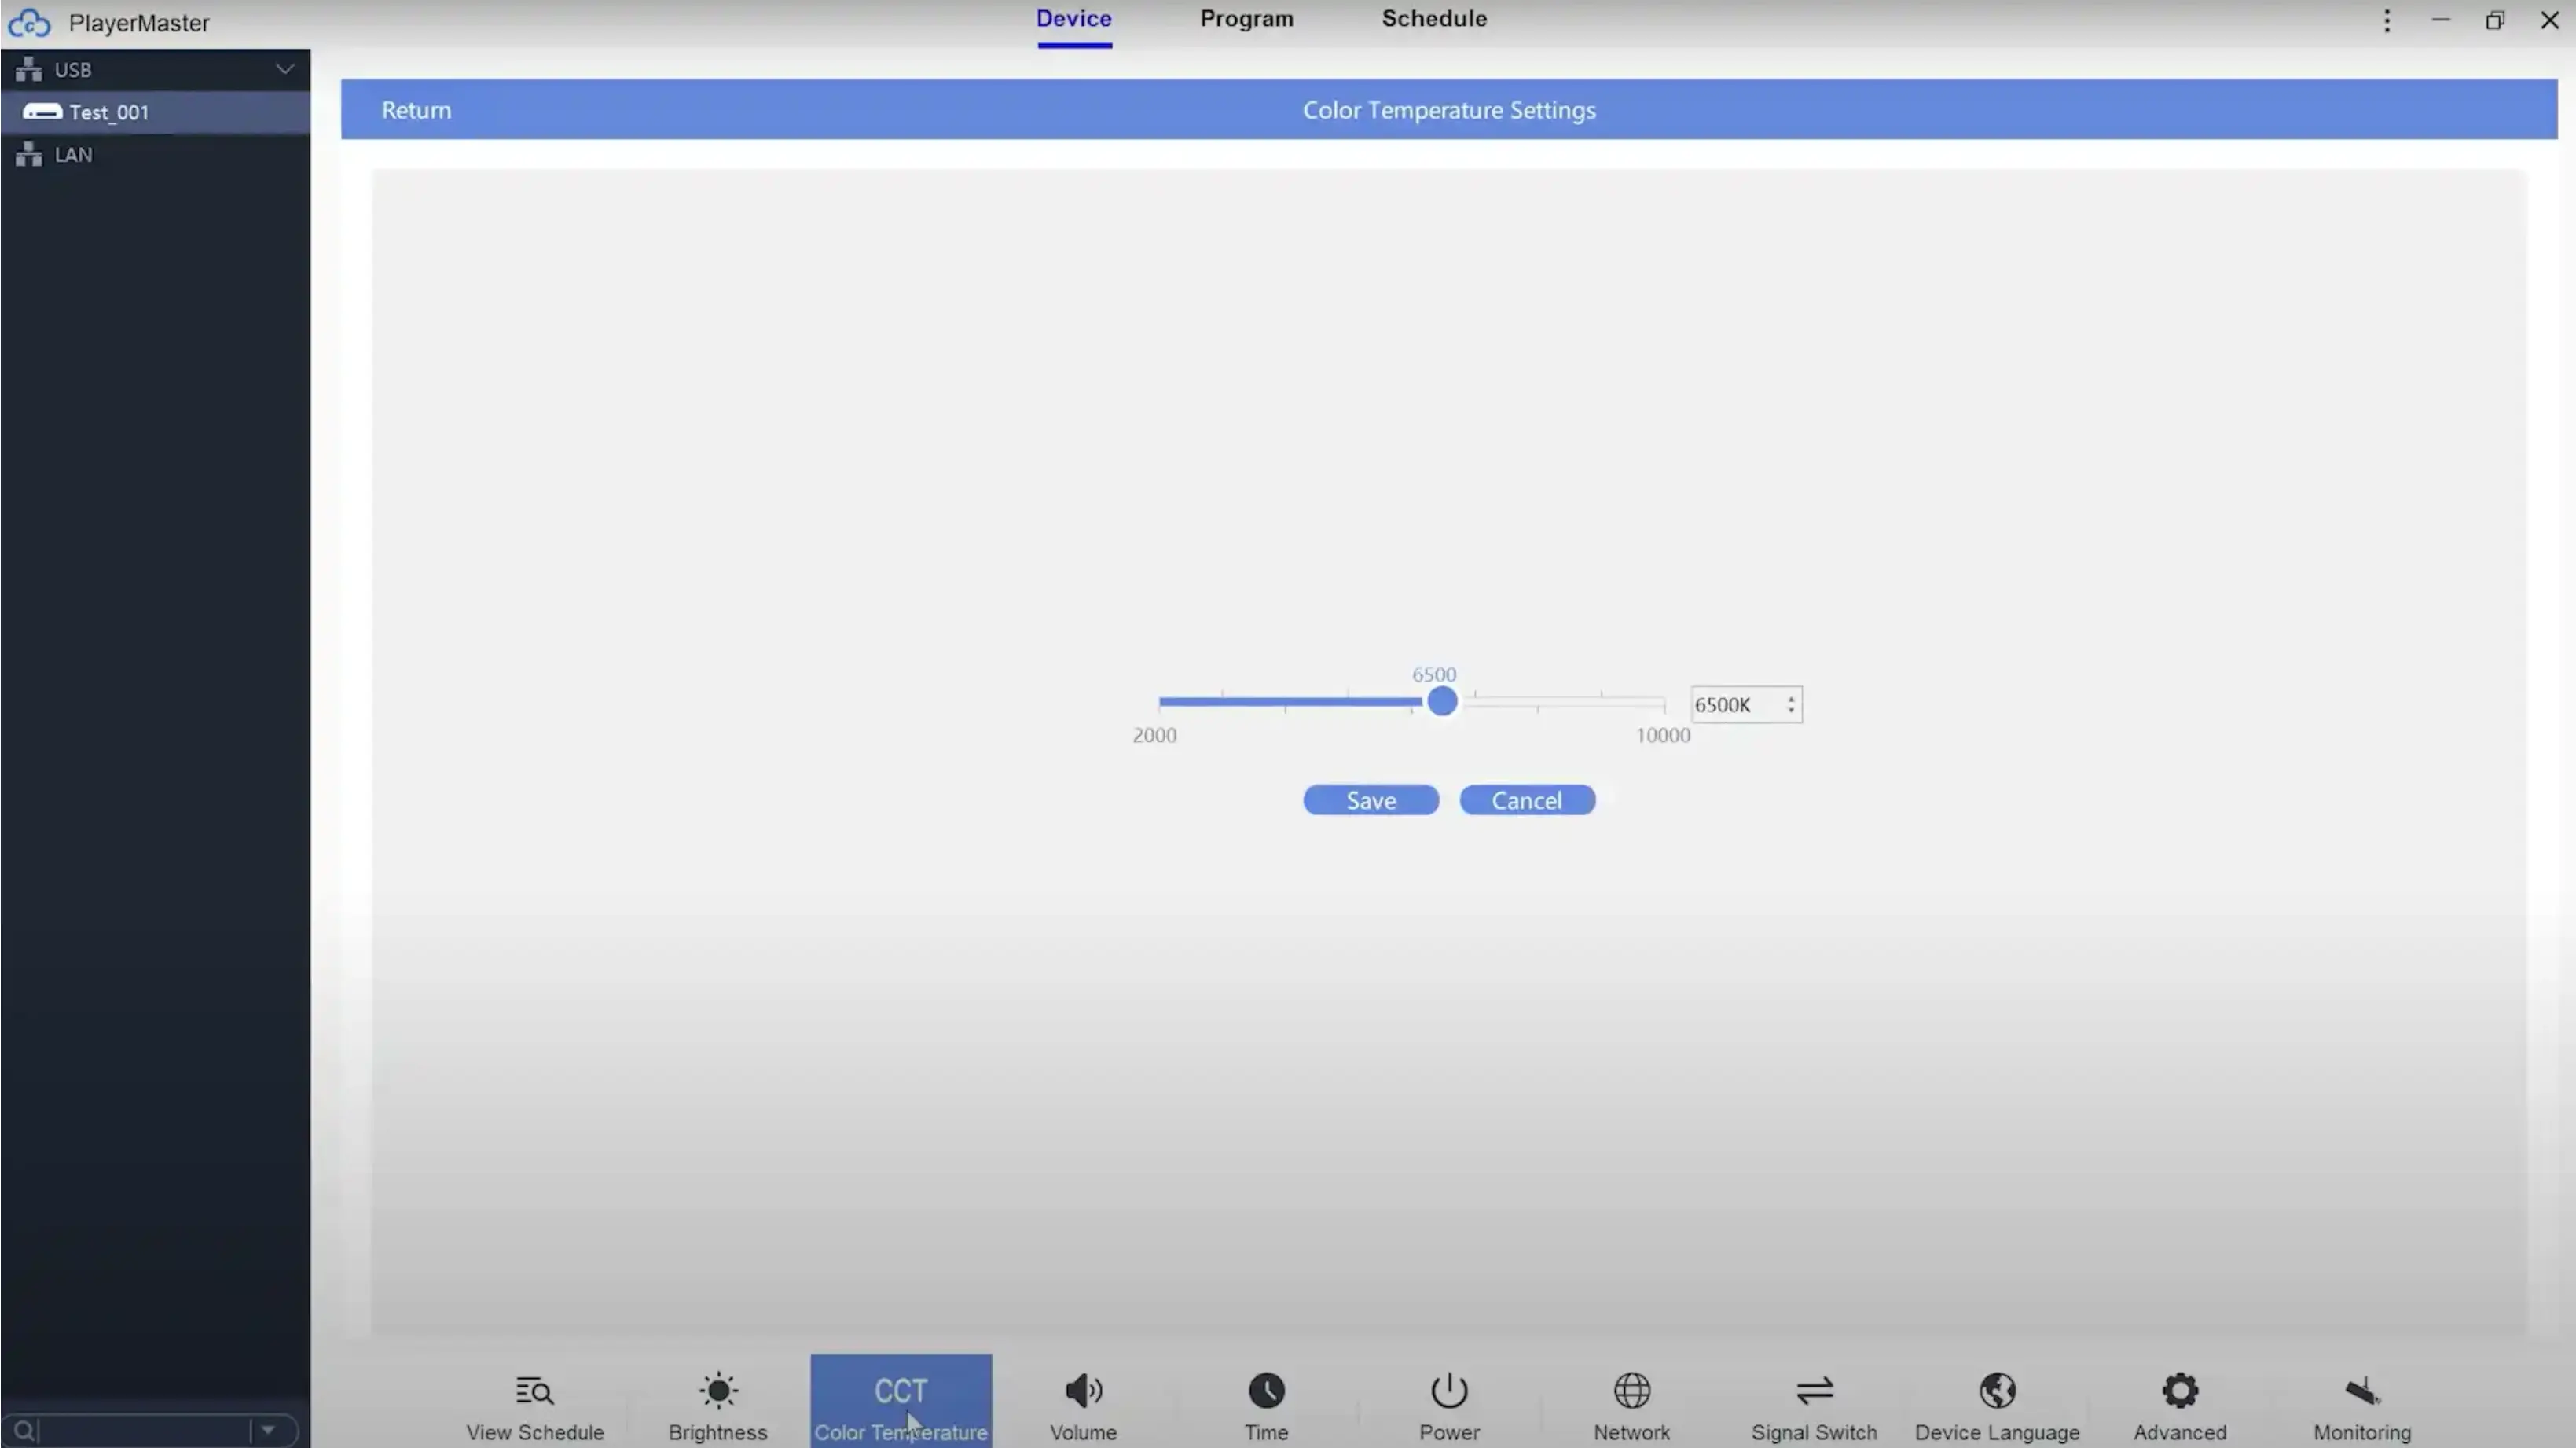
Adjust Color Temperature
Access the bottom menu to click “Color Temperature”.
Set control way
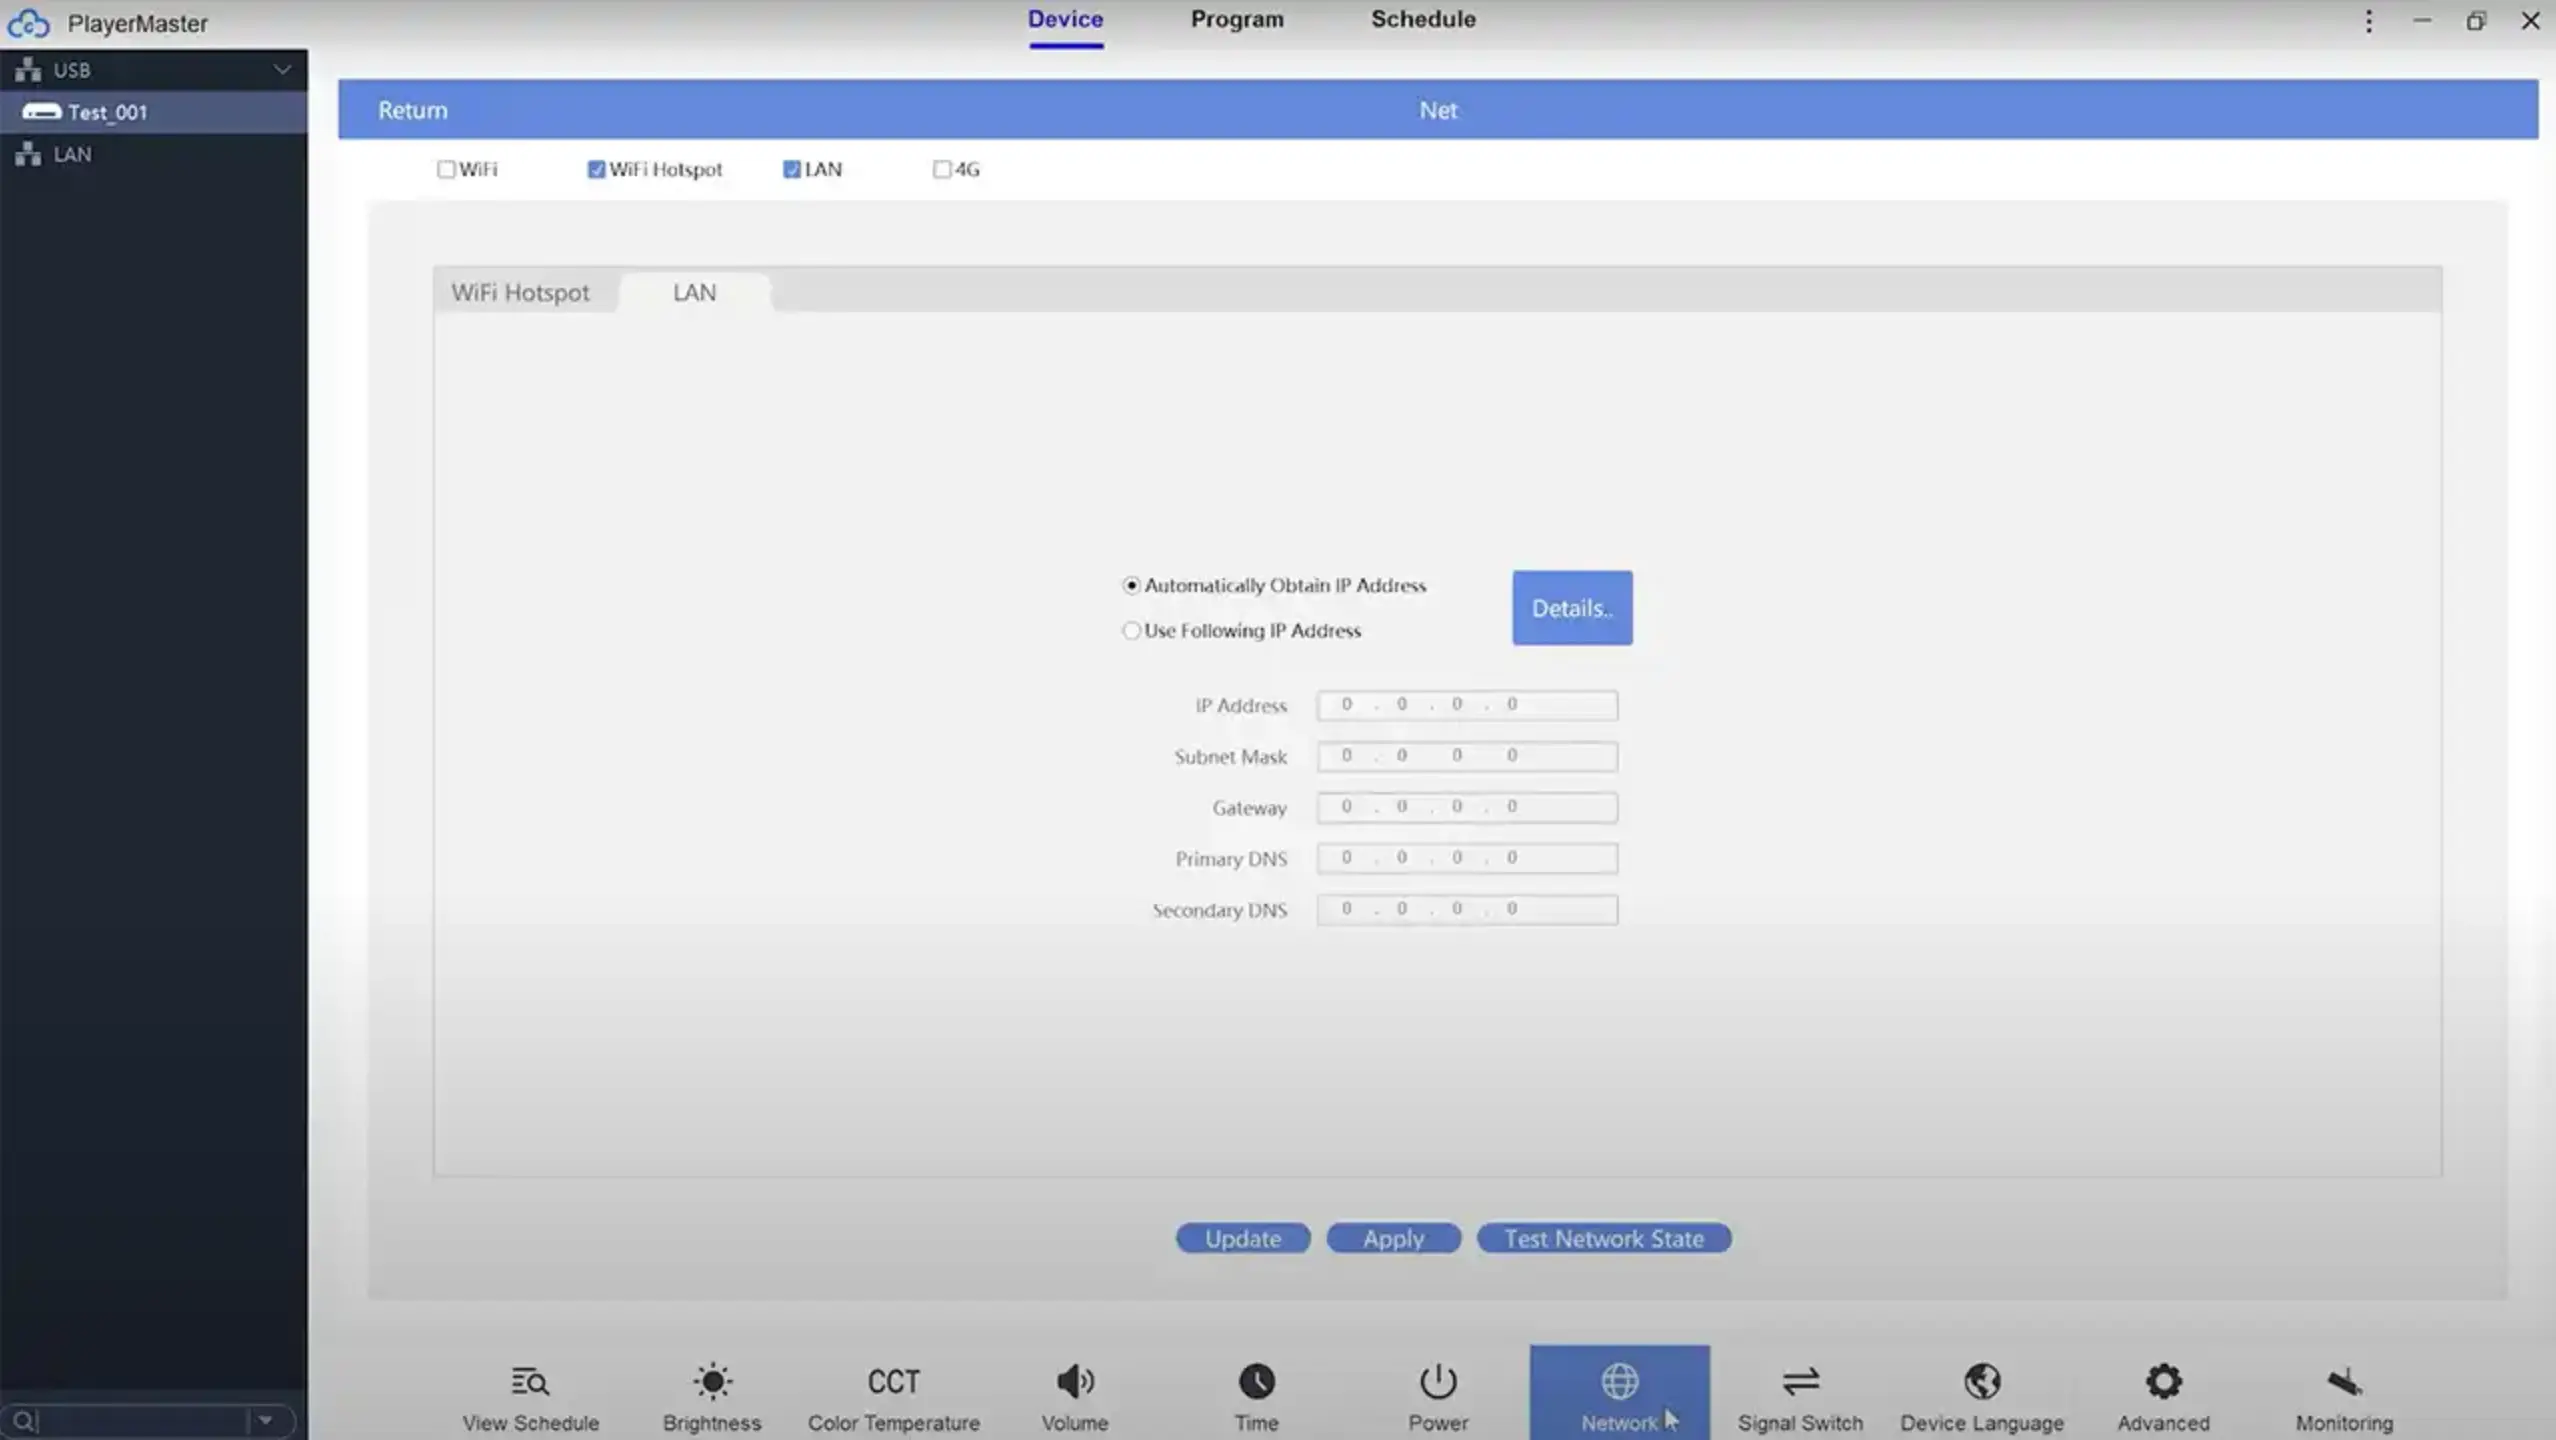
In the lower toolbar of the Playermaster software, you can click on the Network button, where you can choose to use Wi-Fi, Wi-Fi hotspot, LAN, or 4G, to allow your media player to be controlled wirelessly and publish programs.
How to enable Cloud Control
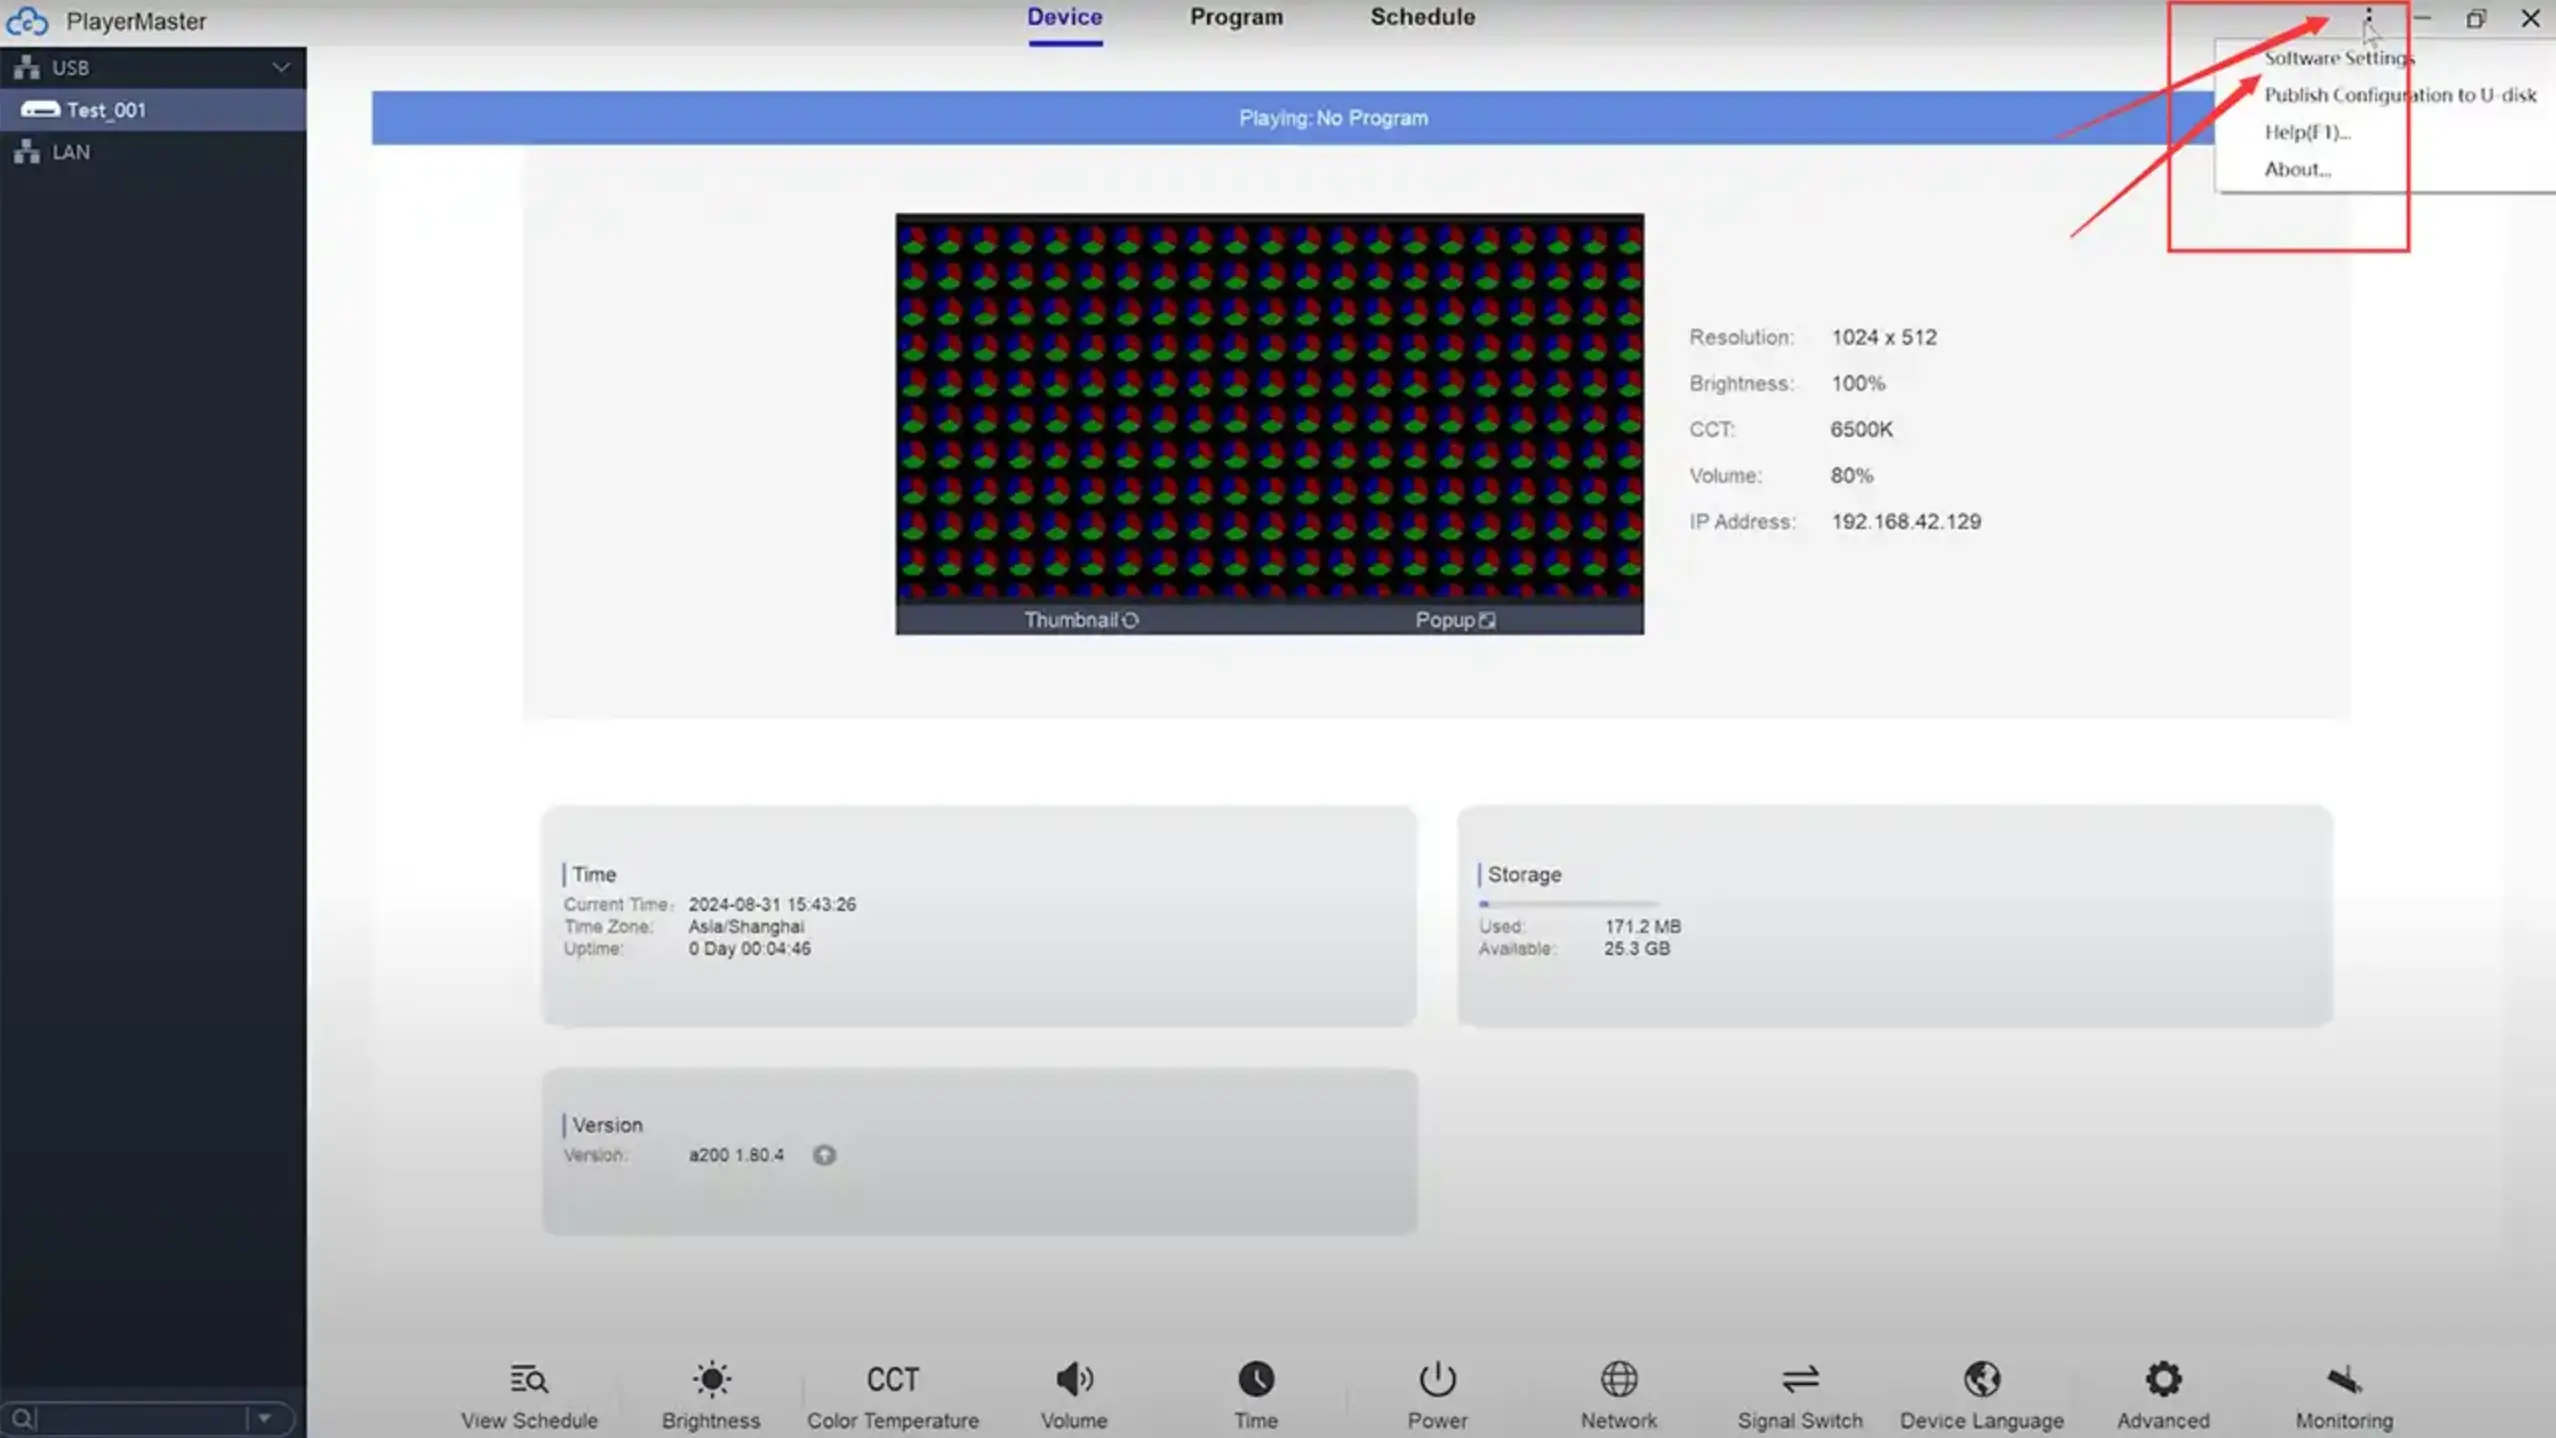
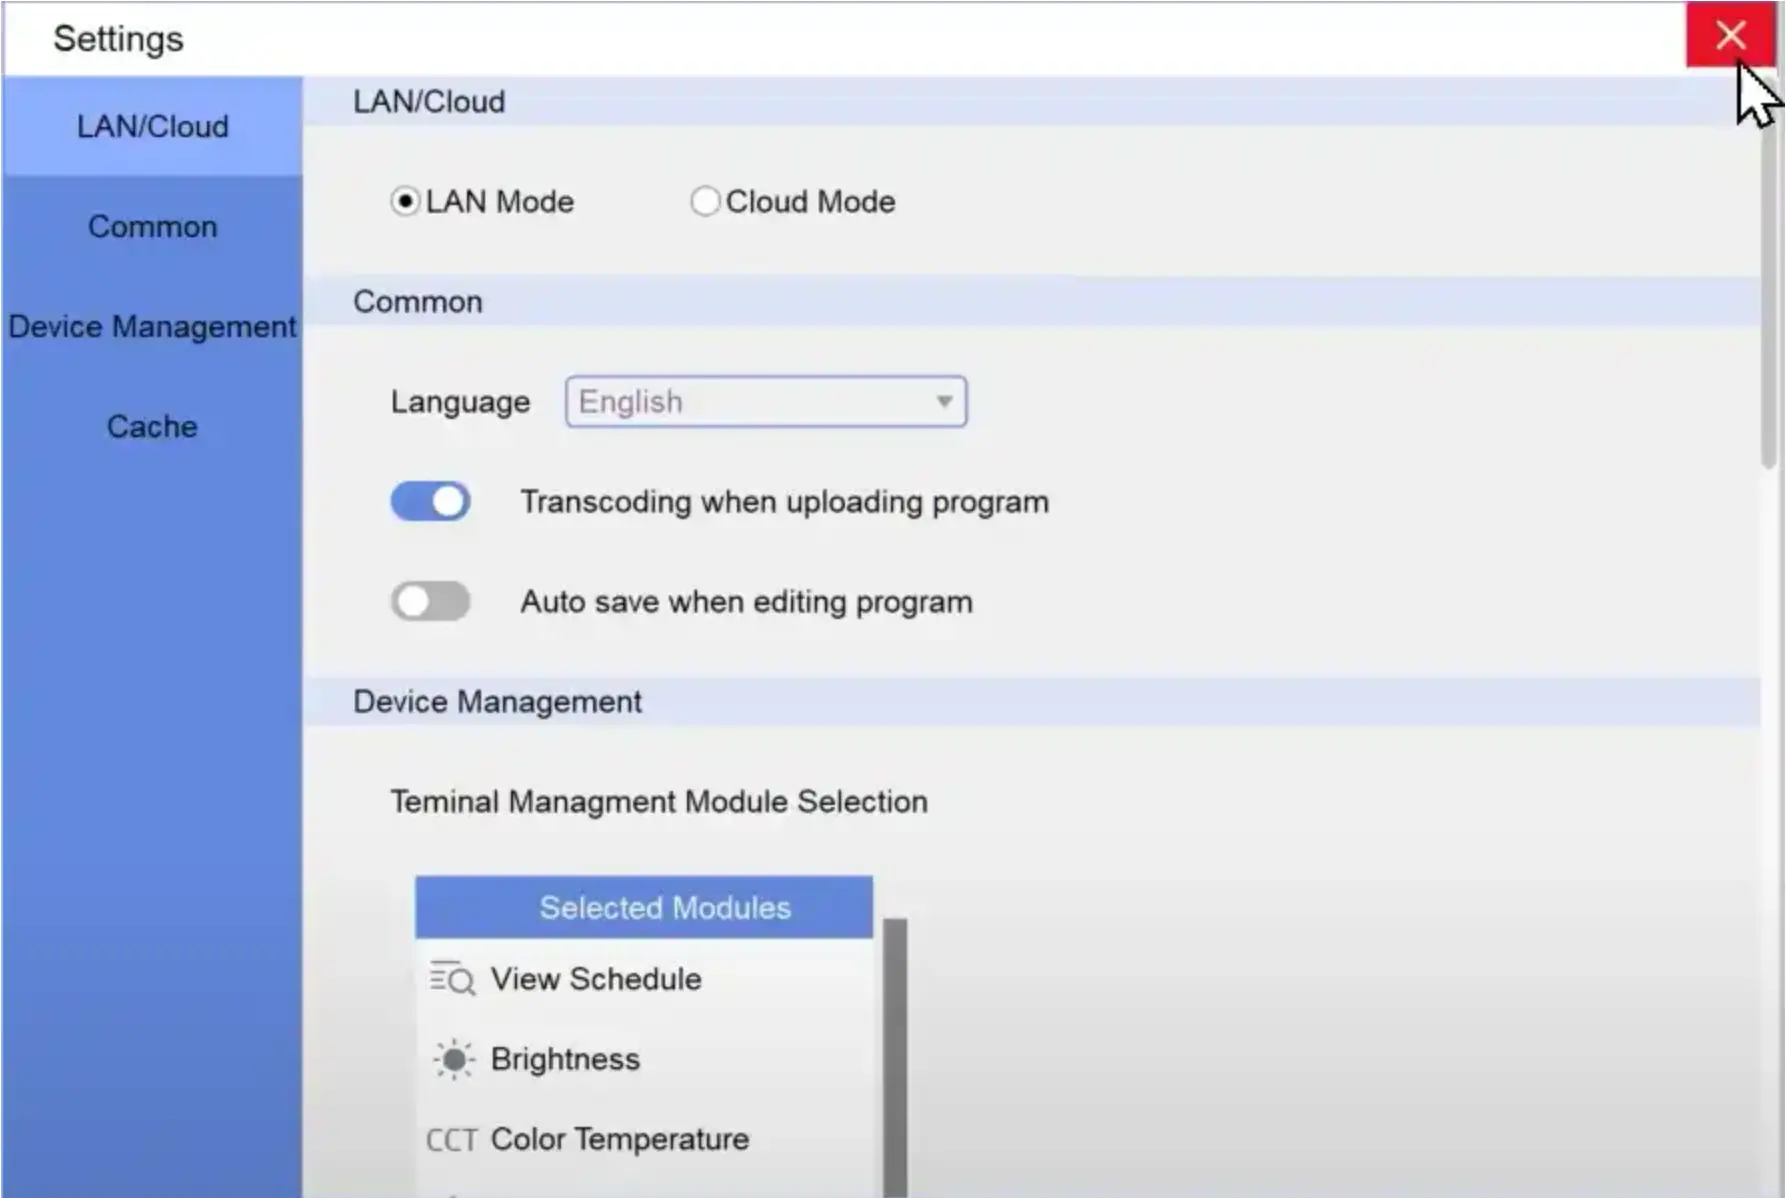
If you want to use cloud control, first, open the software setting in the dropdown list by clicking the upper-right menu.
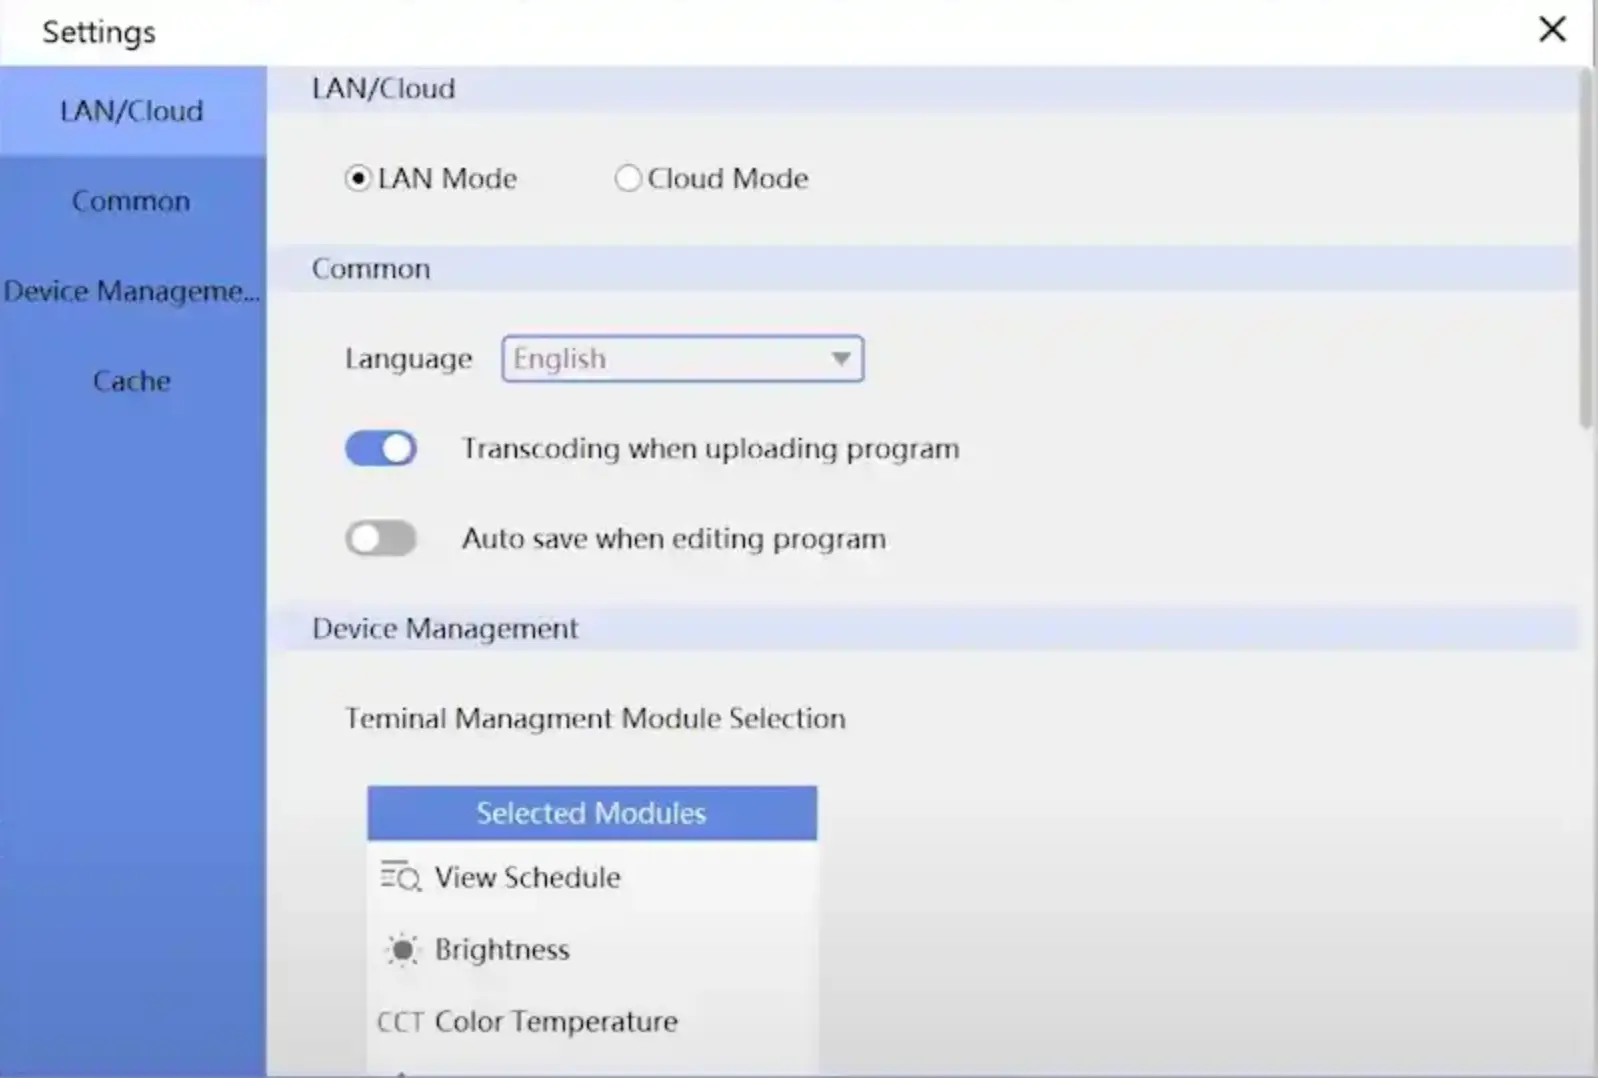
Next, switch Playermaster to cloud mode. As shown in the following image, there are two modes: LAN mode and Cloud Mode. If it is LAN mode, then switch to Cloud Mode.
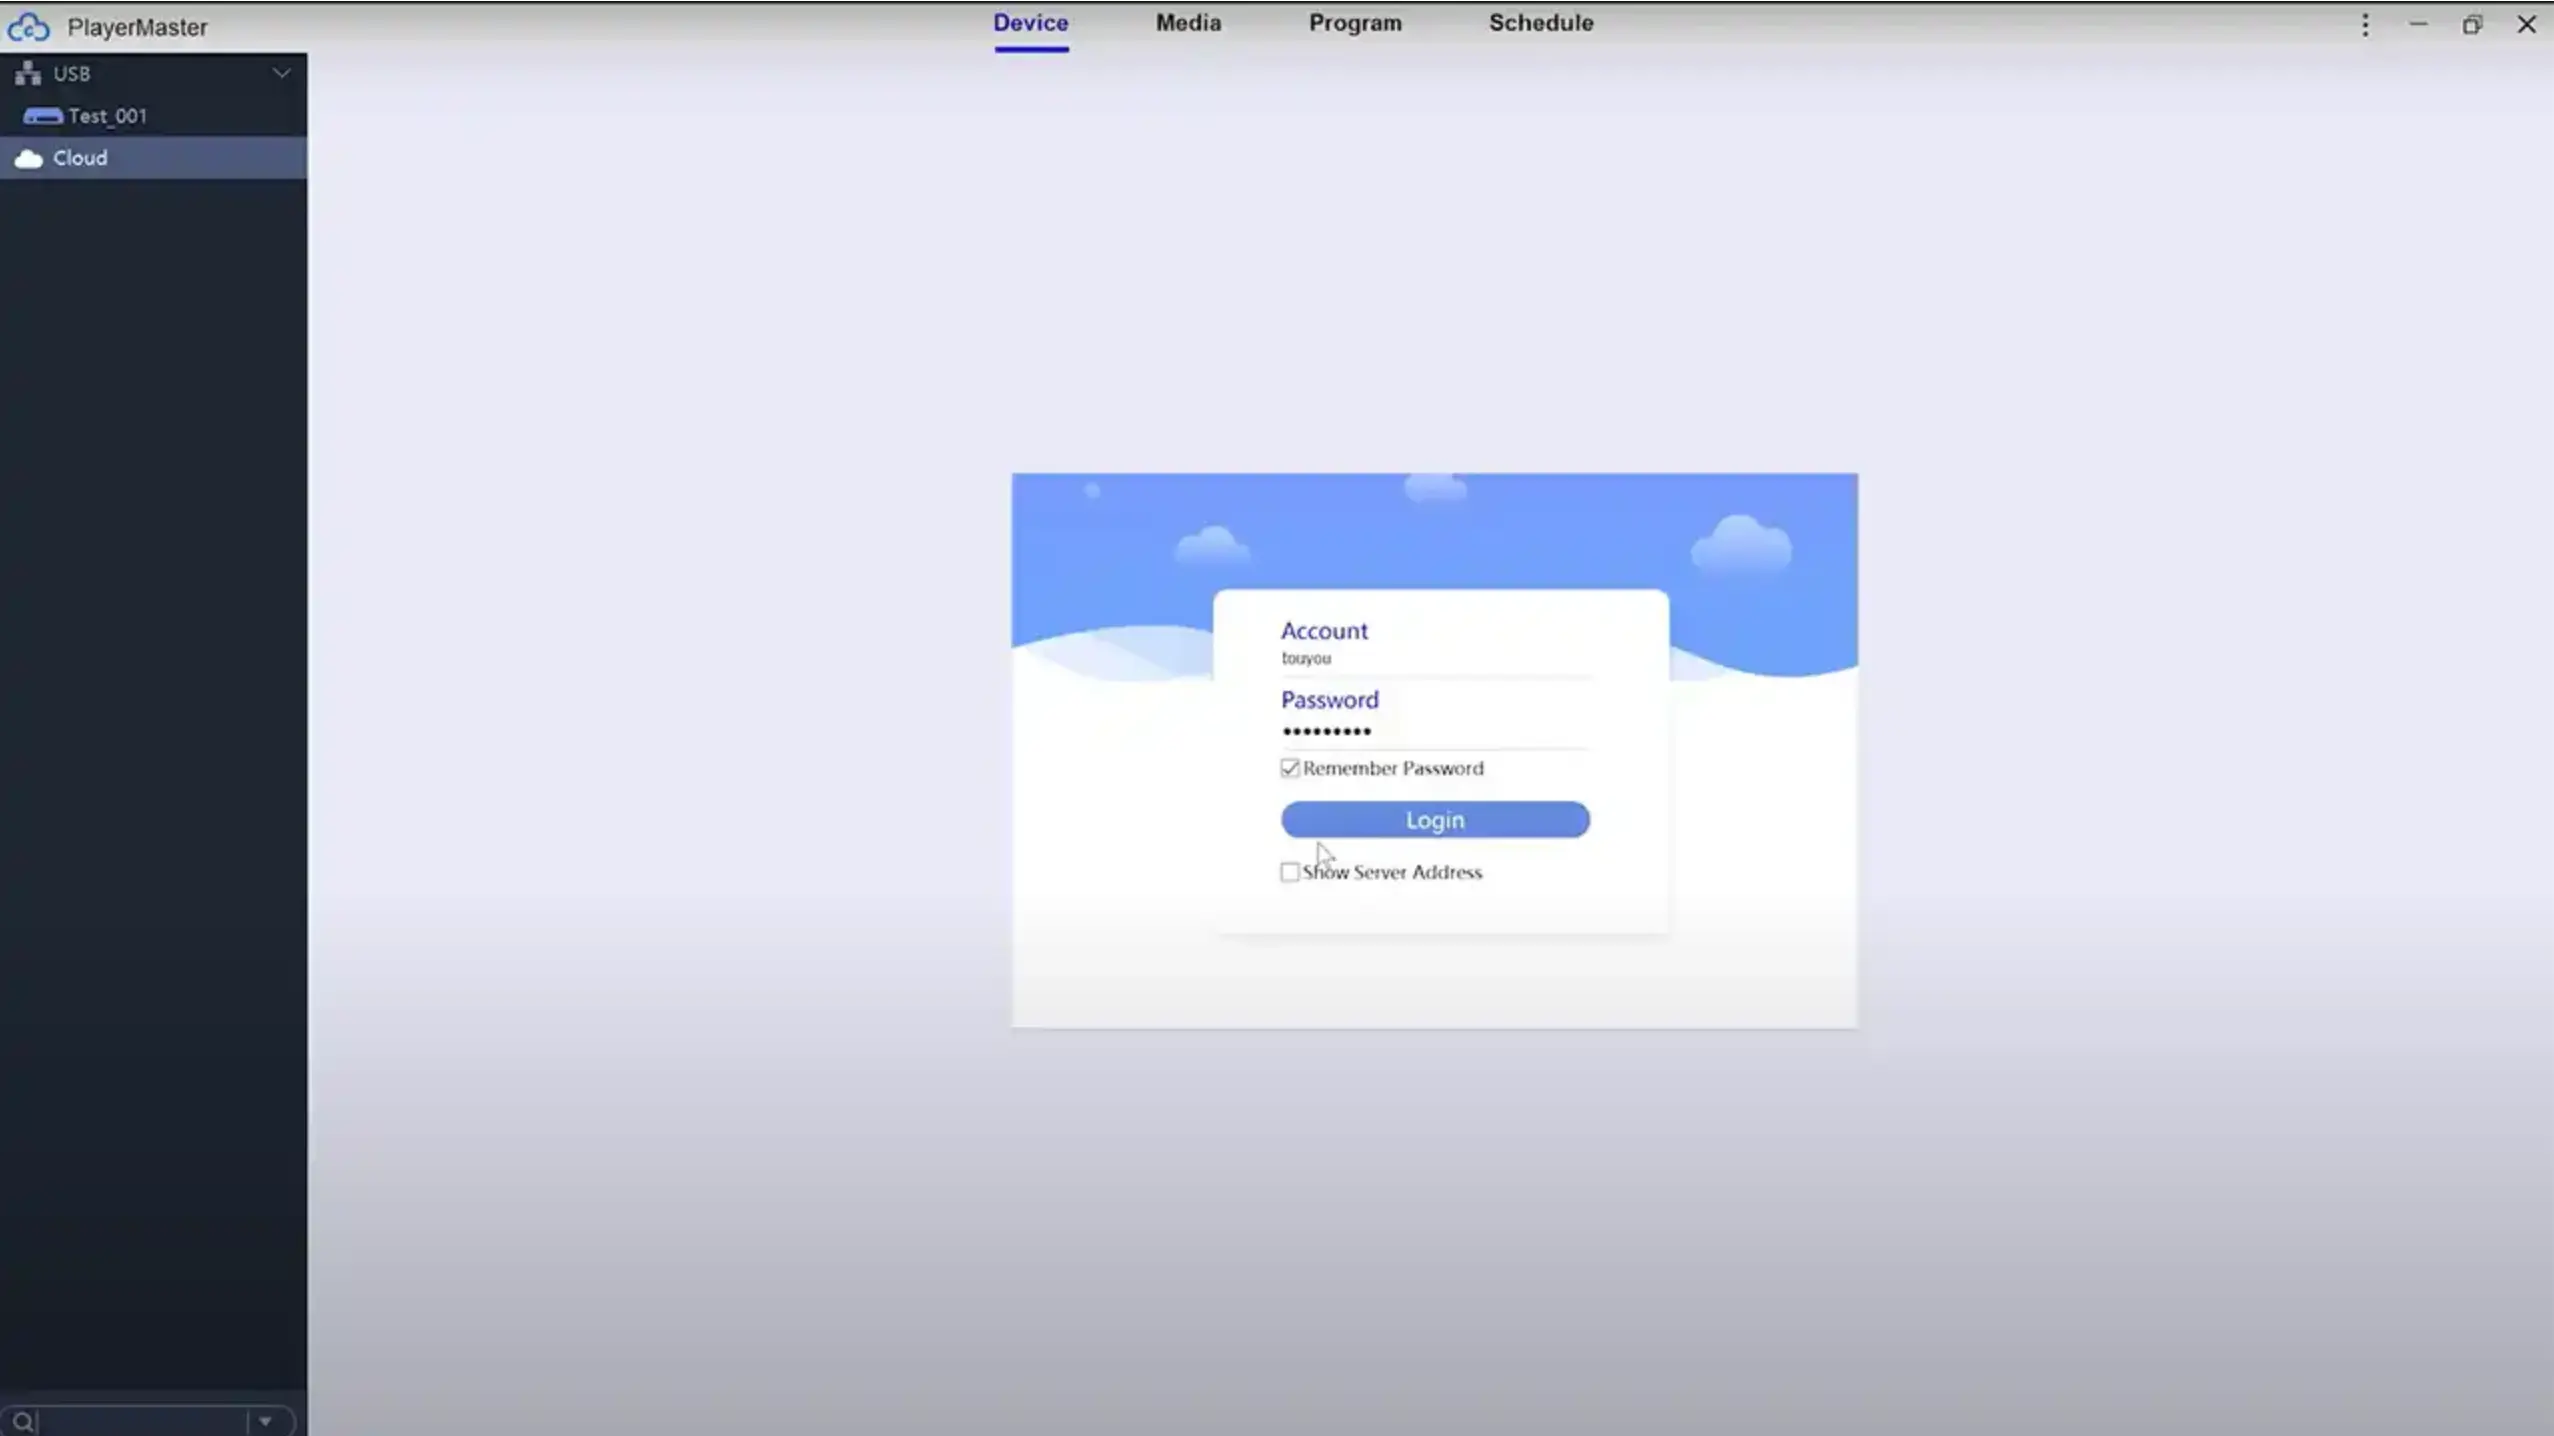
Next, switch Playermaster to cloud mode, then log in to your cloud account and drag and drop your connected devices onto the cloud so that the cloud platform is ready to use!
Similarly, you can click the bottom button to progress the corresponding function such as adjust volume, set time (Modify time and timezone), power management (Restart, Sleep, Wakeup), set language, monitor status, etc.
إنشاء الجدولة الدورية ونشر البرامج
For creating and editing programs, first, we need to specify the program publishing mode, go to Software Settings, and select between LAN Mode or Cloud Mode.
Here we take LAN Mode as an example. Right-click LAN in the upper-left corner and select Refresh. After that, The blue icons under LAN indicate the normal connection of meida players. Note that when the icons are gray with an X attached, it means the connection failed, please check your network connection.
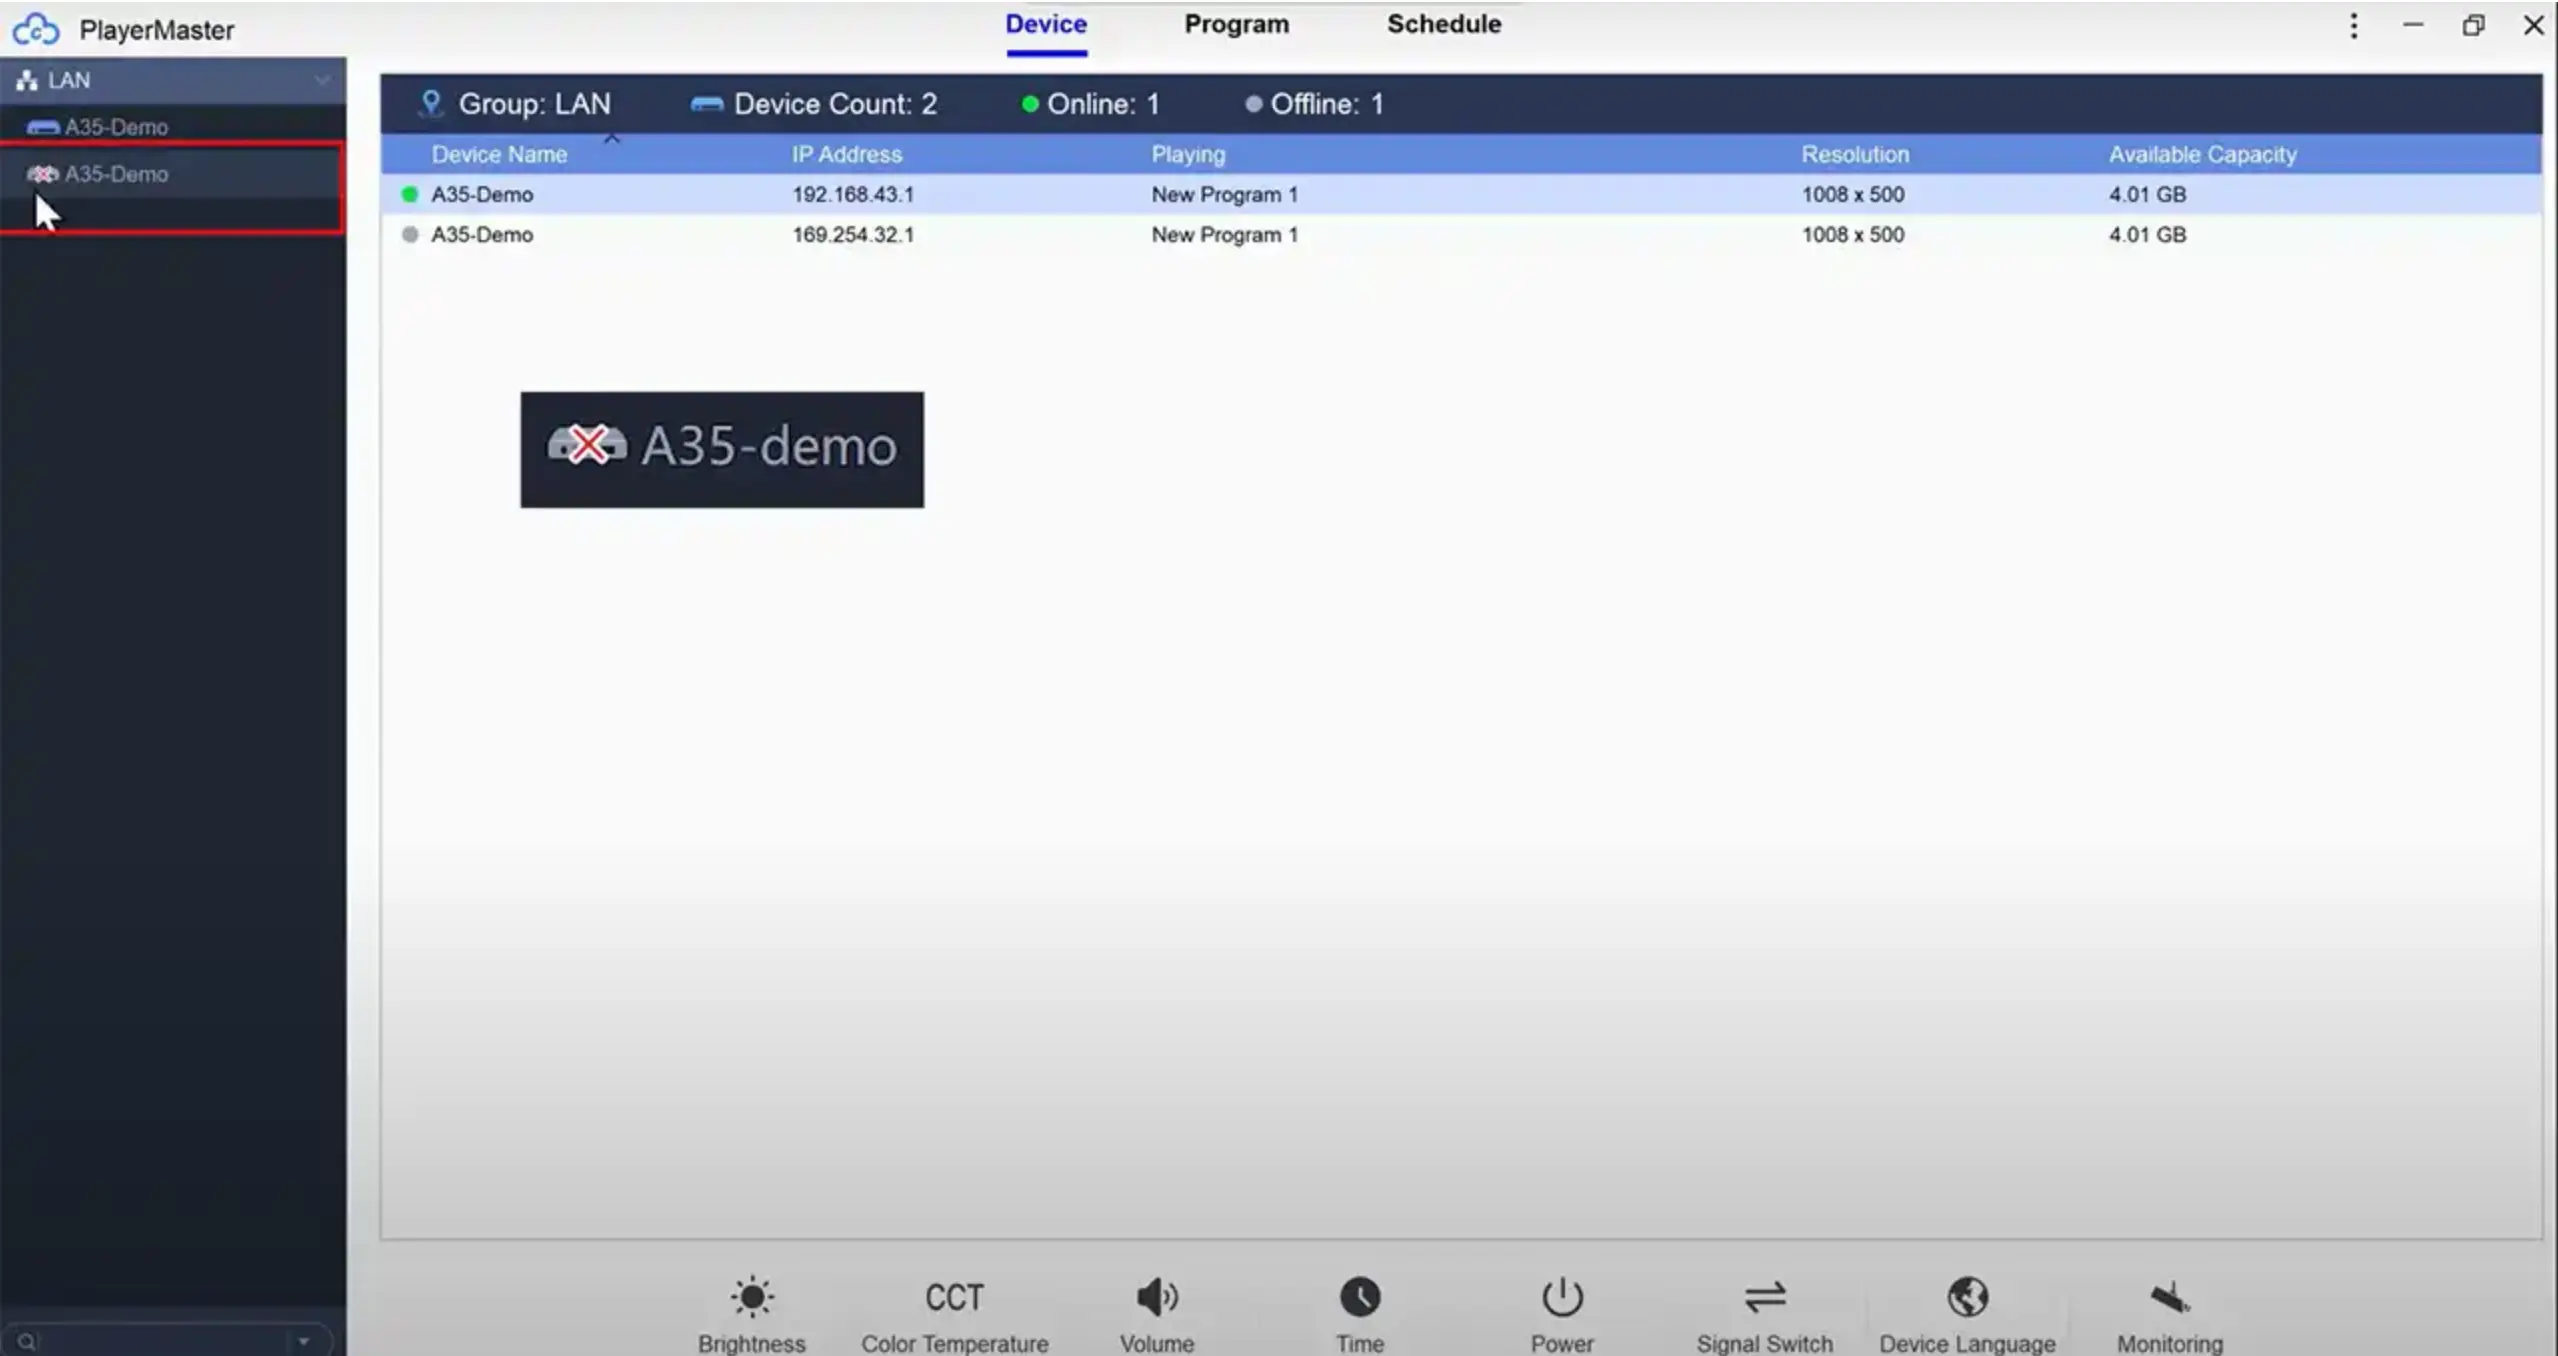
Once the connection is verified, next we proceed to create programs.
إنشاء برامج
Select the “Program” tab and click on “New“.
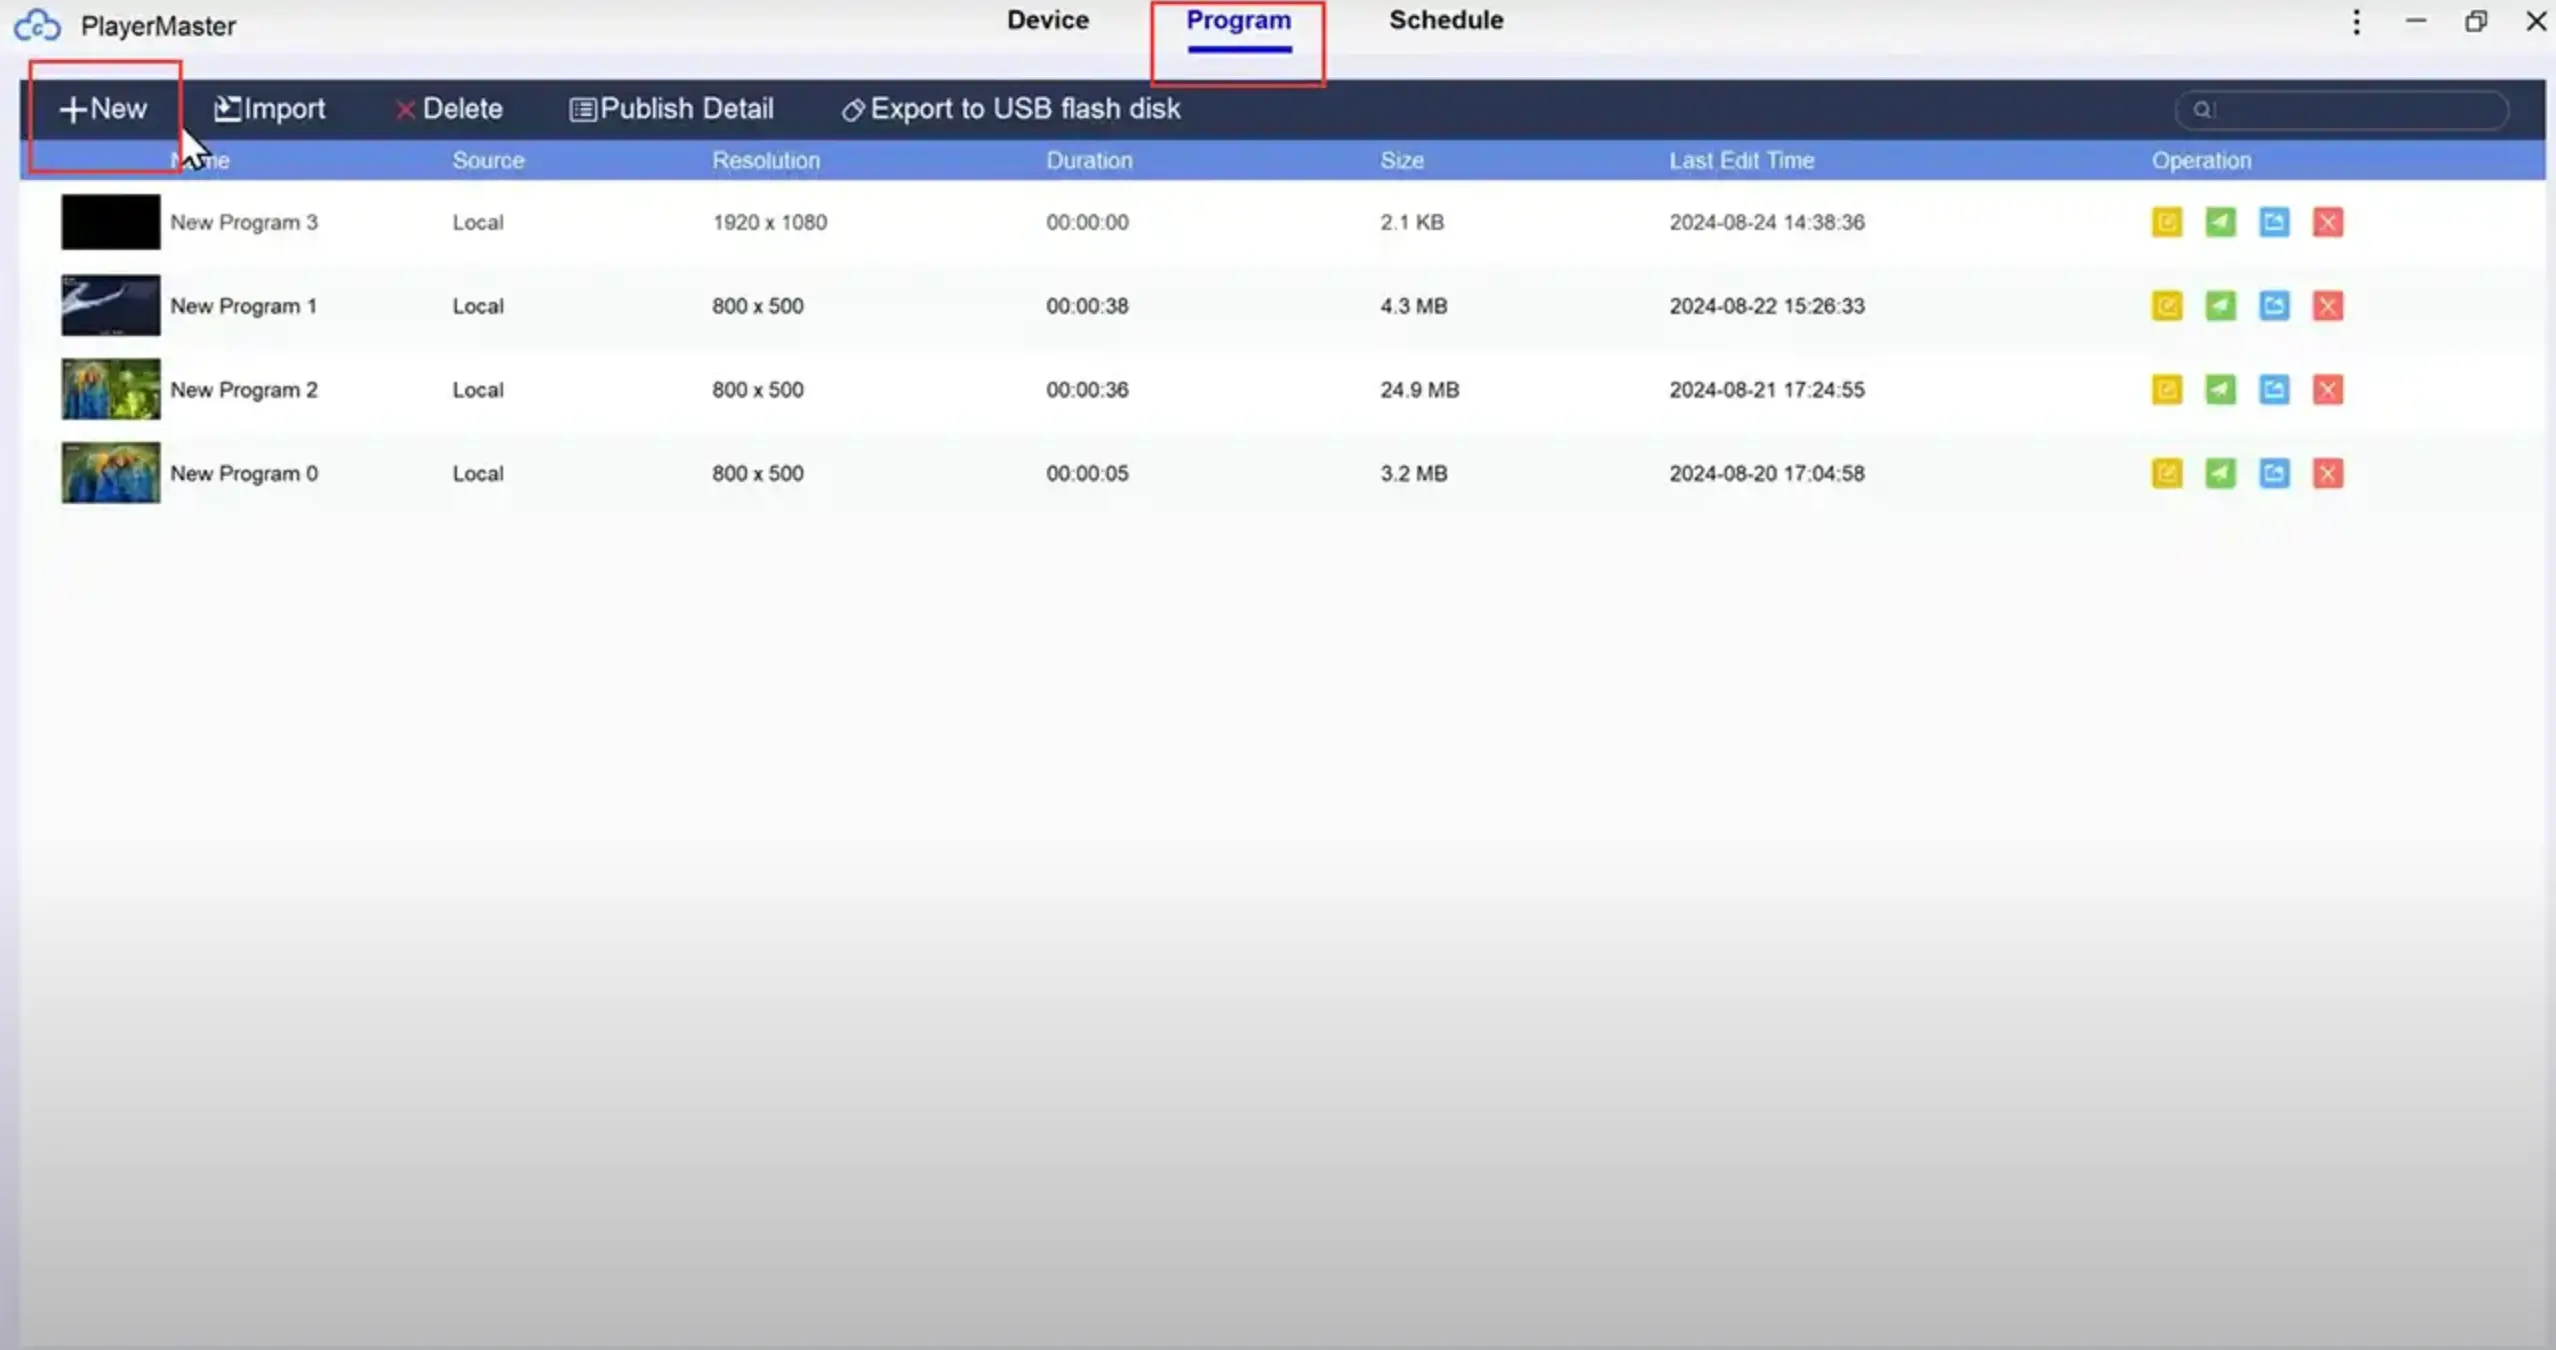
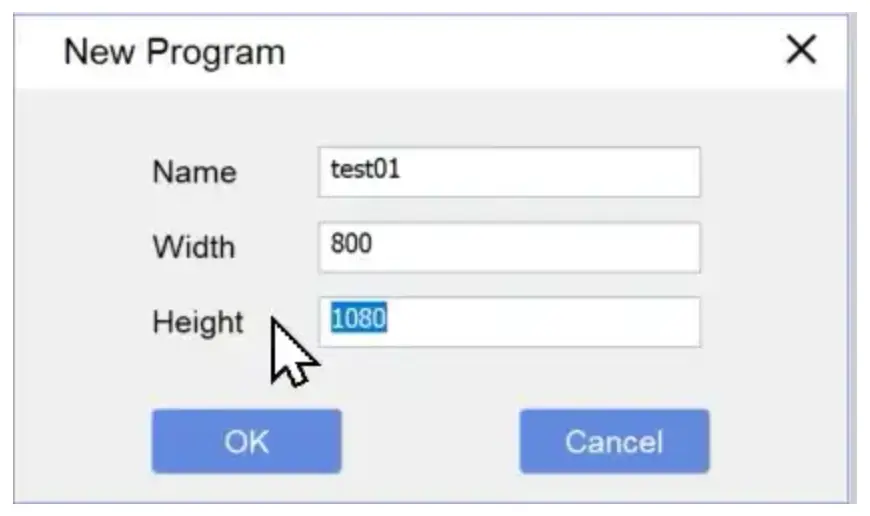
A new pop-up interface will be displayed to let you enter a program name in the field and set the program width and height according to the screen size. After you have entered the correct value, just click button “OK”
تحرير البرامج
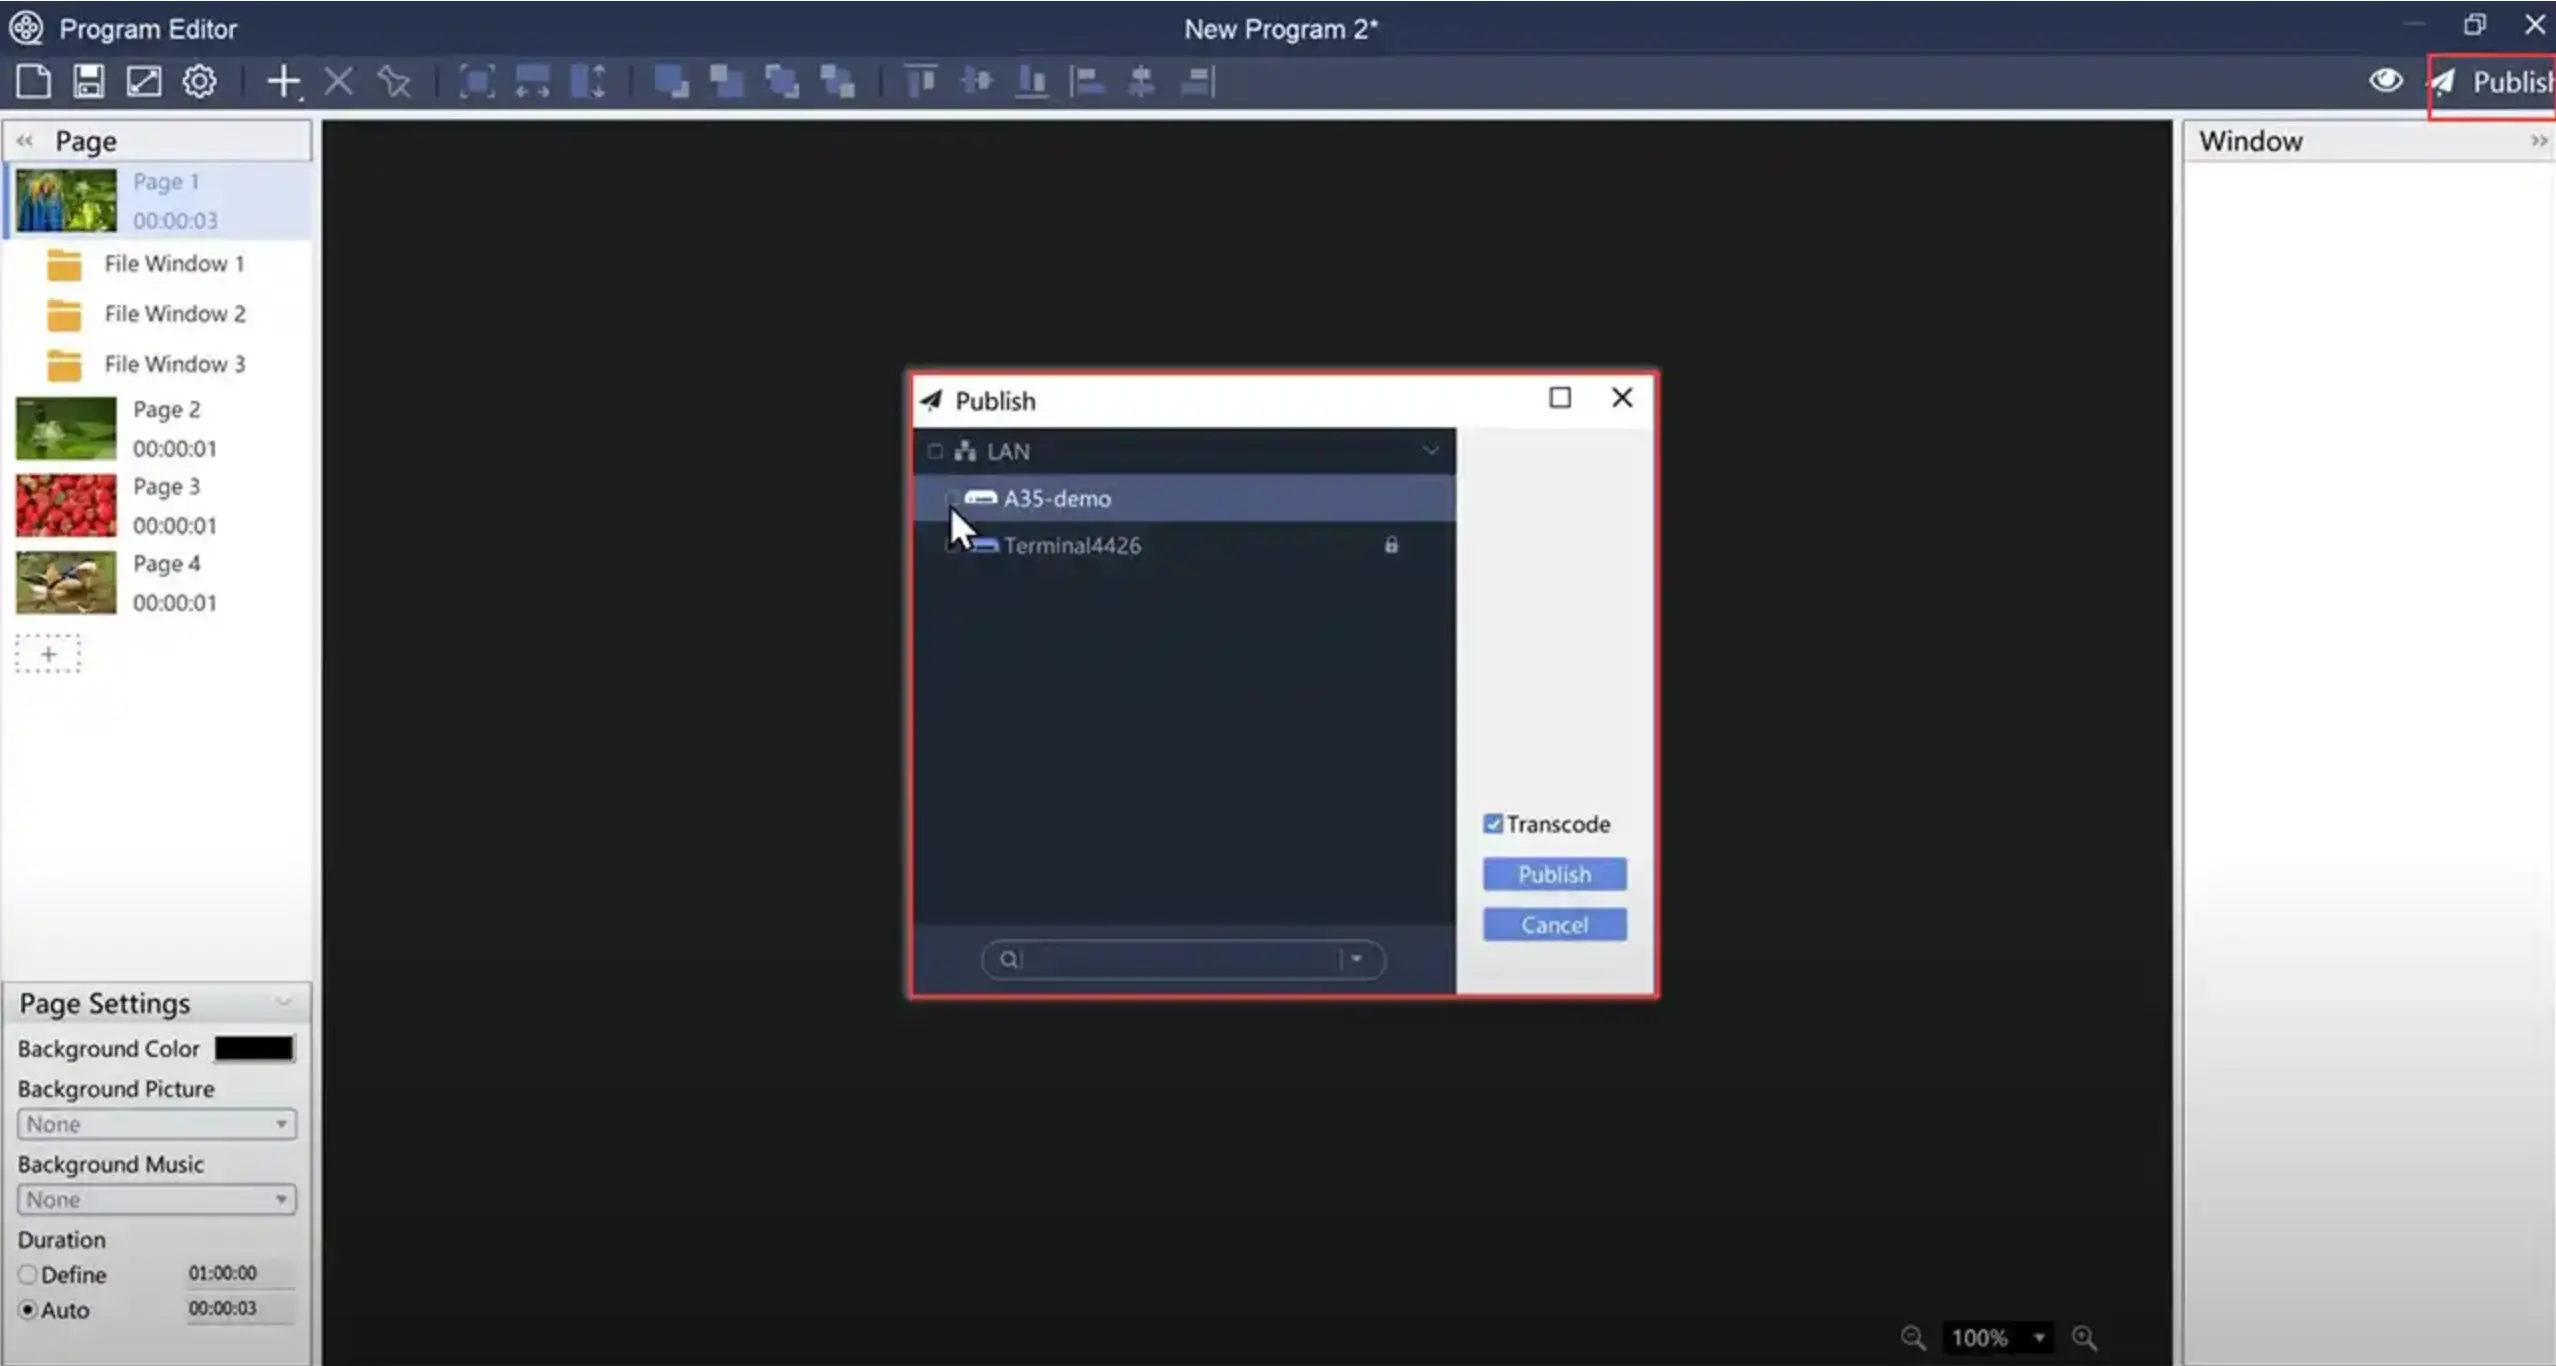
Next, you will reach the Program Editor interface, which consists of four main sections. The toolbar allows you to add, modify, and remove program windows, letting you tailor the program content to your preferences. In the upper-right corner, you’ll find the Preview and Publish buttons. On the left side, the panel displays the program page area, showing the program structure, including program pages and windows.
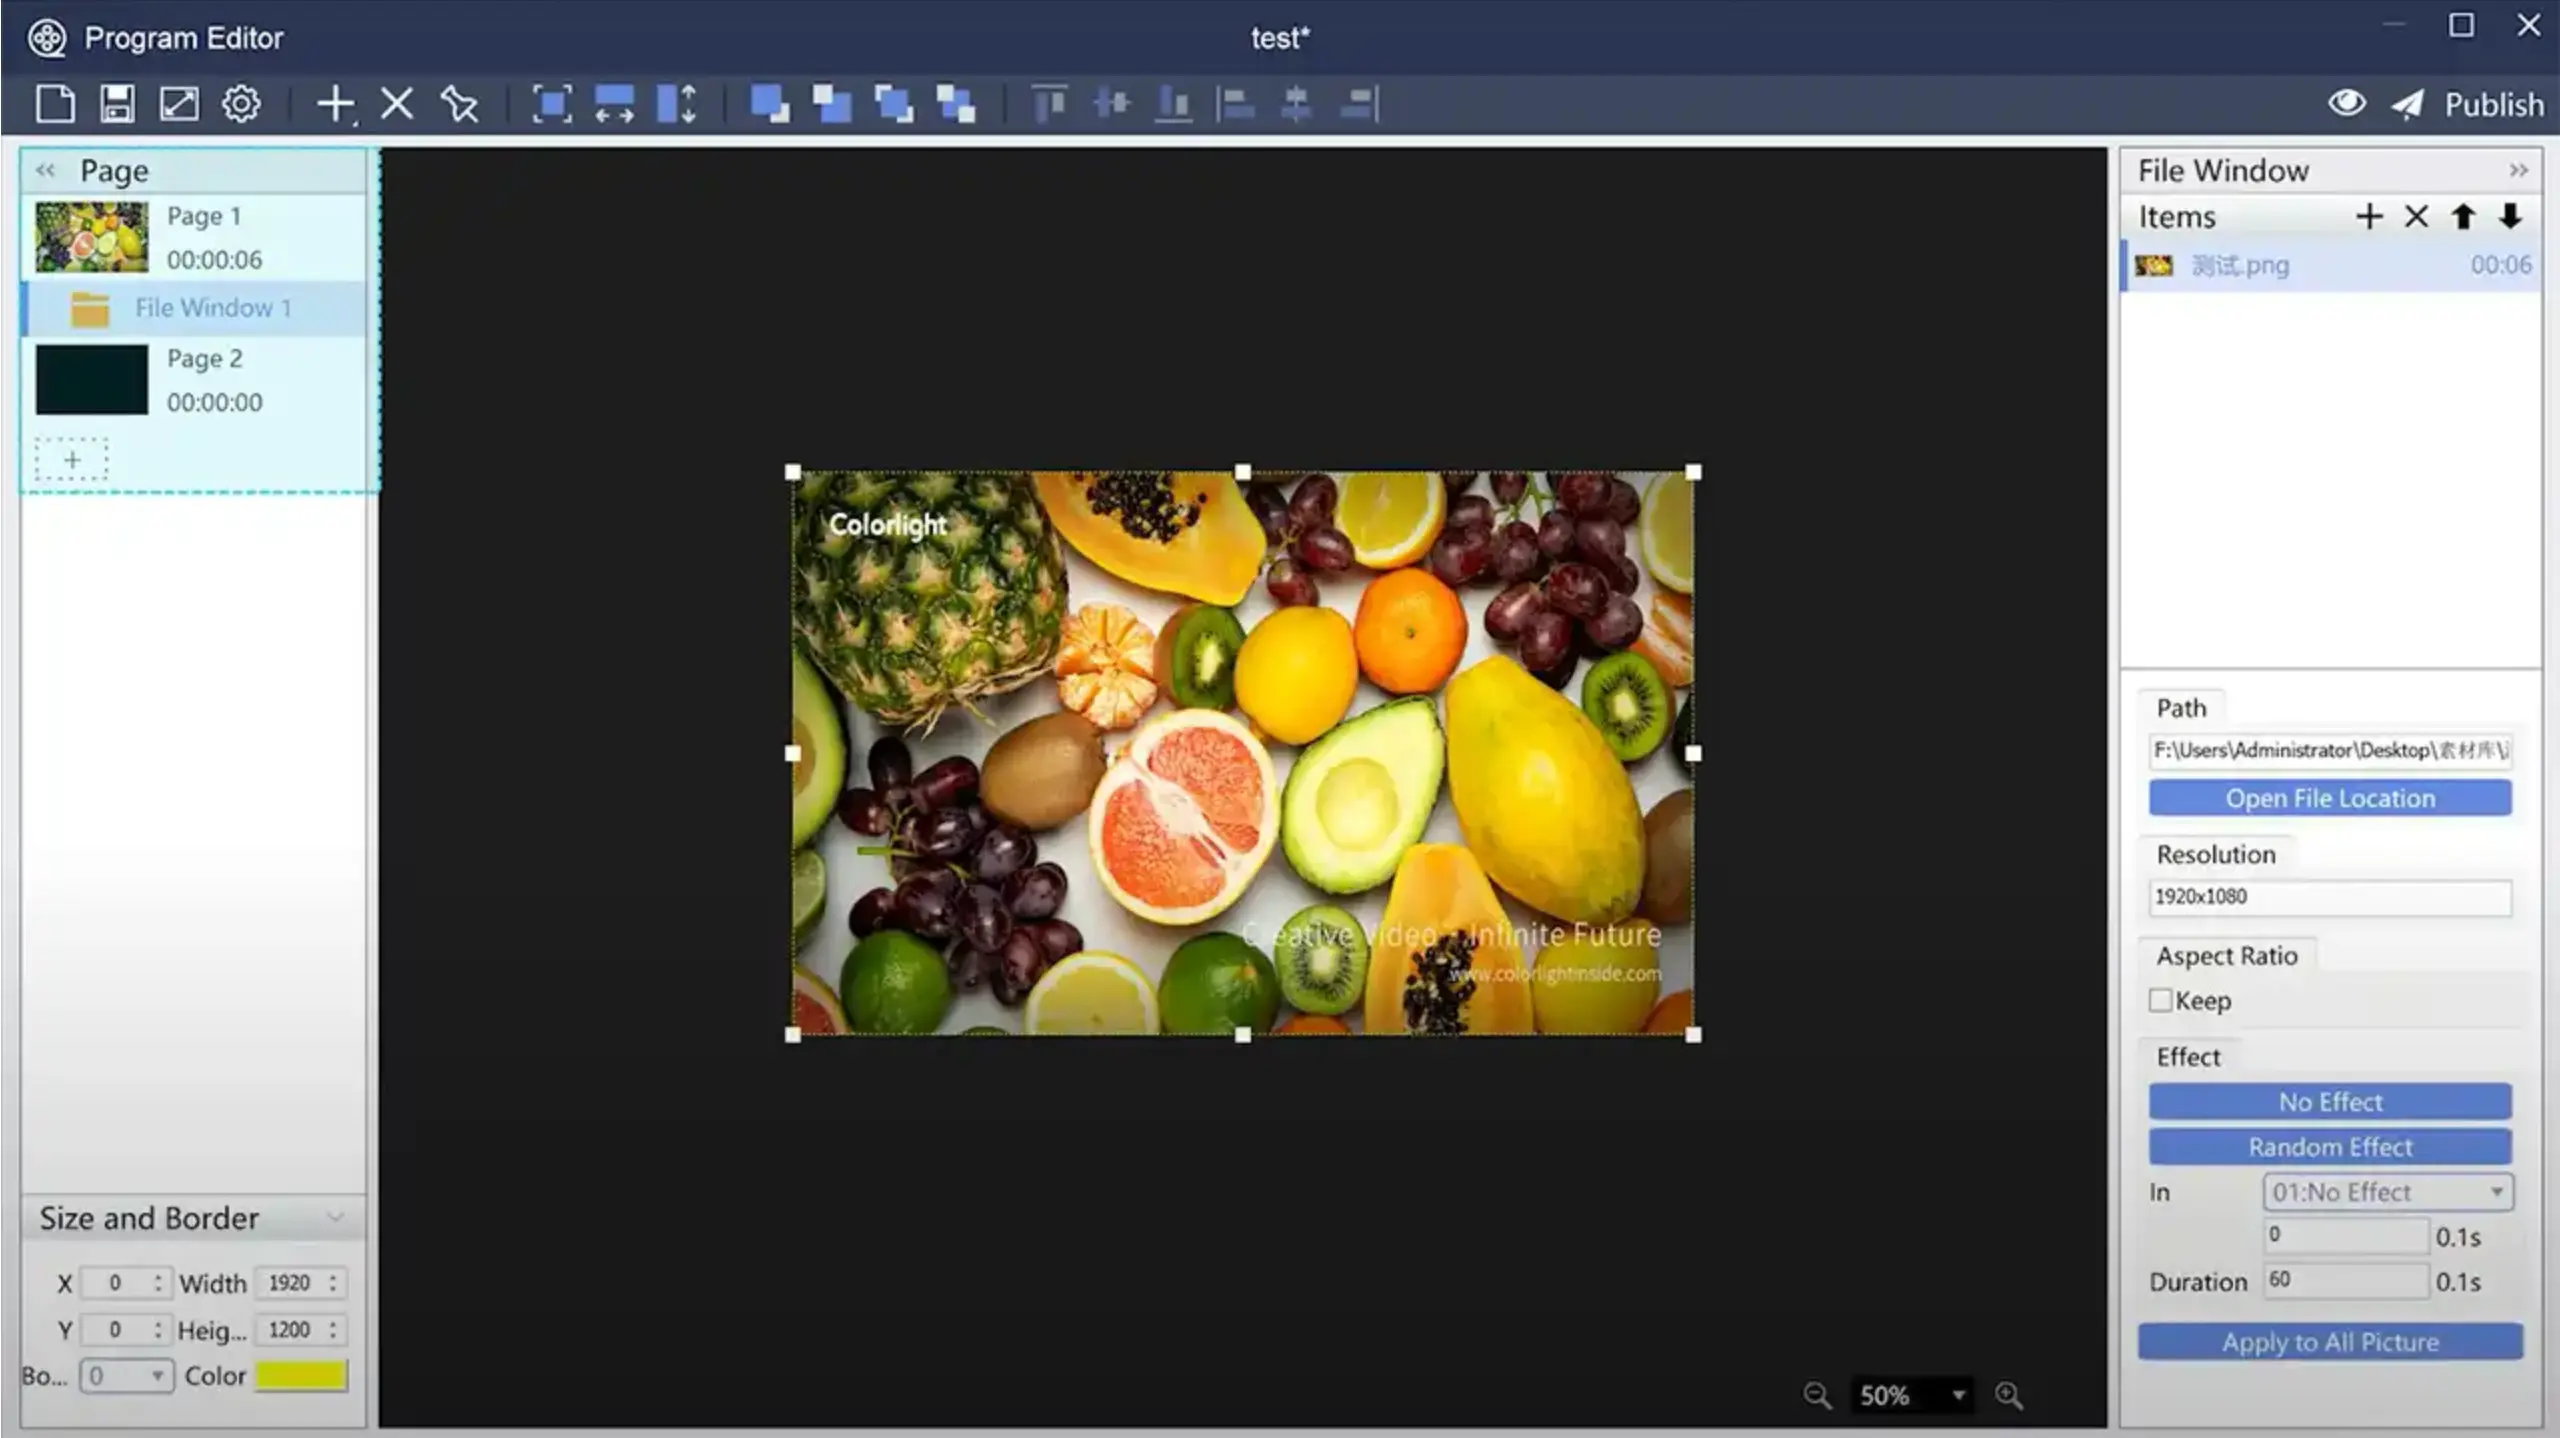
How to play the programs you create?
A program consists of multiple pages, with each page featuring one or more program windows. The program file plays in the sequence of the program pages, and all program windows on each page are displayed simultaneously. Within each program window, the materials are played in a sequential order.
Program Windown Creation
Click the “+” icon to add the desired type of program window from the available options. For example, to add a picture file, select “+” and choose “File Window“, then specify the image you wish to display.
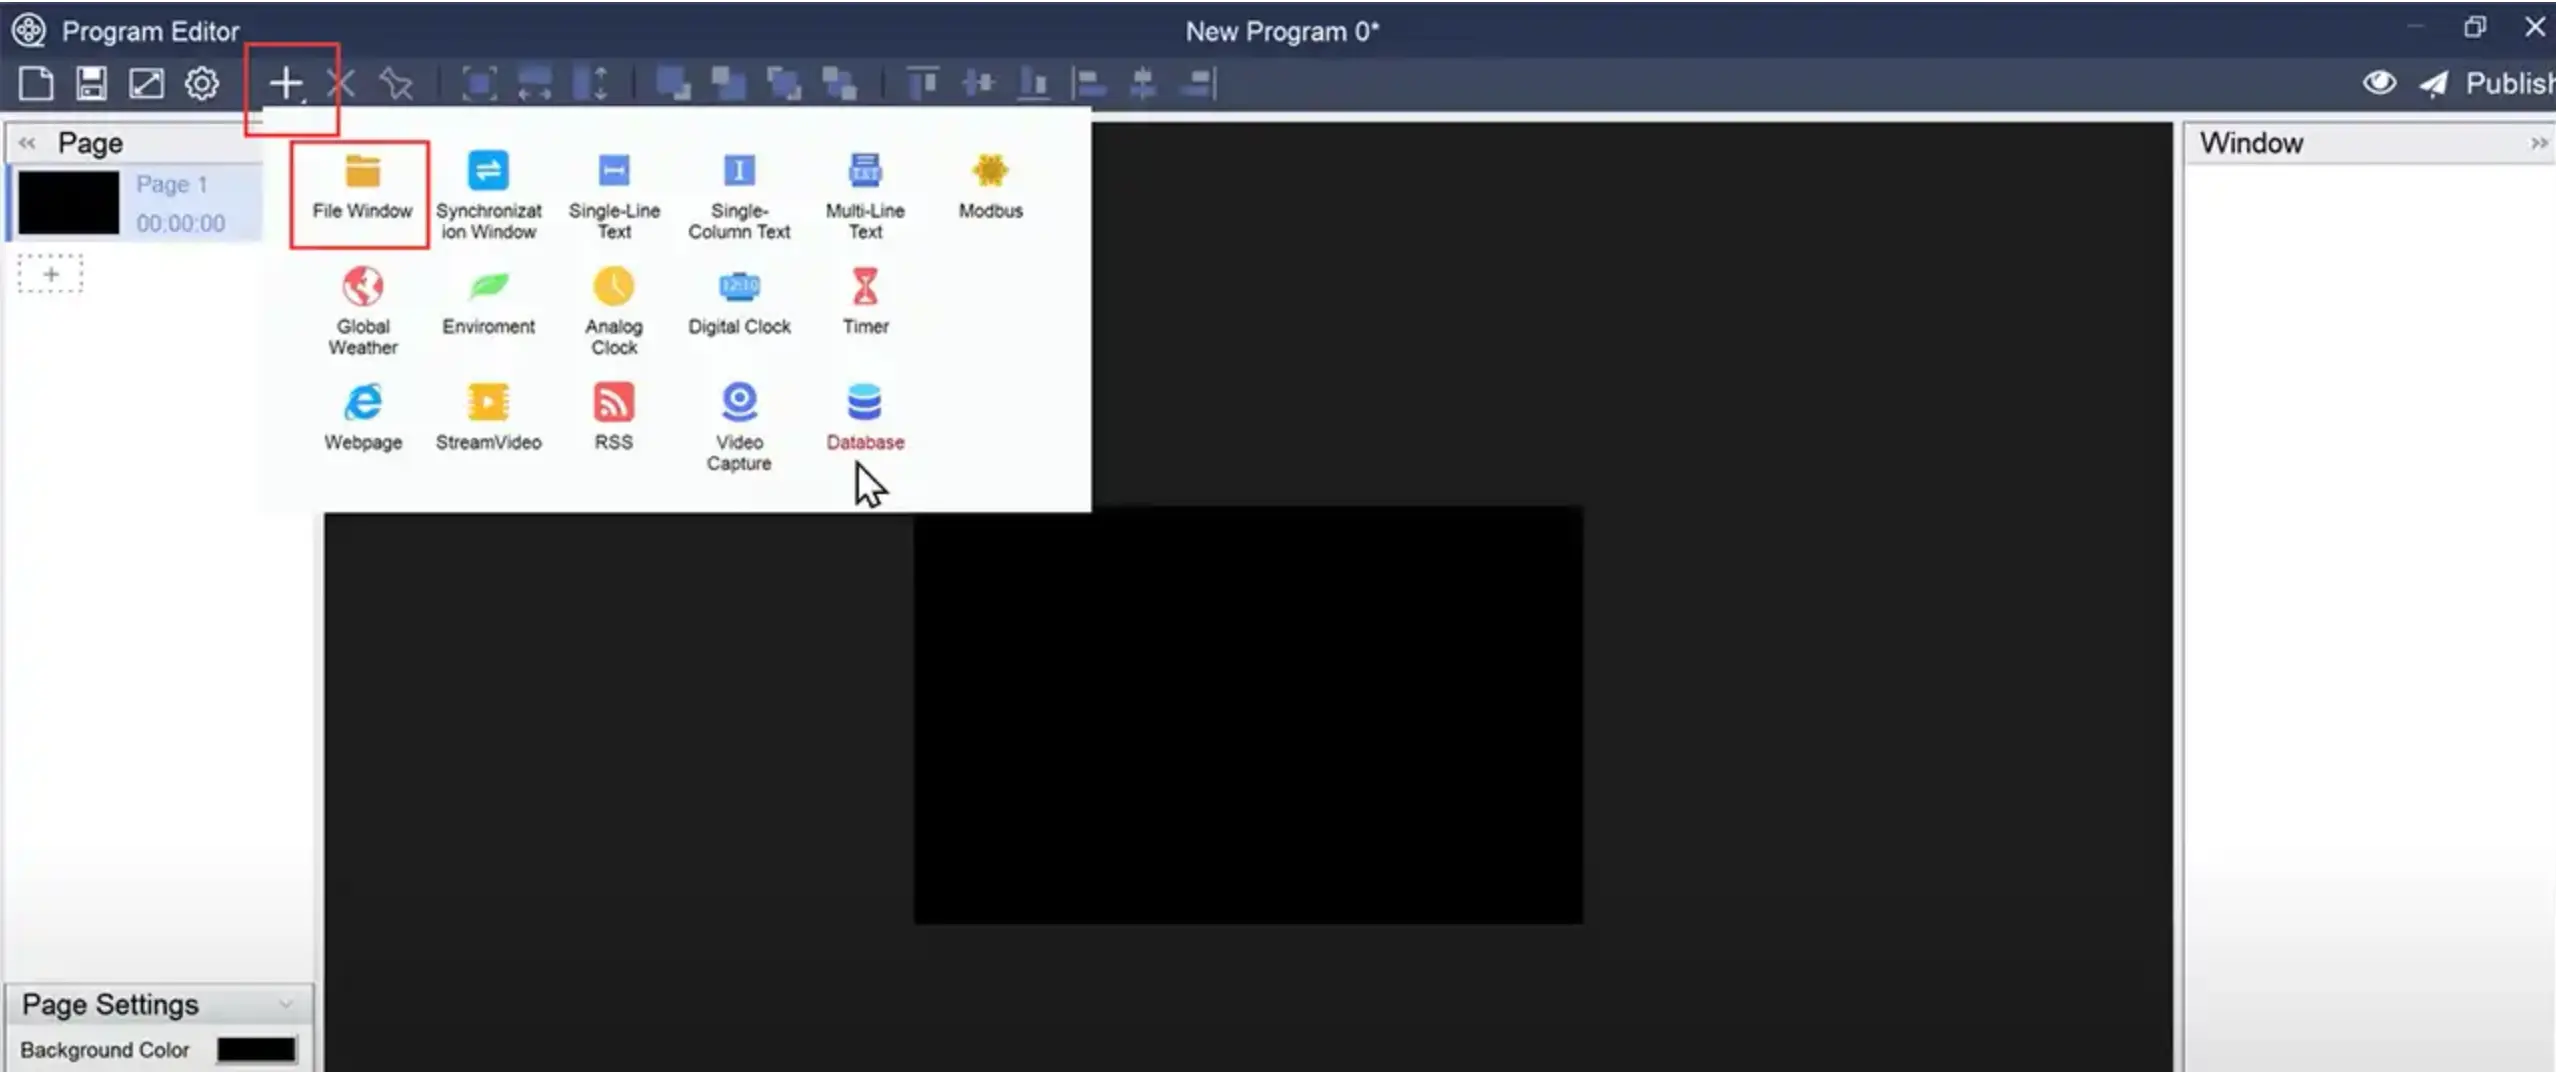
You can reposition the program window by dragging it, and adjust its size by dragging its corners. Alternatively, you can enter values in the lower-left panel to quickly adjust the window’s coordinates and dimensions, which is efficient for editing multiple windows.
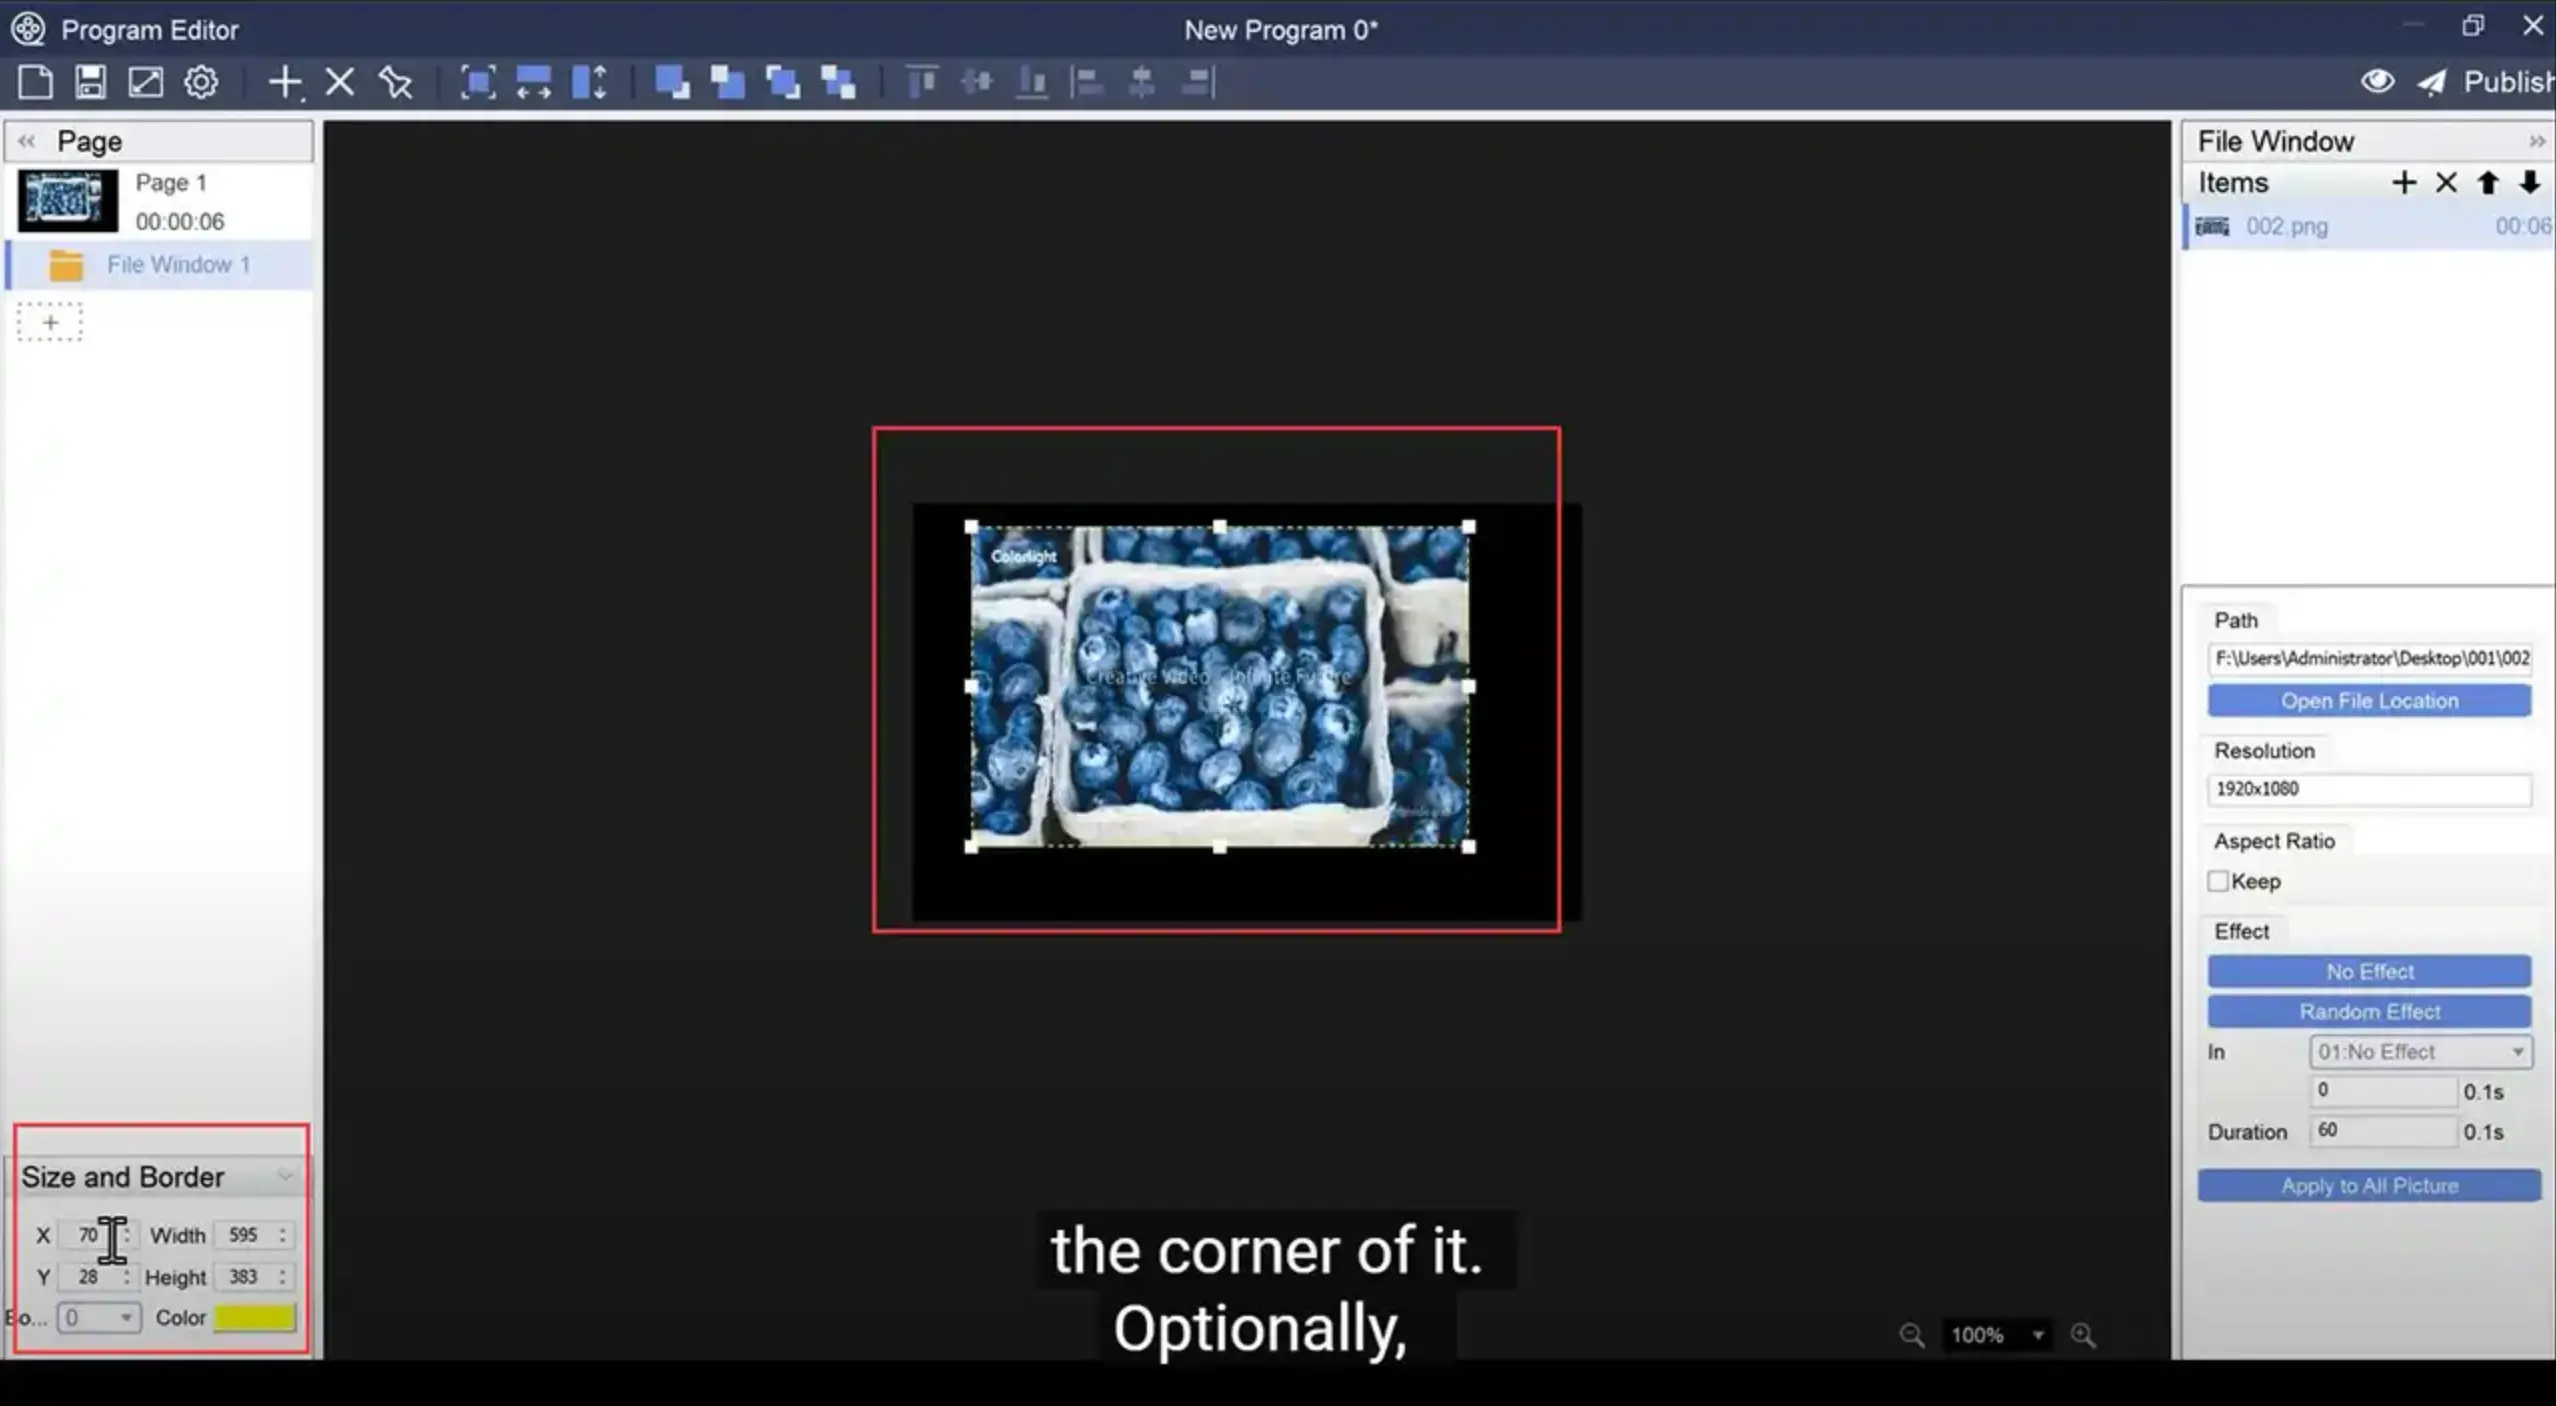
As you can see from the above image, in the lower-left panel, you can set the border width of the program using the drop-down menu and pick a border color using the color picker.
To apply a random entrance effect to the materials within the program window, select “Random Effect” in the Effect panel on the right, or customize the effect from the drop-down menu.
Program Page Creation
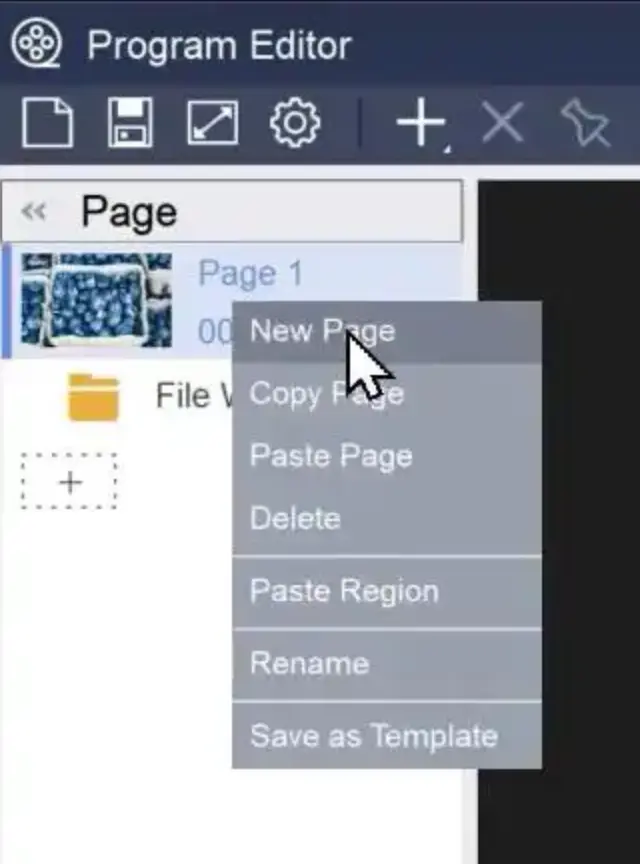
To add a new program page, right-click on an existing program page and choose “New Page” from the pop-up context menu.
معاينة تأثير العرض ونشر البرامج.
After we have created the program, next we can click on “Preview” in the topper-right panel to check the display effect.
بالنص، حدّد “نشر” من شريط الأدوات. اختر الأجهزة التي تريد نشر البرامج إليها، ثم انقر على “نشر”. ستظهر شريط تقدم يعرض حالة تنزيل ملف البرنامج.
لضمان عرض المحتوى البرمجي بشكل صحيح على الشاشات، يمكنك الحصول على لقطة شاشة. إليك الطريقة: اختر الجهاز ، وانقر نقرًا مزدوجًا على لقطة الشاشة، فستتم تحديثها تلقائيًا في PlayerMaster. يمكنك بعد ذلك التحقق من تأثير العرض باستخدام لقطة الشاشة.
إدارة ملفات البرامج
فيما يلي، سأوضح لك كيفية إدارة ملفات البرامج التي تم تنزيلها إلى المشغل المحلي لديك. ابدأ بالاختيار الجهاز وتحديد “إدارة البرامج“.
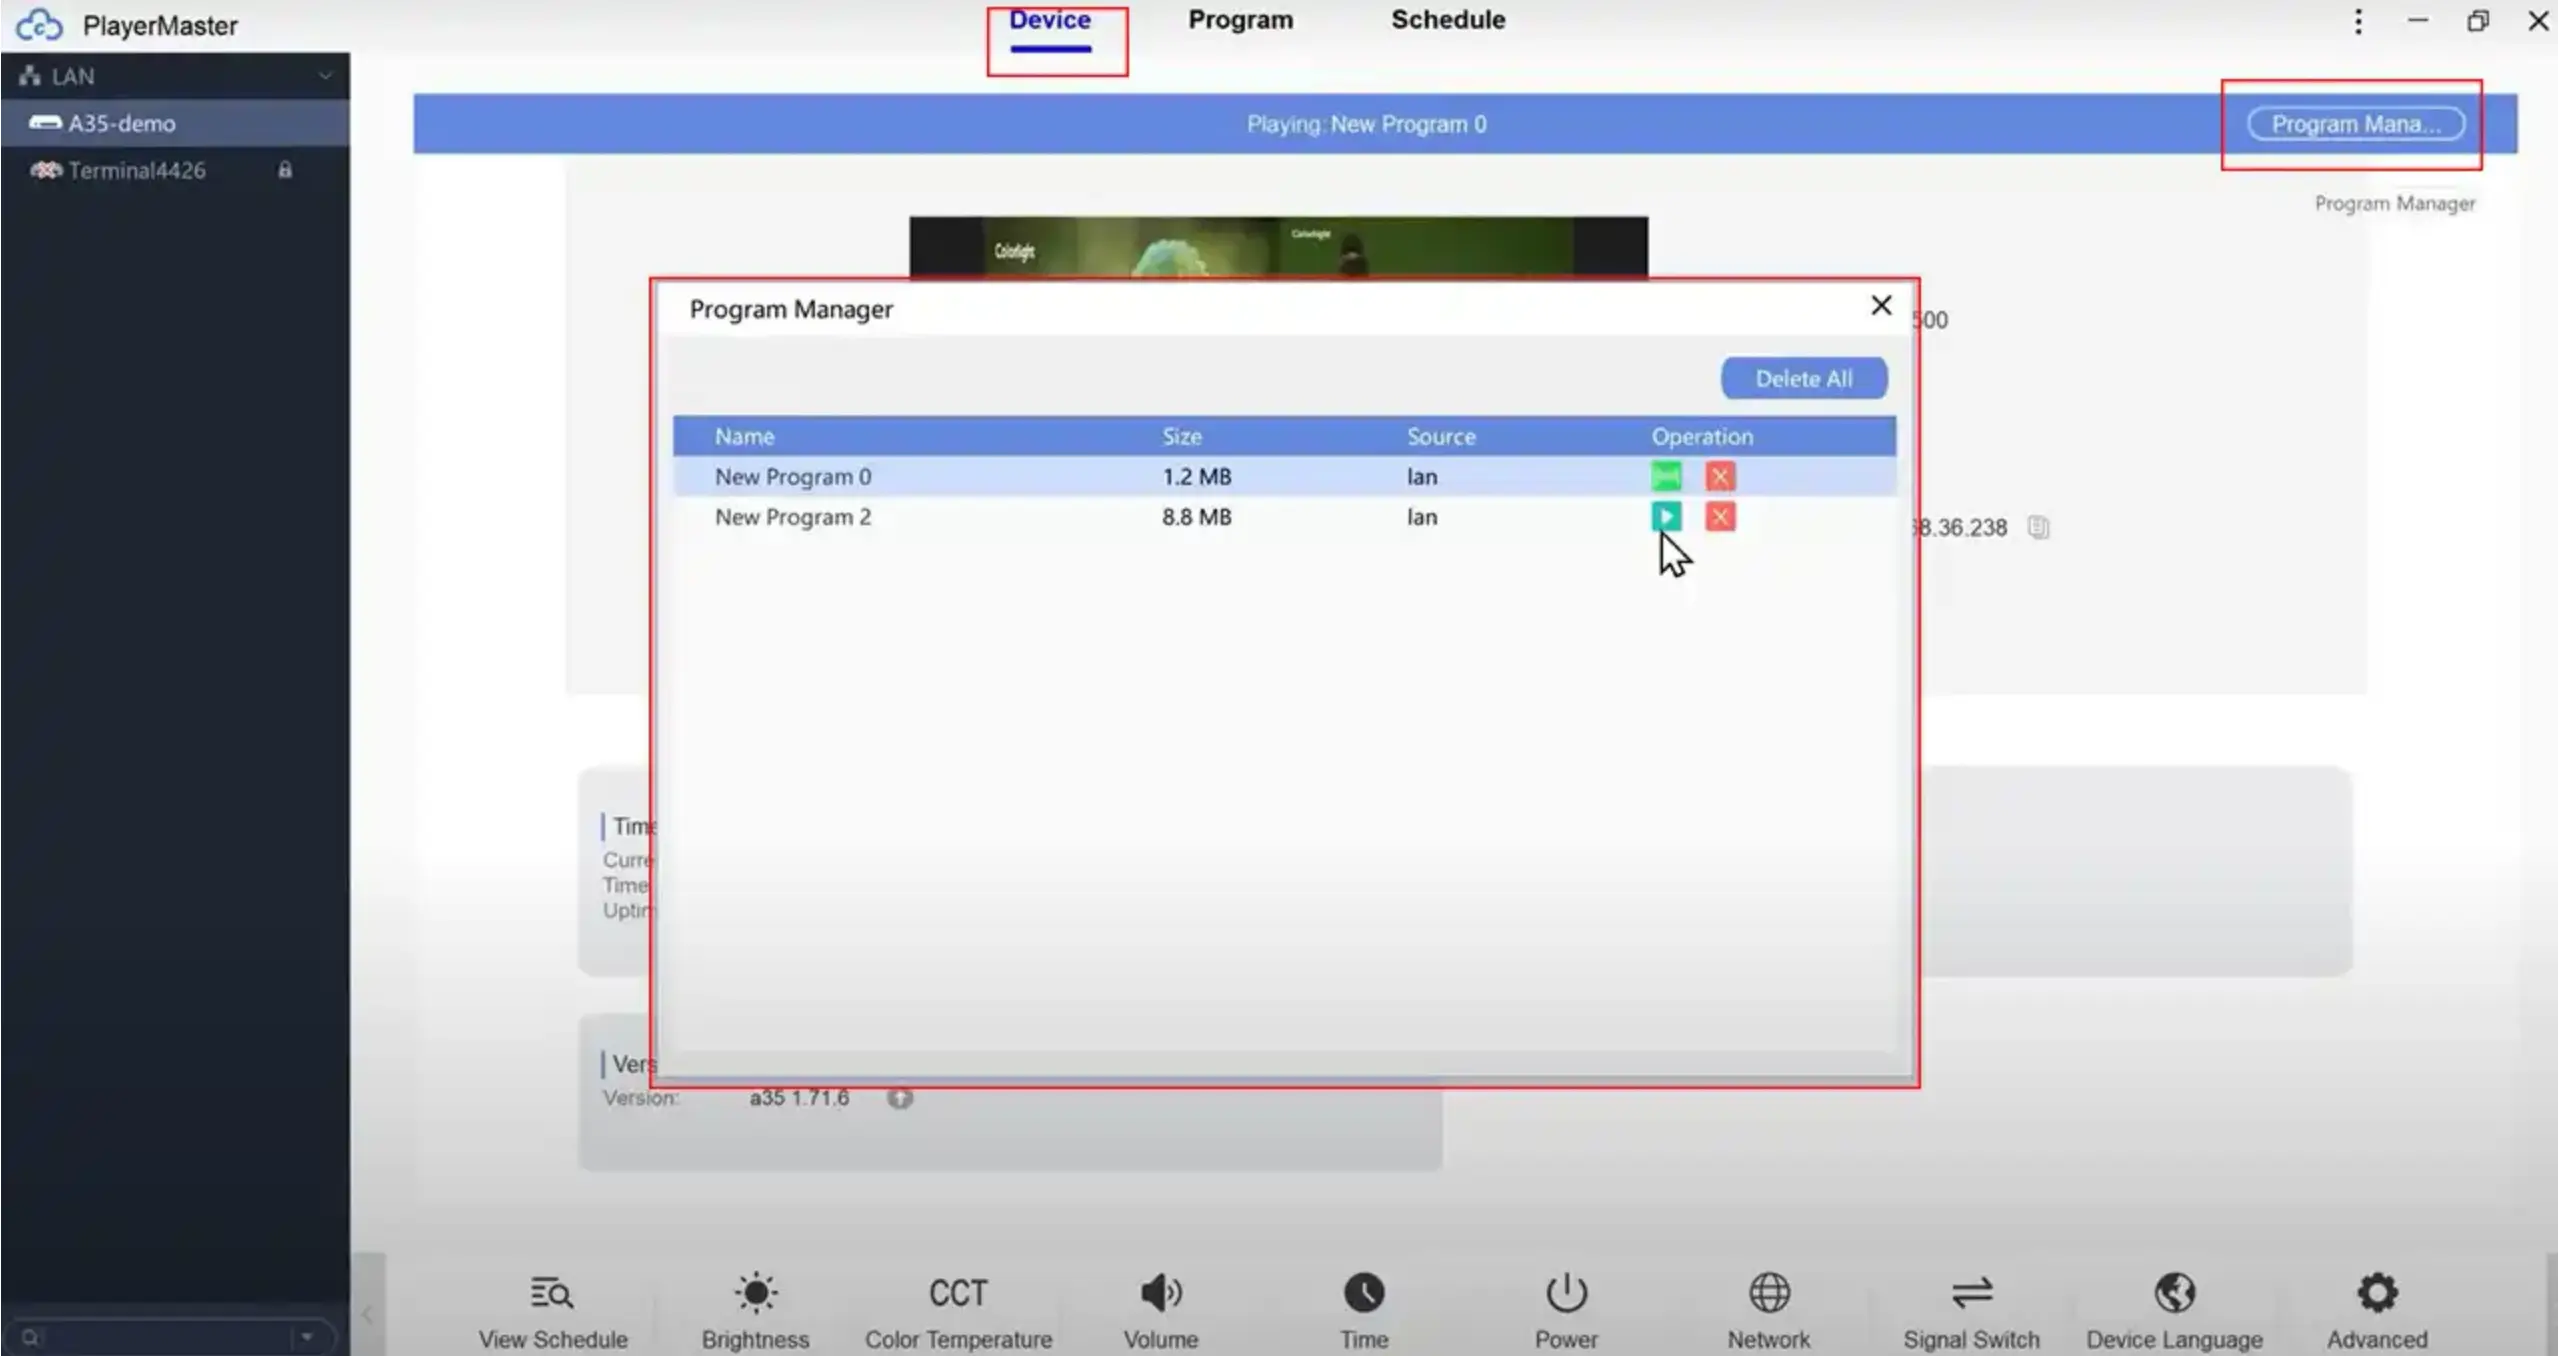
“ في الزاوية العلوية اليمنى لعرض البرامج التي تم تنزيلها. استخدم "تشغيل”خيار “ on the left to switch between programs. For removing any local programs, just click on "حذف“.
الخاتمة
في هذا الدليل السريع، قمنا بتعريفك بالميزات الأساسية لتشغيلات Colorlight Media Players، واستخدمنا PlayerMaster لإظهار كيفية ضبط وإدارة مشغلات الوسائط بشكل فعال.
إذا كانت لديك أي أسئلة إضافية عند استخدام مشغلات Colorlight للوسائط، فلا تتردد في تواصل معنا.
إذا كان إعادة ضبط المصنع مطلوبة، اتبع دليل إعادة ضبط مشغل الوسائط من Colorlight قبل إعادة ضبط المشغل.
مقالات ذات صلة